RabbitMQ
消息队列
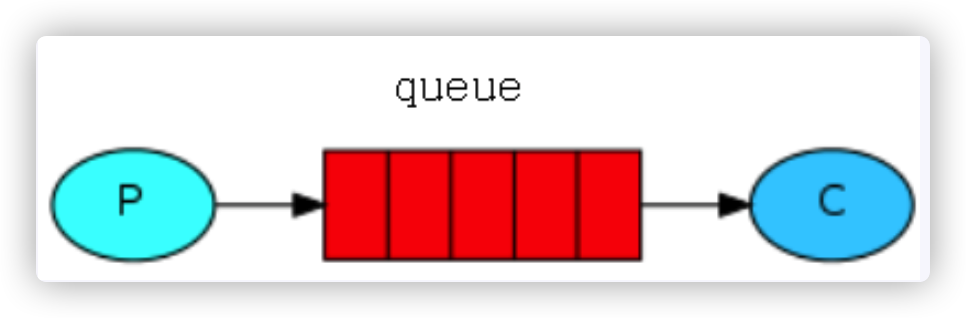
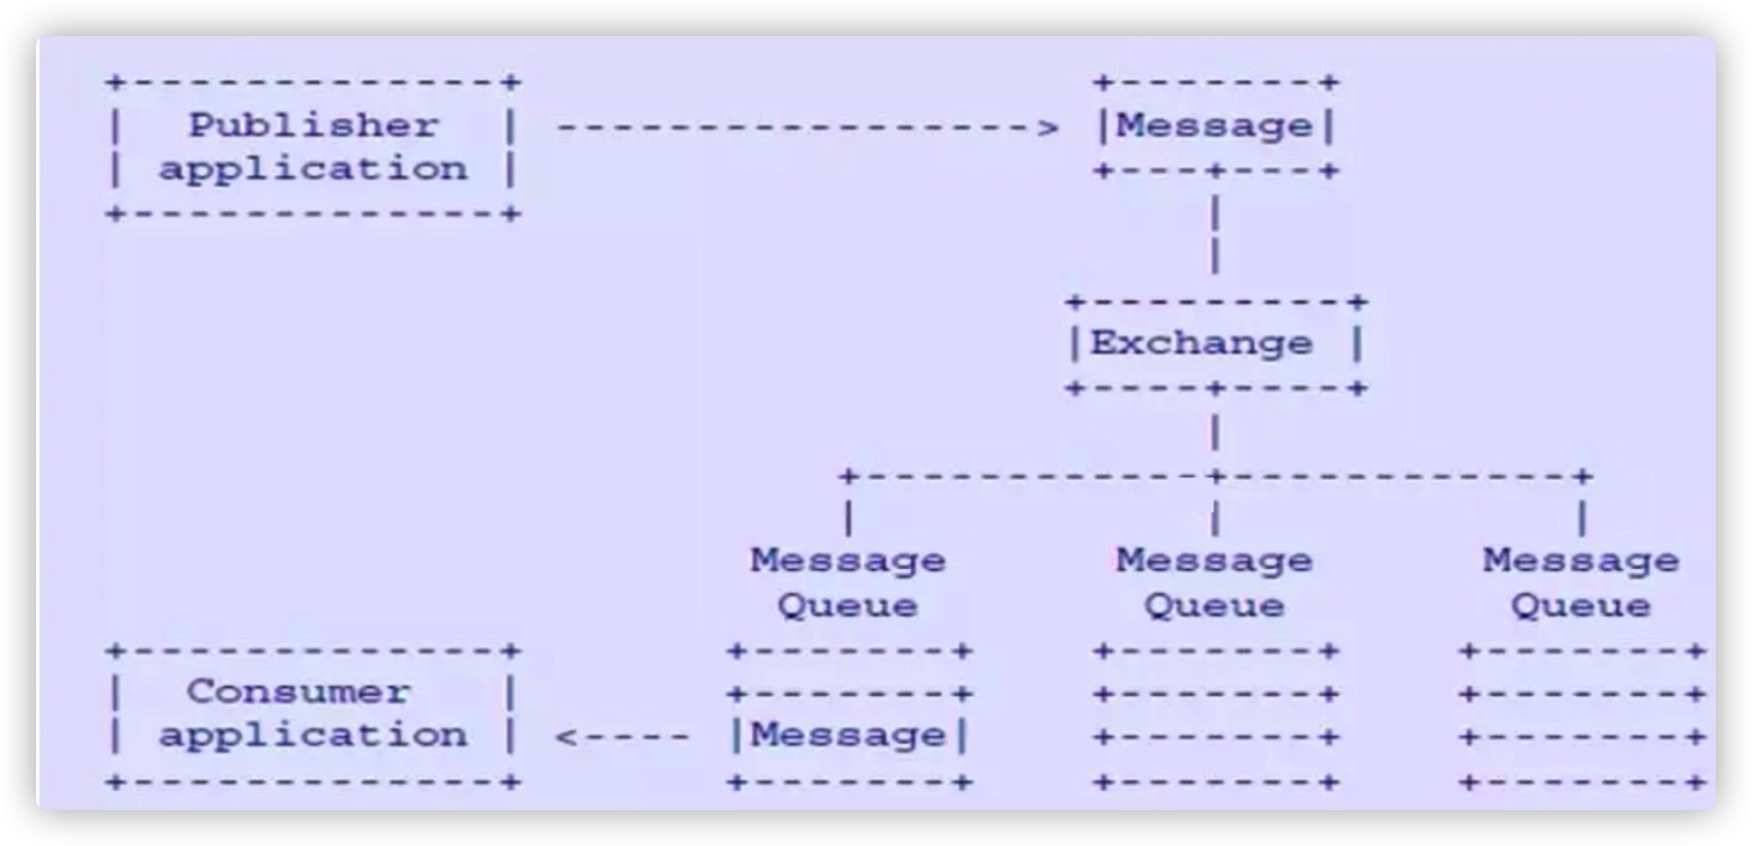
MQ(Message Queue):MQ 的模型大致如下
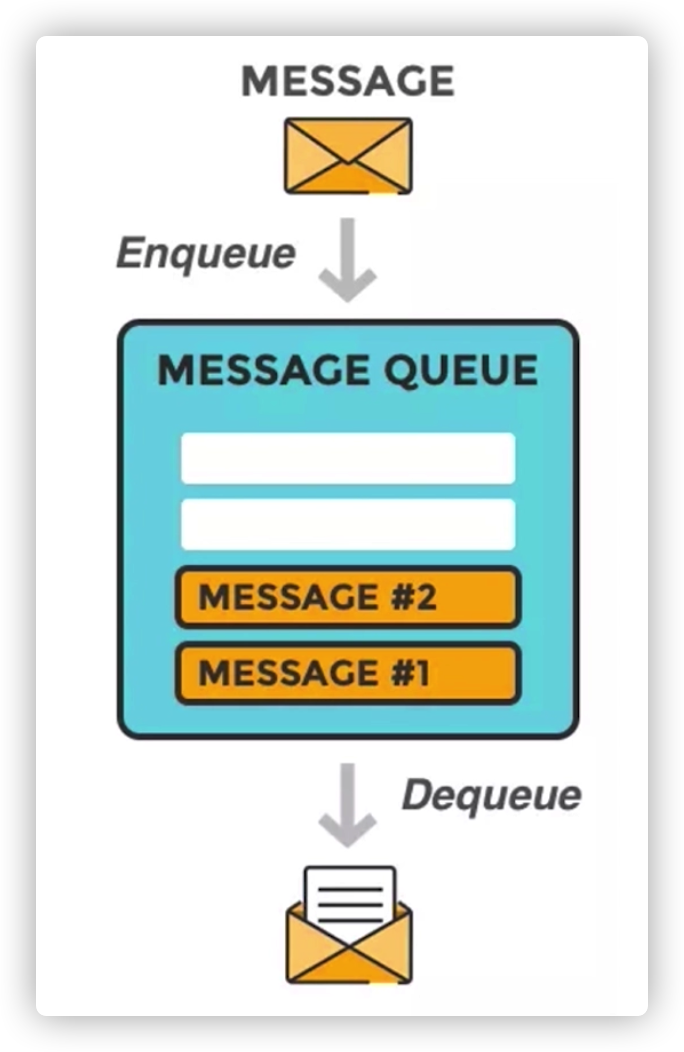
消息队列的特性
- 业务无关性
- FIFO
- 容灾
- 性能
使用消息队列的原因
- 系统解耦
- 异步调用
- 流量削峰
RabbitMQ 介绍
RabbitMQ 基础思想
- 核心思想:接收并转发消息,可以类比于邮局
- producer:生产者、消息发送者
- queue:消息存储队列
- consumer:消费者
RabbitMQ 的特点
- 开源、跨语言
- Erlang 语言编写、内建集群
- 应用广泛
- 社区活跃、API 丰富
RabbitMQ 核心概念
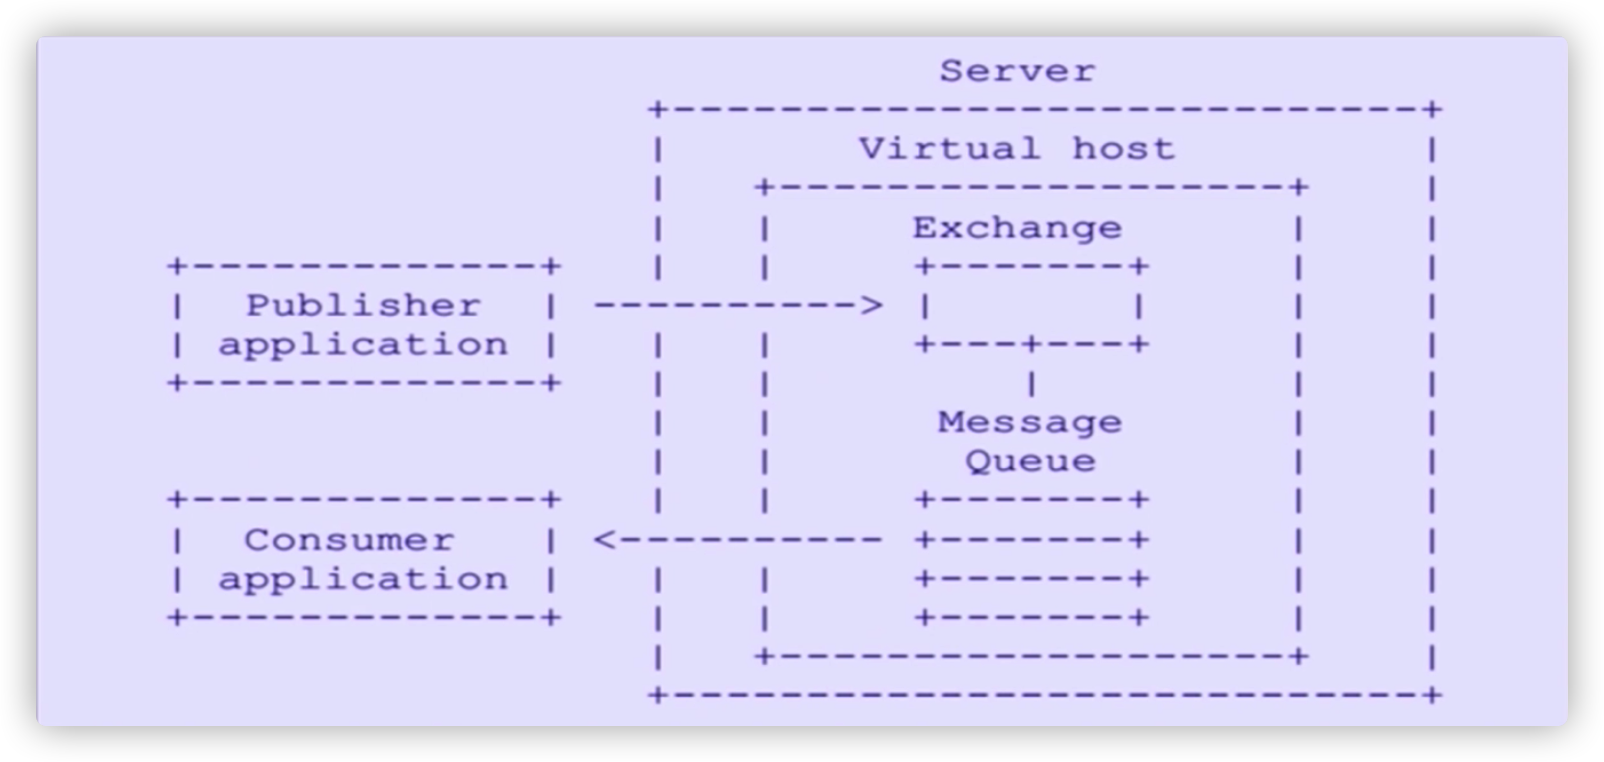
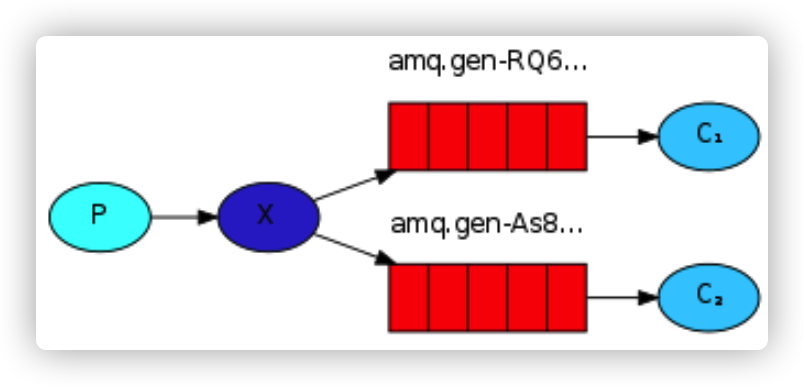
- RabbitMQ 是基于 AMPQ 协议的开源实现,其模型如下:
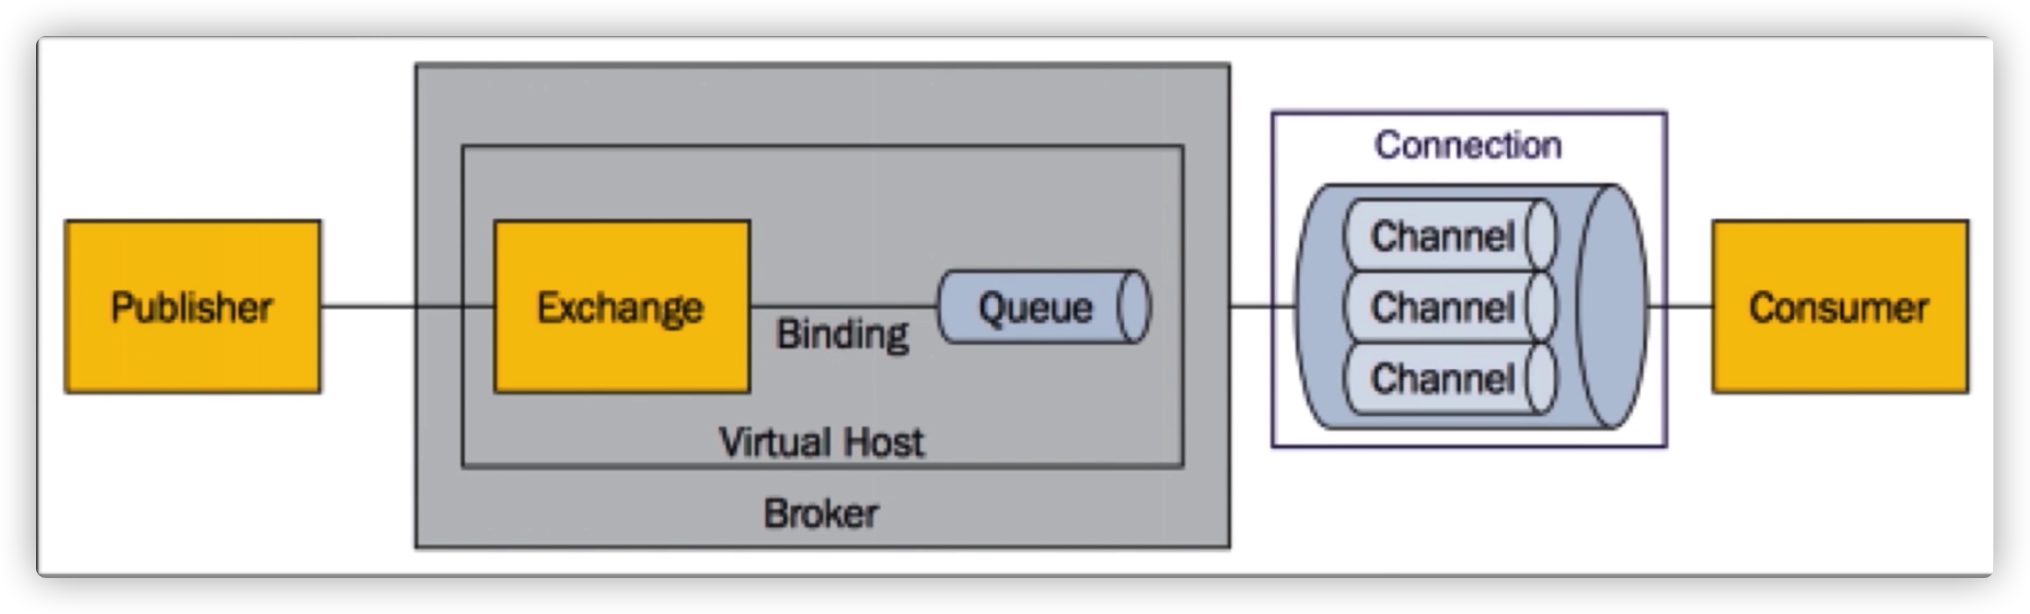
Server:服务
connection:与 Server 建立的连接
channel:信道,几乎所有的操作都是在信道上完成的,客户端可以建立多个信道
项目与 RabbitMQ 之间使用 TCP 连接,引入信道的概念,所有需要发布消息的线程都包装成一条信道在 TCP 中传输,理论上一条 TCP 连接支持无限多个信道。

message:消息,由 properties 和 body 组成
virtual host:虚拟主机,顶层隔离。统一虚拟主机下,不能有重复的交换机和 queue
exchange:交换机,接收生产者的消息,根据指定的路由键去把消息转发到所绑定的队列上
binding:绑定交换机和队列
用于消息队列和交换器之间的关联。一个绑定就是基于路由键将交换器和消息队列连接起来的路由规则,所以可以将交换器理解成一个由绑定构成的路由表。
routing key:路由键,路由规则
queue:队列,消费者只需要监听队列来消费消息
消息队列,用来保存消息直到发送给消费者。它是消息的容器,也是消息的终点。一个消息可以投入一个或多个队列。消息一直在队列里面,等待消费者连接这个队列将其取走。
AMQP 协议
Advanced Message Queuing Protocol
RabbitMQ 的安装启动
官方教程见:https://www.rabbitmq.com/install-rpm.html
CentOS7 下使用 YUM 安装 Erlang
新建erlang 的源配置
➜  ~ vim /etc/yum.repos.d/rabbitmq_erlang.repo

[rabbitmq-erlang]
name=rabbitmq-erlang
baseurl=https://dl.bintray.com/rabbitmq-erlang/rpm/erlang/22/el/7
gpgcheck=1
gpgkey=https://dl.bintray.com/rabbitmq/Keys/rabbitmq-release-signing-key.asc
repo_gpgcheck=0
enabled=1
更新源信息
➜  ~ yum clear all
➜  ~ yum makecache
安装 erlang
➜  ~ yum install erlang
# 确认源为 rabbitmq-erlang
================================================================================
 Package      架构         版本                     源                     大小
================================================================================
正在安装:
 erlang       x86_64       22.3.4.12-1.el7          rabbitmq-erlang        19 M
CentOS7 下安装 RabbitMQ
导入秘钥
➜ ~ rpm --import https://www.rabbitmq.com/rabbitmq-release-signing-key.asc新建 rabbitMq 源信息
➜  ~ vim /etc/yum.repos.d/rabbitmq.repo

[bintray-rabbitmq-server]
name=bintray-rabbitmq-rpm
baseurl=https://dl.bintray.com/rabbitmq/rpm/rabbitmq-server/v3.8.x/el/7/
gpgcheck=0
repo_gpgcheck=0
enabled=1
更新源信息
➜  ~ yum clear all
➜  ~ yum makecache
安装 rabbitmq
➜ ~ yum install rabbitmq-server.noarch
RabbitMQ 的运行与管理
启动 RabbitMQ
# 使用 systemd 管理服务
➜  ~ systemctl start rabbitmq-server
# 使用 rabbitmq 可执行文件启动 -detached 参数指定为后台启动
➜  ~ rabbitmq-server -detached
停止 RabbitMQ
# 停止应用
➜  ~ rabbitmqctl --node rabbit@localhost stop_app
Stopping rabbit application on node rabbit@localhost ...
# 停止特定节点
➜  ~ rabbitmqctl -n rabbit@localhost stop
Stopping and halting node rabbit@localhost ...
查询服务器状态
➜  ~ rabbitmqctl status
Status of node rabbit@localhost ...
Runtime

OS PID: 29695
OS: Linux
查看队列、绑定、交换器
➜  ~ rabbitmqctl list_queues
Timeout: 60.0 seconds ...
Listing queues for vhost / ...
name	messages
task_queue	0
queue1	0
queue2	0

➜  ~ rabbitmqctl list_exchanges
Listing exchanges for vhost / ...
name	type
amq.direct	direct
amq.match	headers

➜  ~ rabbitmqctl list_bindings
Listing bindings for vhost /...
source_name	source_kind	destination_name	destination_kind	routing_key	arguments
	exchange	task_queue	queue	task_queue	[]
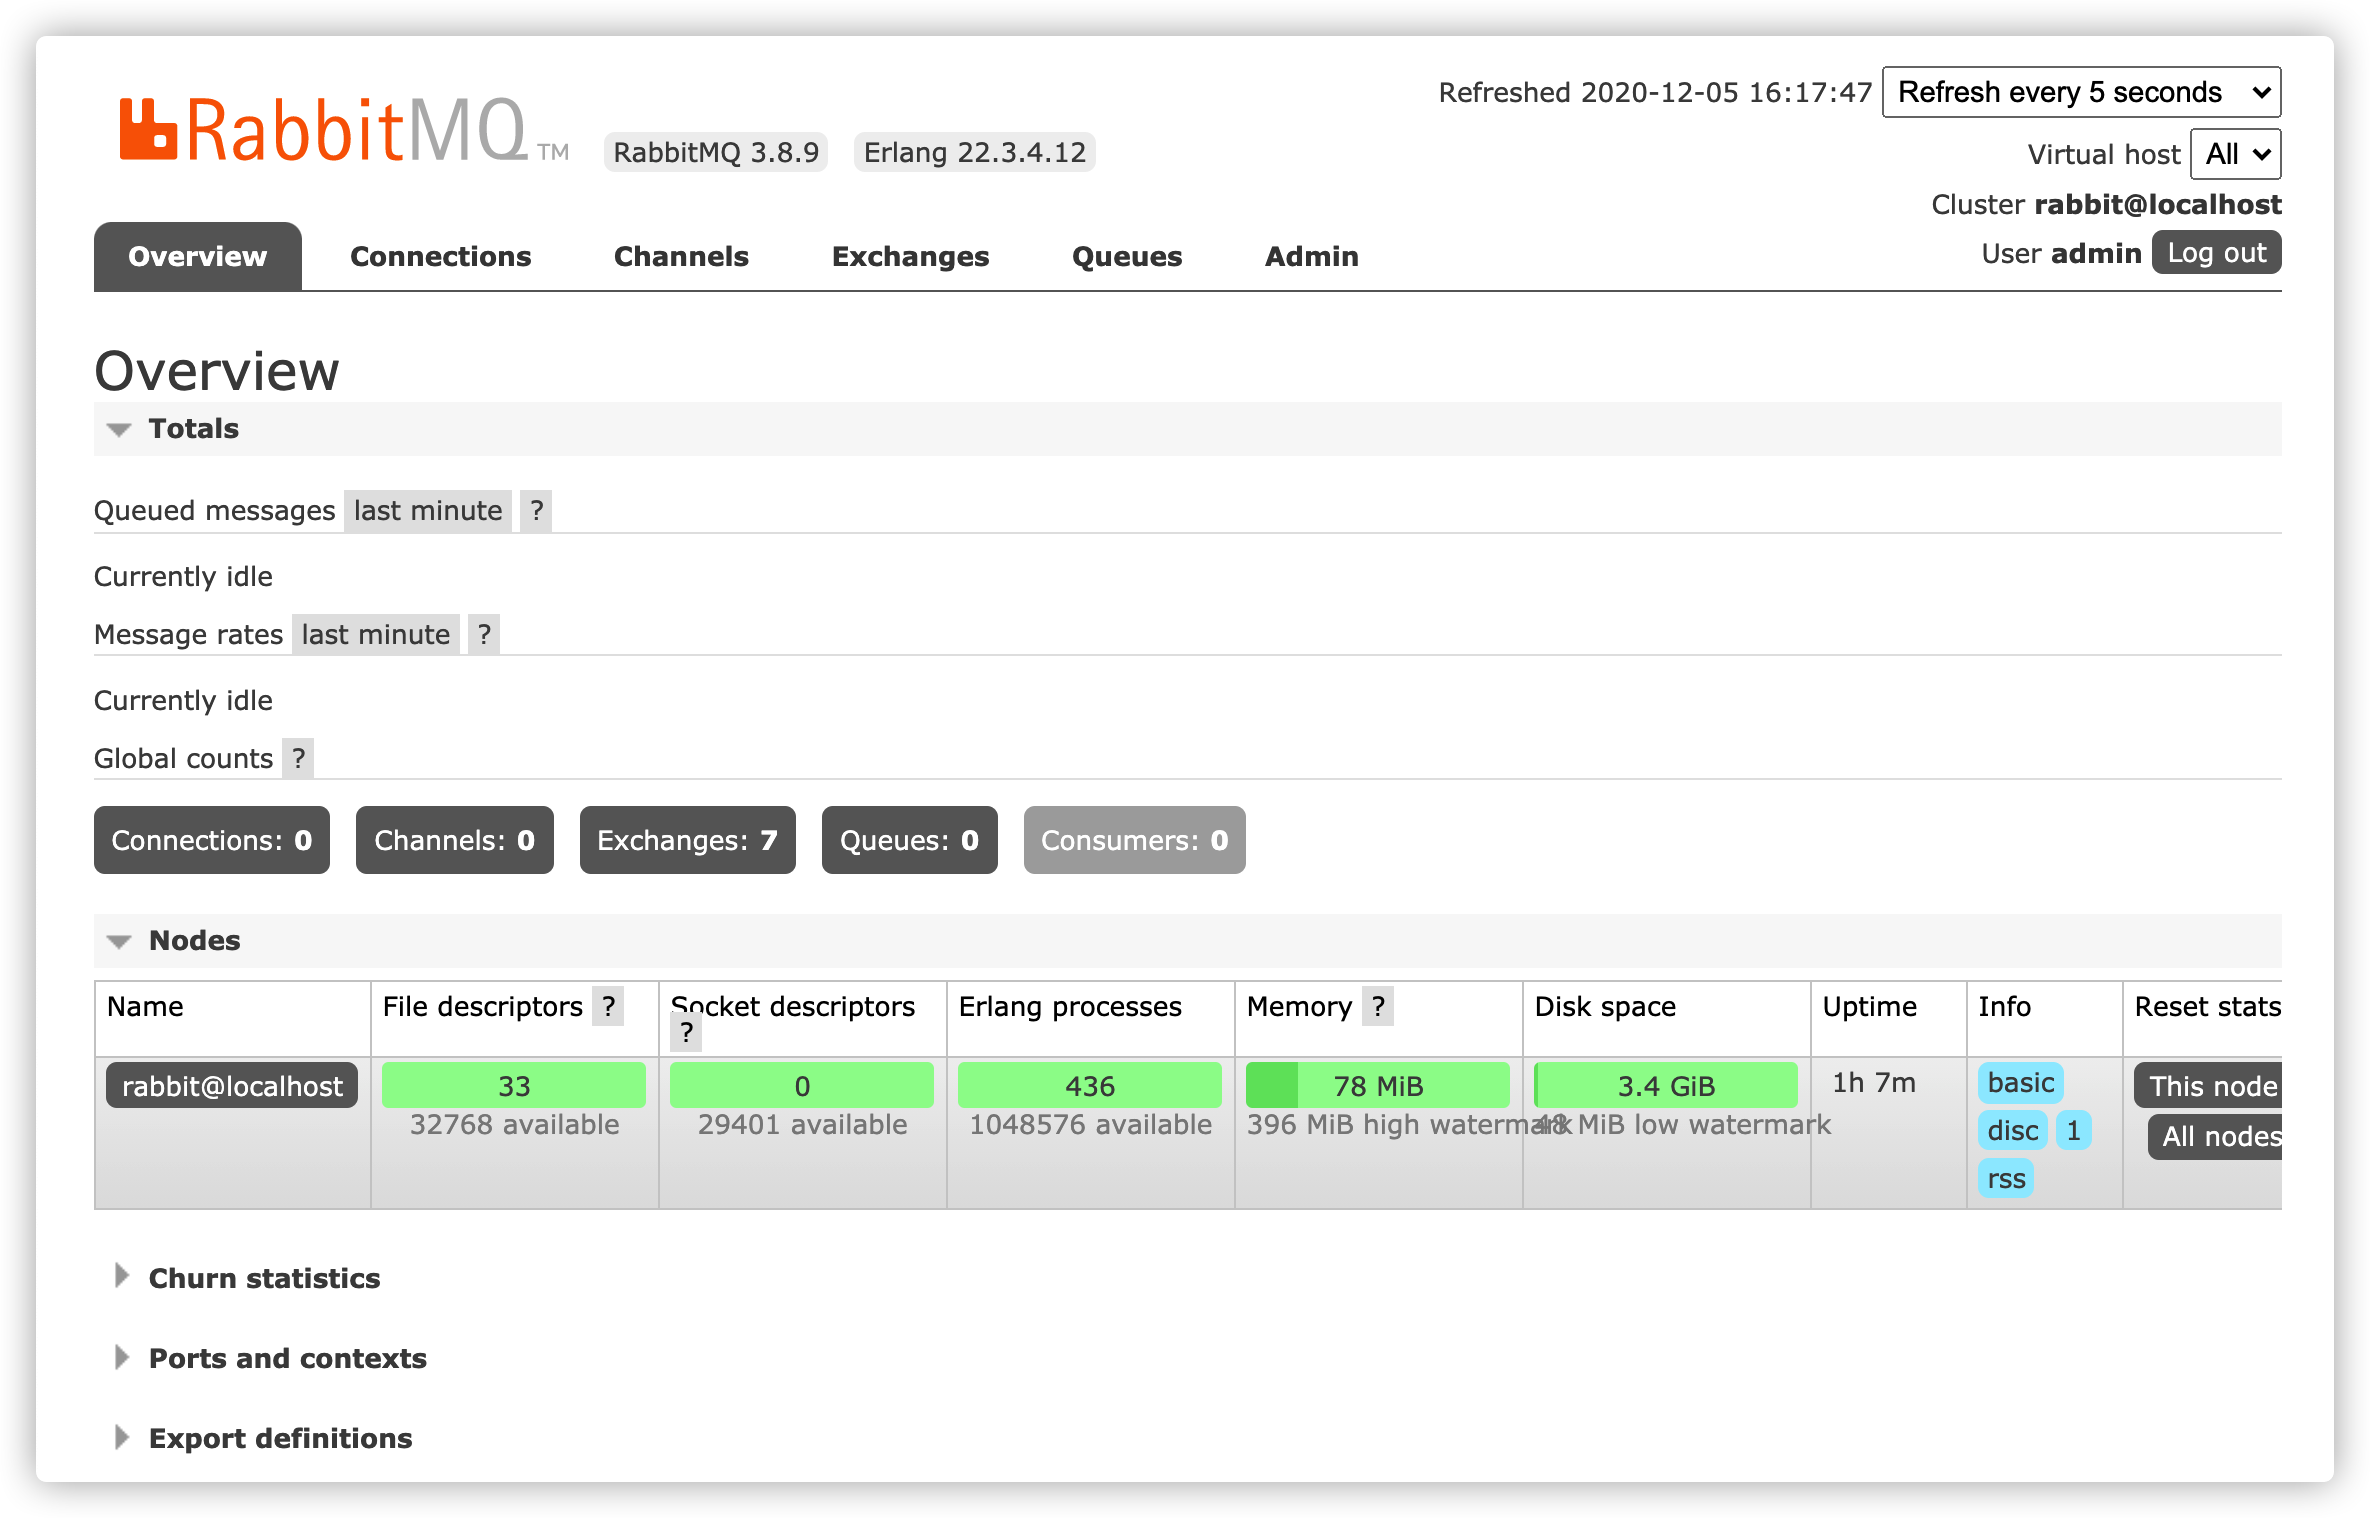
启用管理页面
启动插件
➜ ~ rabbitmq-plugins enable rabbitmq_management新建管理员用户
# amdin 为用户名 password 为密码
➜  ~ rabbitmqctl add_user admin password
➜  ~ rabbitmqctl set_user_tags admin administrator
开放15672端口
➜  ~ firewall-cmd --add-port=15672/tcp --permanent
➜  ~ firewall-cmd --reload
尝试登陆后台管理页面

Java 使用 RabbitMQ
简单使用,无交换器概念
引入 Maven 依赖
<dependency>
    <groupId>com.rabbitmq</groupId>
    <artifactId>amqp-client</artifactId>
    <version>5.8.0</version>
</dependency>
<dependency>
    <groupId>org.slf4j</groupId>
    <artifactId>slf4j-nop</artifactId>
    <version>1.7.29</version>
</dependency>
RabbitMQ 消息发送者
public class Send {
    private final static String QUEUE_NAME = "hello";

    public static void main(String[] args) throws IOException, TimeoutException {
        // 创建连接工厂
        ConnectionFactory connectionFactory = new ConnectionFactory();
        // 设置 RabbitMQ 地址
        connectionFactory.setHost("192.168.56.106");
        connectionFactory.setUsername("admin");
        connectionFactory.setPassword("password");
        // 建立连接
        Connection connection = connectionFactory.newConnection();
        // 获得信道
        Channel channel = connection.createChannel();
        // 声明队列
        channel.queueDeclare(QUEUE_NAME, false, false, false, null);
        // 发布消息
        String message = "Hello World!";
        channel.basicPublish("", QUEUE_NAME, null, message.getBytes());
        System.out.println("发送了消息:" + message);
        // 关闭连接
        channel.close();
        connection.close();
    }
}
消费者
public class Receiver {
    private final static String QUEUE_NAME = "hello";

    public static void main(String[] args) throws IOException, TimeoutException {
        // 创建连接工厂
        ConnectionFactory connectionFactory = new ConnectionFactory();
        // 设置 RabbitMQ 地址
        connectionFactory.setHost("192.168.56.106");
        connectionFactory.setUsername("admin");
        connectionFactory.setPassword("password");
        // 建立连接
        Connection connection = connectionFactory.newConnection();
        // 获得信道
        Channel channel = connection.createChannel();
        // 声明队列
        channel.queueDeclare(QUEUE_NAME, false, false, false, null);

        channel.basicConsume(QUEUE_NAME, true, new DefaultConsumer(channel) {
            @Override
            public void handleDelivery(String consumerTag, Envelope envelope, AMQP.BasicProperties properties, byte[] body) throws IOException {
                String message = new String(body);
                System.out.println("收到消息:" + message);
            }
        });
    }
}
RabbitMQ 交换器工作模式
fanout:广播,只需要将队列绑定到交换机上即可,不需要设置路由键direct:根据RoutingKey 匹配消息路由到指定的队列topic:生产者指定 RoutingKey, 消息根据消费端指定的队列通过模糊匹配的方式进行相应转发headers:根据发送消息内容中的 headers 属性来匹配
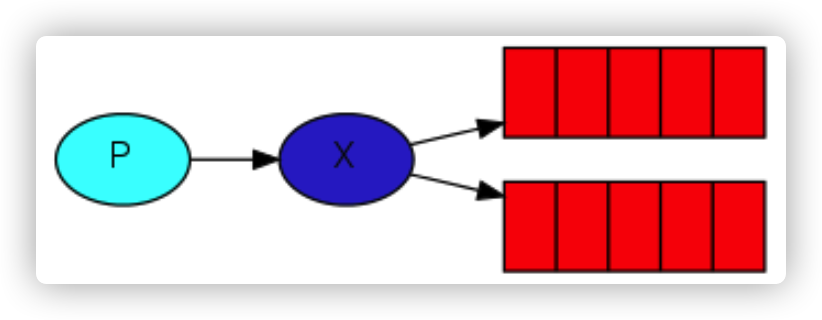
fanout 模式
- 每个发送到
fanout类型交换器的消息都会被分发到所有绑定的队列上去,它不会处理路由键。
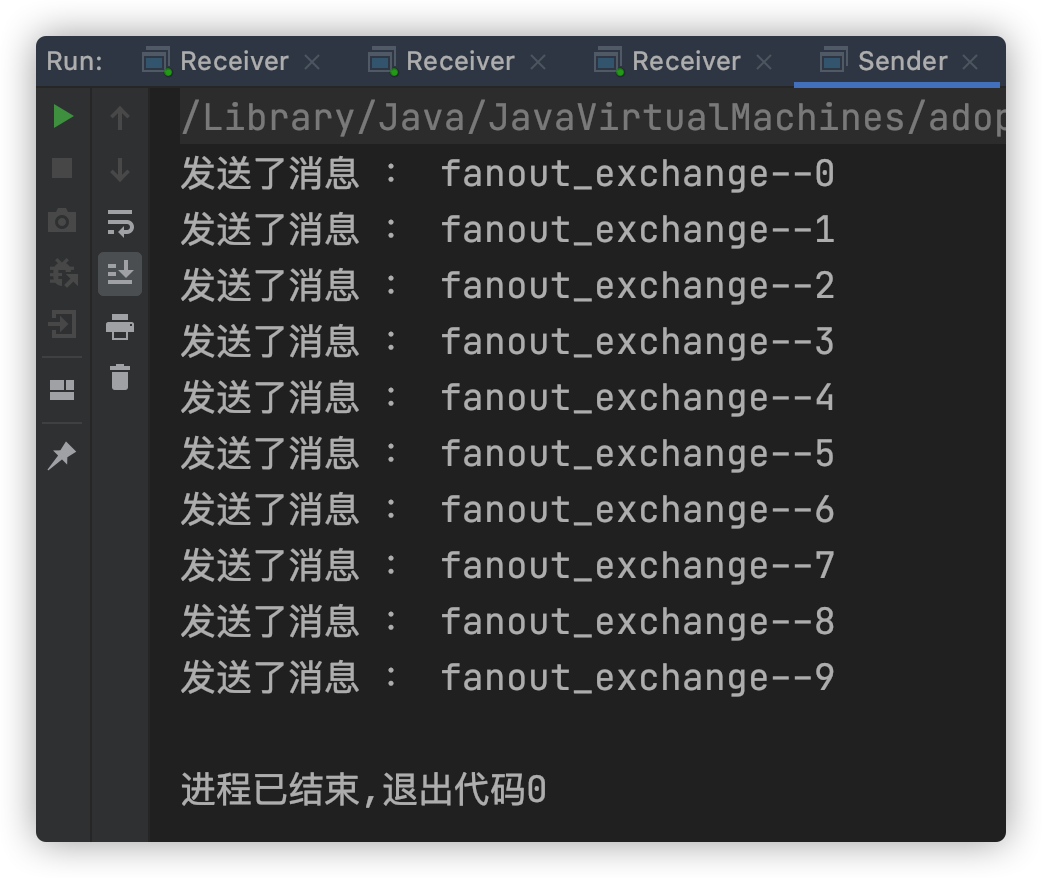
消息生产者
public static void main(String[] args) {
  // 创建连接工厂
  ConnectionFactory connectionFactory = new ConnectionFactory();
  connectionFactory.setHost("192.168.56.106");
  connectionFactory.setUsername("admin");
  connectionFactory.setPassword("password");
  // 创建连接、获取信道
  try (Connection connection = connectionFactory.newConnection(); Channel channel = connection.createChannel()) {
    // 声明 fanout 类型的交换器
    String exchange = "fanout_exchange";
    channel.exchangeDeclare(exchange, BuiltinExchangeType.FANOUT, false);
    // 发布消息
    for (int i = 0; i < 10; i++) {
      String message = "fanout_exchange--" + i;
      // fanout 类型的交换器不处理 RoutingKey
      channel.basicPublish(exchange, "", null, message.getBytes());
      System.out.println("发送了消息 : " + message);
    }
  } catch (Exception ignored) {

  }
}
消息消费者
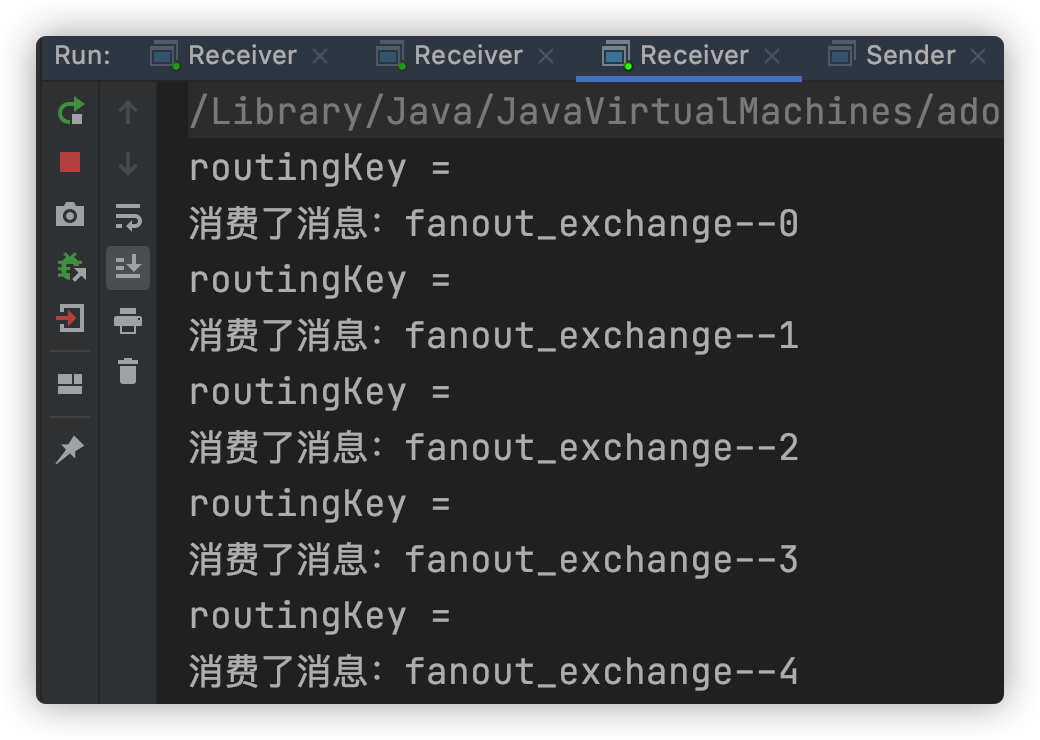
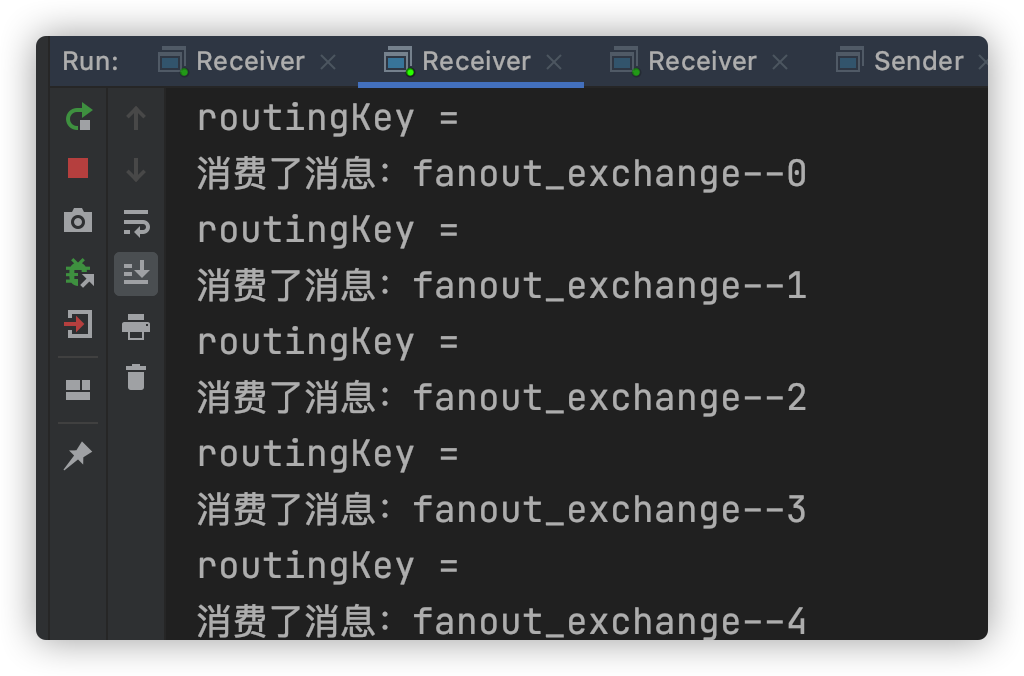
public static void main(String[] args) throws IOException, TimeoutException {
  // 创建连接工厂
  ConnectionFactory connectionFactory = new ConnectionFactory();
  connectionFactory.setHost("192.168.56.106");
  connectionFactory.setUsername("admin");
  connectionFactory.setPassword("password");

  Connection connection = connectionFactory.newConnection();
  Channel channel = connection.createChannel();
  // 声明交换器
  String exchange = "fanout_exchange";
  channel.exchangeDeclare(exchange, BuiltinExchangeType.FANOUT, false);
  // 生成一个非持久、独占、自动删除的临时队列
  String queue = channel.queueDeclare().getQueue();
  // 绑定队列
  channel.queueBind(queue, exchange, "");

  // 接收消息
  channel.basicConsume(queue, false, new DefaultConsumer(channel) {
    @Override
    public void handleDelivery(String consumerTag, Envelope envelope, AMQP.BasicProperties properties, byte[] body) throws IOException {
      String routingKey = envelope.getRoutingKey();
      System.out.println("routingKey = " + routingKey);
      String message = new String(body);
      System.out.println("消费了消息:" + message);
      // 确认消息
      channel.basicAck(envelope.getDeliveryTag(), false);
    }
  });
}
启动多个消费者实例,后运行消息生产者
direct 模式
消息中的路由键(routing key)和 Binding 中的 binding key 一致,交换器就将消息发送到对应的队列中。如果一个队列绑定到交换器要求路由键为
error,则只转发 routing key 标记为error的消息,不会转发标记为info或者error.error的消息。它是完全匹配、单播的模式。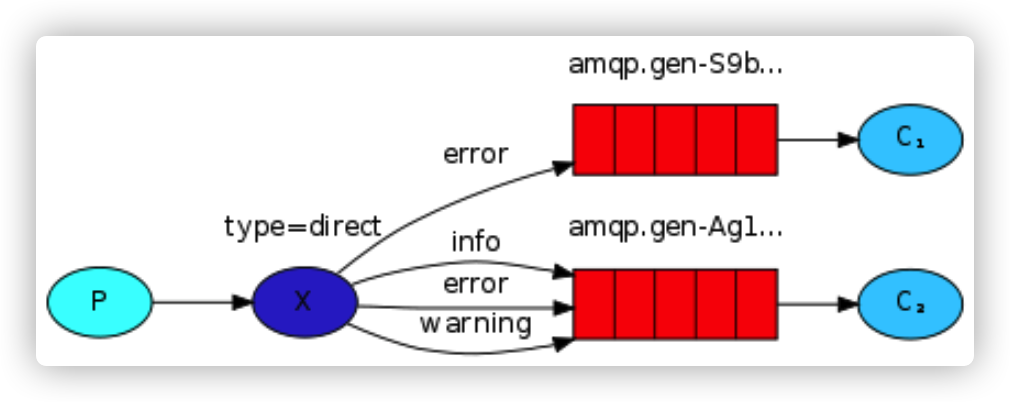
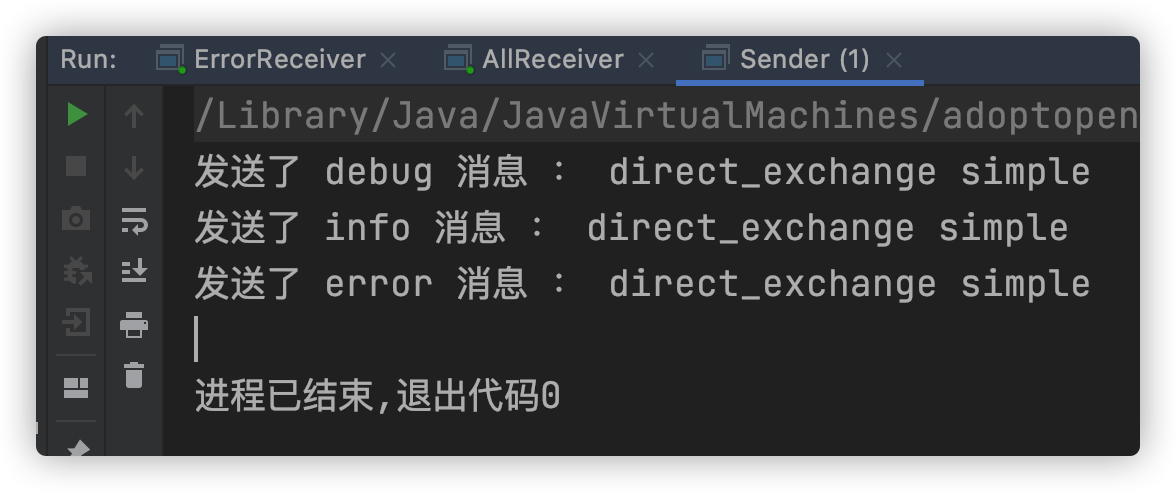
消息生产者
// 声明 direct 类型的交换器
String exchange = "direct_exchange";
channel.exchangeDeclare(exchange, BuiltinExchangeType.DIRECT, false);
// 发布消息
String message = "direct_exchange simple";
// 假定发送日志信息,级别为:debug info error
channel.basicPublish(exchange, "debug", null, message.getBytes());
System.out.println("发送了 debug 消息 : " + message);
channel.basicPublish(exchange, "info", null, message.getBytes());
System.out.println("发送了 info 消息 : " + message);
channel.basicPublish(exchange, "error", null, message.getBytes());
System.out.println("发送了 error 消息 : " + message);
消息消费者
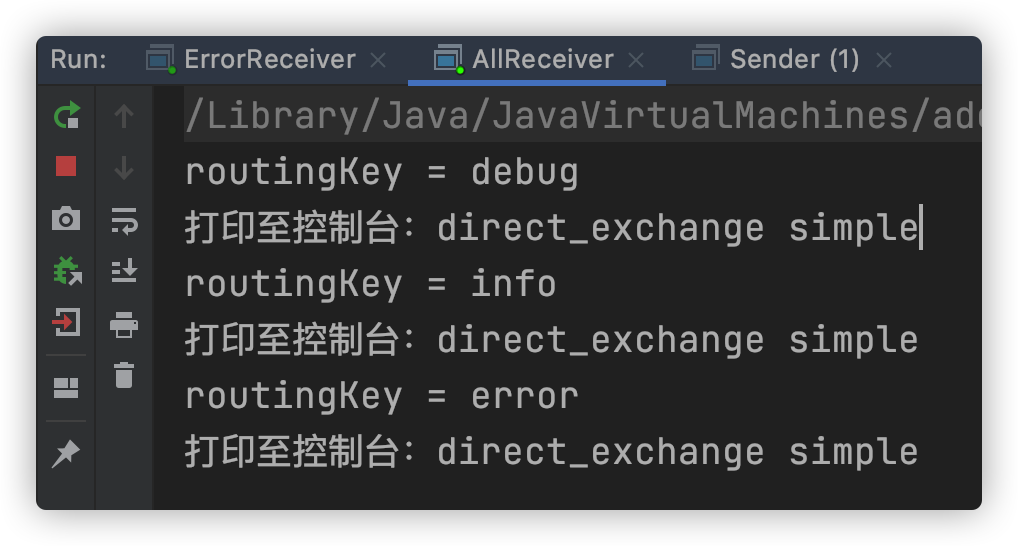
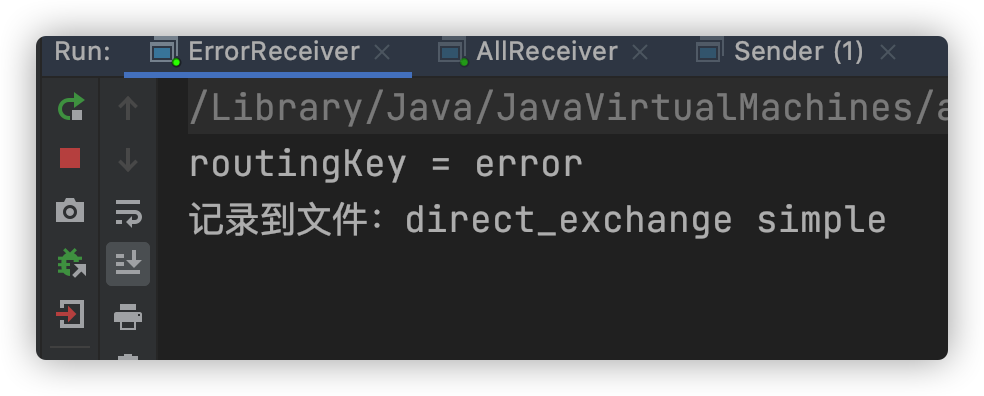
ErrorReceiver.java
// 绑定队列、只处理 error 标记的日志,记录到文件
channel.queueBind(queue, exchange, "error");

AllReceiver.java

// 关注所有标记的日志,打印至控制台
channel.queueBind(queue, exchange, "debug");
channel.queueBind(queue, exchange, "info");
channel.queueBind(queue, exchange, "error");
先后启动消息消费者和消息生产者
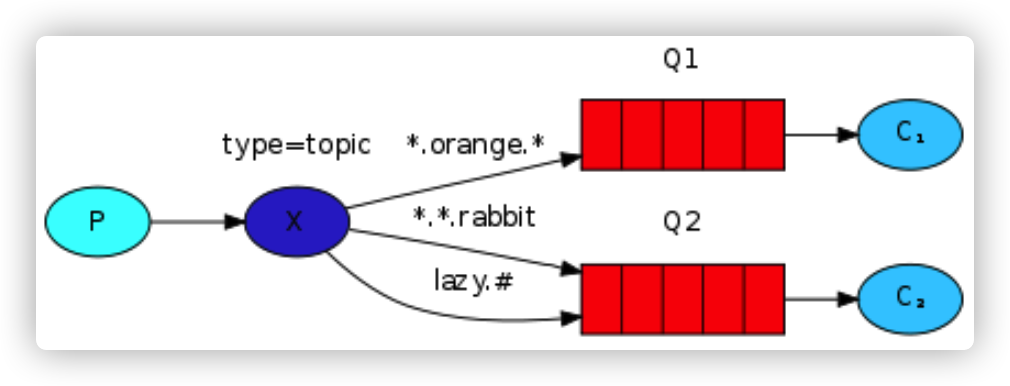
topic 模式
topic交换器类似于direct交换器,它通过模式匹配分配消息的路由键属性,将路由键与某个模式进行匹配,此时队列需要绑定到一个模式上。它将路由键和绑定键的字符串以.切分为单词,同时识别两个通配符:*可以匹配一个单词#可以匹配任意个单词
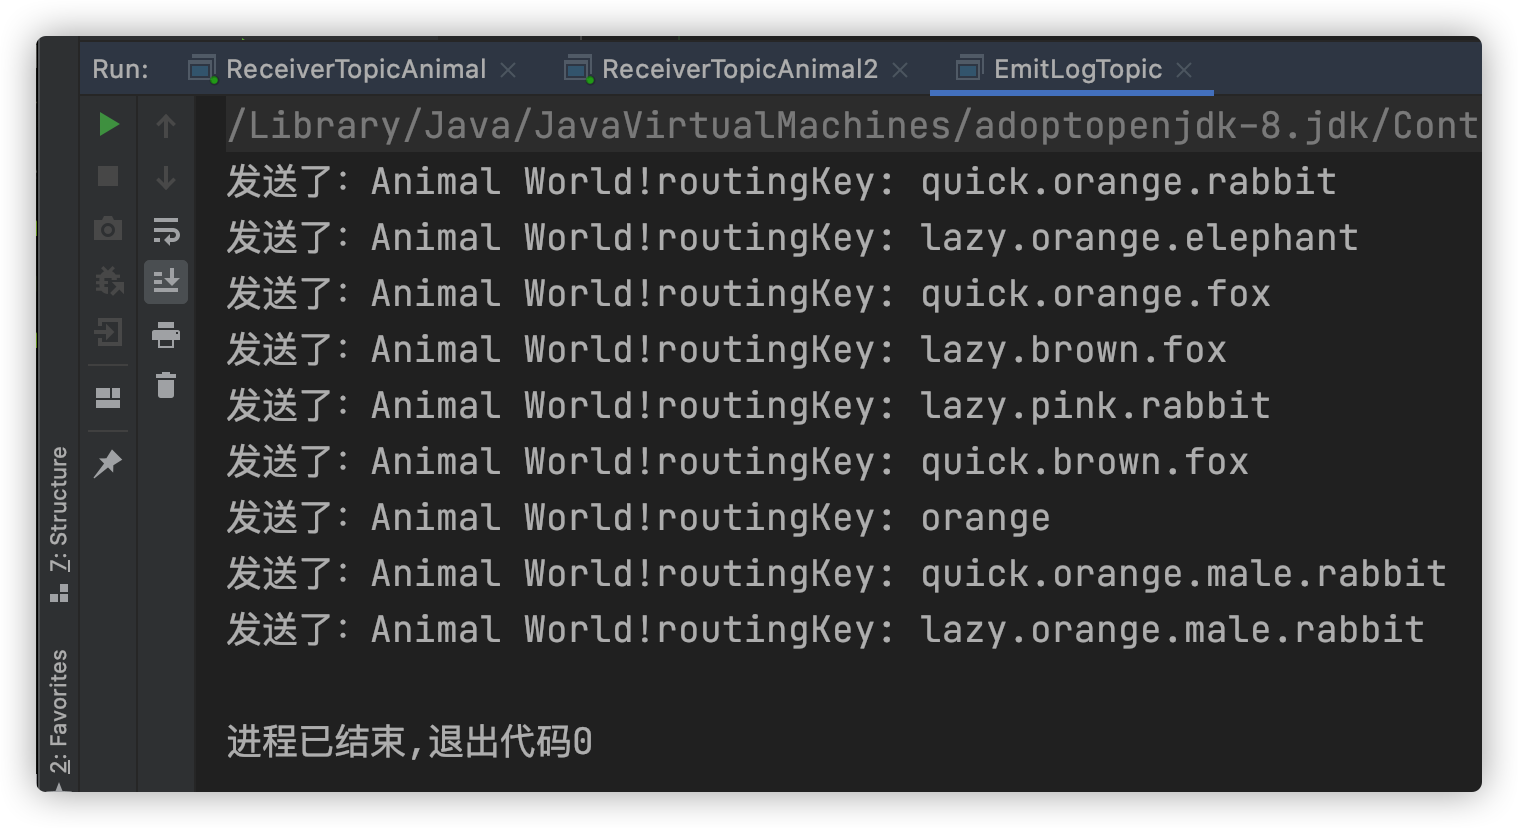
消息发送者
public static void main(String[] args) throws IOException, TimeoutException {
    ConnectionFactory connectionFactory = new ConnectionFactory();
    connectionFactory.setHost("192.168.56.106");
    connectionFactory.setUsername("admin");
    connectionFactory.setPassword("password");
    Connection connection = connectionFactory.newConnection();
    Channel channel = connection.createChannel();
    // 声明交换机
    String exchange = "topic_exchange";
    channel.exchangeDeclare(exchange, BuiltinExchangeType.TOPIC);

    String message = "Animal World!";
    String[] routingKeys = new String[9];
    routingKeys[0] = "quick.orange.rabbit";
    routingKeys[1] = "lazy.orange.elephant";
    routingKeys[2] = "quick.orange.fox";
    routingKeys[3] = "lazy.brown.fox";
    routingKeys[4] = "lazy.pink.rabbit";
    routingKeys[5] = "quick.brown.fox";
    routingKeys[6] = "orange";
    routingKeys[7] = "quick.orange.male.rabbit";
    routingKeys[8] = "lazy.orange.male.rabbit";

    for (String routingKey : routingKeys) {
      channel.basicPublish(exchange, routingKey, null, message.getBytes());
      System.out.println("发送了:" + message + "routingKey: " + routingKey);
    }

    channel.close();
    connection.close();
}
消息消费者
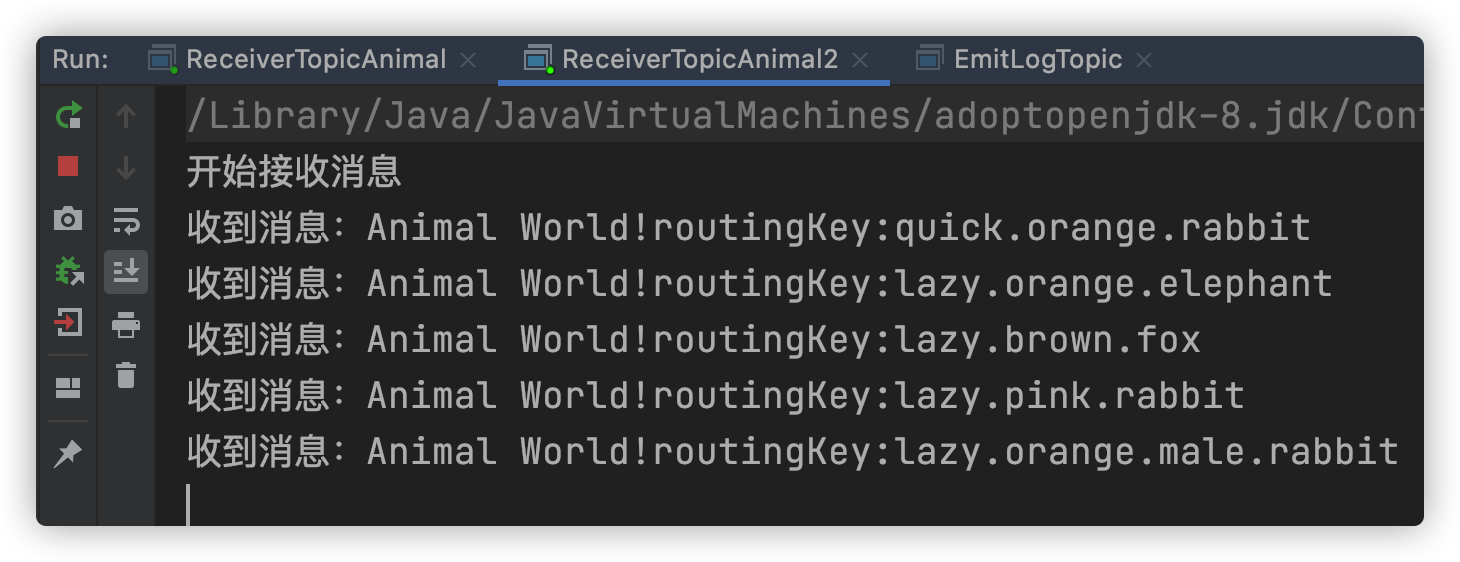
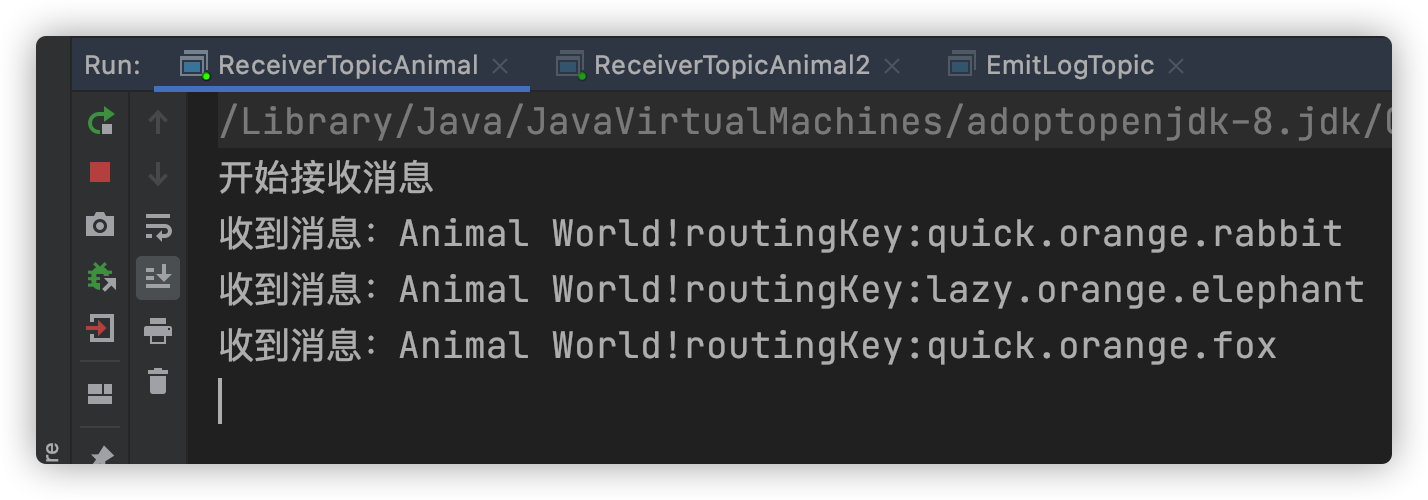
Comsumer1.java
String exchange = "topic_exchange";
channel.queueBind(queueName, exchange, "*.orange.*");

Comsumer2.java
channel.queueBind(queueName, exchange, "*.*.rabbit");
channel.queueBind(queueName, exchange, "lazy.#");
先后启动消费者和生产者
SpringBoot 中使用 RabbitMQ
生产者应用
引入起步依赖
<dependency>
    <groupId>org.springframework.boot</groupId>
    <artifactId>spring-boot-starter-amqp</artifactId>
</dependency>
在
application.properties中配置连接信息server.port=8080 spring.application.name=producer spring.rabbitmq.addresses=192.168.56.106:5672 spring.rabbitmq.username=admin spring.rabbitmq.password=password spring.rabbitmq.virtual-host=/ spring.rabbitmq.connection-timeout=15000编写
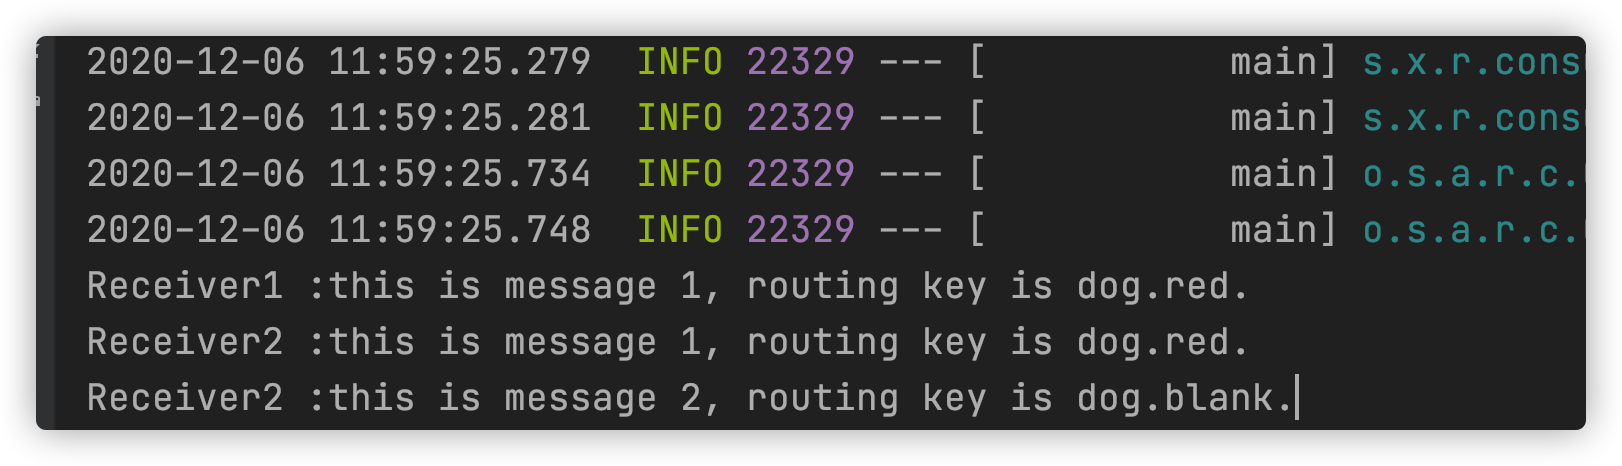
TopicRabbitConfig配置类@Configuration public class TopicRabbitConfig { @Bean public Queue queue1() { return new Queue("queue1"); } @Bean public Queue queue2() { return new Queue("queue2"); } @Bean public TopicExchange exchange() { return new TopicExchange("bootExchange"); } @Bean public Binding bindingExchangeMessage1(Queue queue1, TopicExchange exchange) { return BindingBuilder.bind(queue1).to(exchange).with("dog.red"); } @Bean public Binding bindingExchangeMessage2(Queue queue2, TopicExchange exchange) { return BindingBuilder.bind(queue2).to(exchange).with("dog.#"); } }发送消息
@Component
public class MessageSender {

    @Resource
    private AmqpTemplate rabbitMqTemplate;

    public void send1() {
        String message = "this is message 1, routing key is dog.red.";
        System.out.println("发送消息:" + message);
        this.rabbitMqTemplate.convertAndSend("bootExchange", "dog.red", message);
    }

    public void send2() {
        String message = "this is message 2, routing key is dog.blank.";
        System.out.println("发送消息:" + message);
        this.rabbitMqTemplate.convertAndSend("bootExchange", "dog.blank", message);
    }
}
消费者应用
引入起步依赖
配置连接信息
编写消费者
@Component
@RabbitListener(queues = "queue1")
public class Receiver1 {

    @RabbitHandler
    public void process(String message) {
        System.out.println("Receiver1 :" + message);
    }
}
@Component @RabbitListener(queues = "queue2") public class Receiver2 { @RabbitHandler public void process(String message) { System.out.println("Receiver2 :" + message); } }使用
@RabbitListener(queues = "queue2")指定需要监听的队列
运行项目
使用单元测试的方式,发送消息
@SpringBootTest
class ProducerApplicationTests {

    @Resource
    private MessageSender messageSender;

    @Test
    public void send1() {
        messageSender.send1();
    }

    @Test
    public void send2() {
        messageSender.send2();
    }
}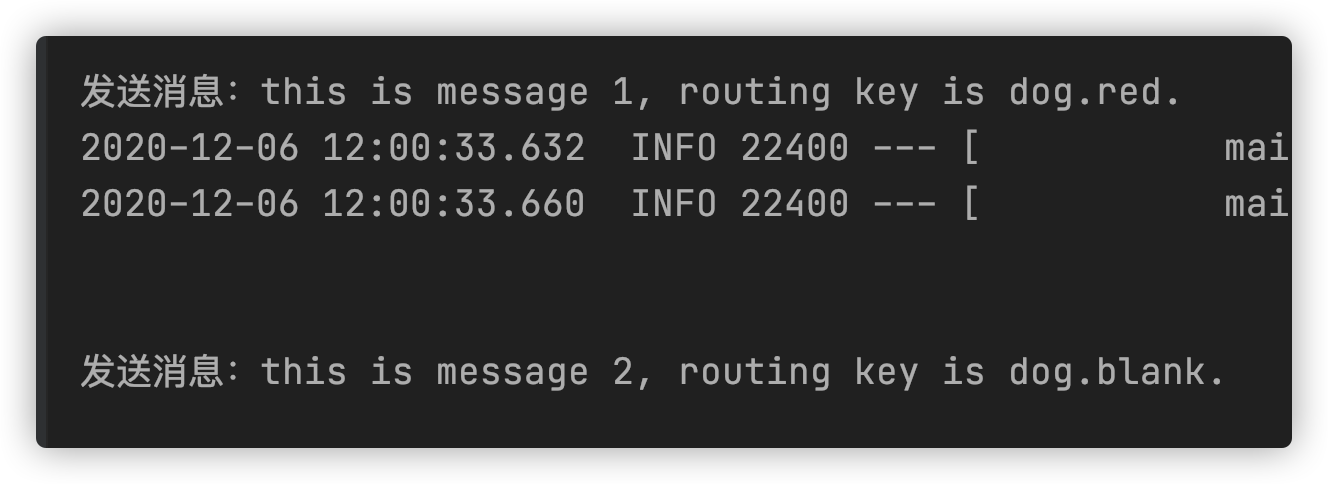
启动消费者应用