CAS 集成、认证流程和模拟登录
CAS 集成
CAS Server 简单配置启动
CAS 服务器启动步骤:
从 cas-overlay-template 项目中获取 5.3 分支的文件,如图;
git clone -b 5.3 git@github.com:apereo/cas-overlay-template.git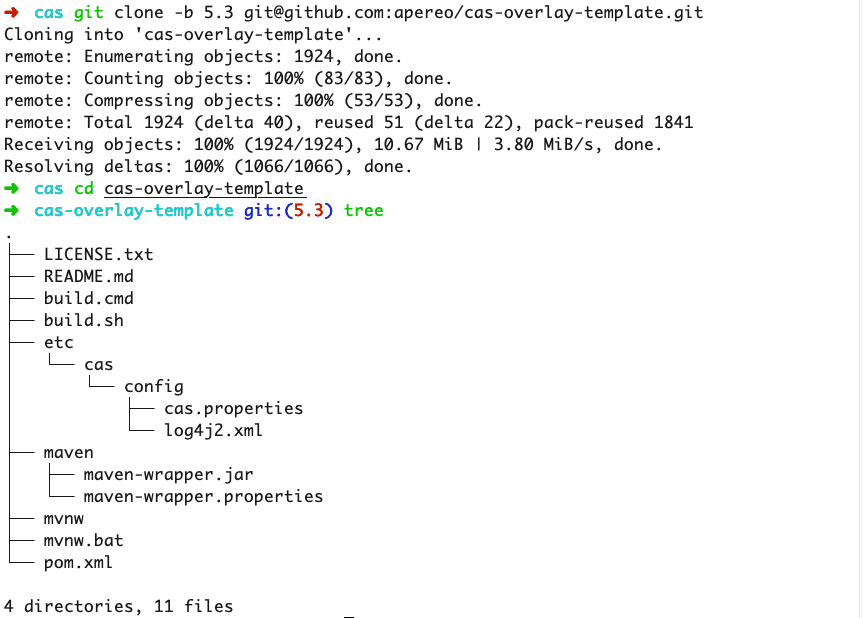
CAS 默认使用 https,需要先生成证书;
可以使用项目中已提供的脚本生成,默认存储在
/etc/cas/thekeystore:./build.sh gencert也可以手动生成,如图:
# 生成证书
keytool -genkey -alias cas -keyalg RSA -keystore thekeystore -storepass changeit -deststoretype pkcs12
# 导出证书
keytool -export -file cas.crt -alias cas -keystore thekeystore -storepass changeit
# 导入证书到JVM的证书库
keytool -import -keystore "/usr/local/opt/openjdk@8/libexec/openjdk.jdk/Contents/Home/jre/lib/security/cacerts" -file /Users/linxiang/Documents/cas/cas.crt -alias cas -storepass changeit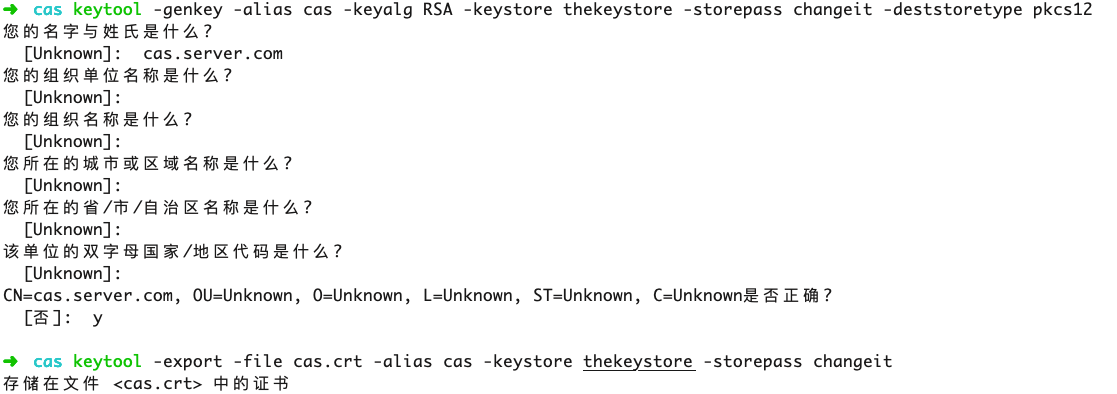
将
etc文件夹及内容复制到根目录下;cp -r etc/cas/config /etc/cas/config启动项目前可以修改
cas.properties中的配置,比如静态认证时默认的用户名密码,应用端口等。logging.config=file:/etc/cas/config/log4j2.xml # 静态认证用户 cas.authn.accept.users=admin::admin,xianglin::xianglin server.ssl.key-store=file:/etc/cas/thekeystore server.ssl.key-store-password=changeit server.ssl.key-password=changeit其中
server.ssl.key-store配置了证书的存储位置。可以将第 2 步生成的证书复制到/etc/cas/thekeystore,也可以修改key-store的值指向证书位置。使用 WAR 方式启动项目,访问认证页面
https://cas.server.com:8443/cas/login,如图;./build.sh run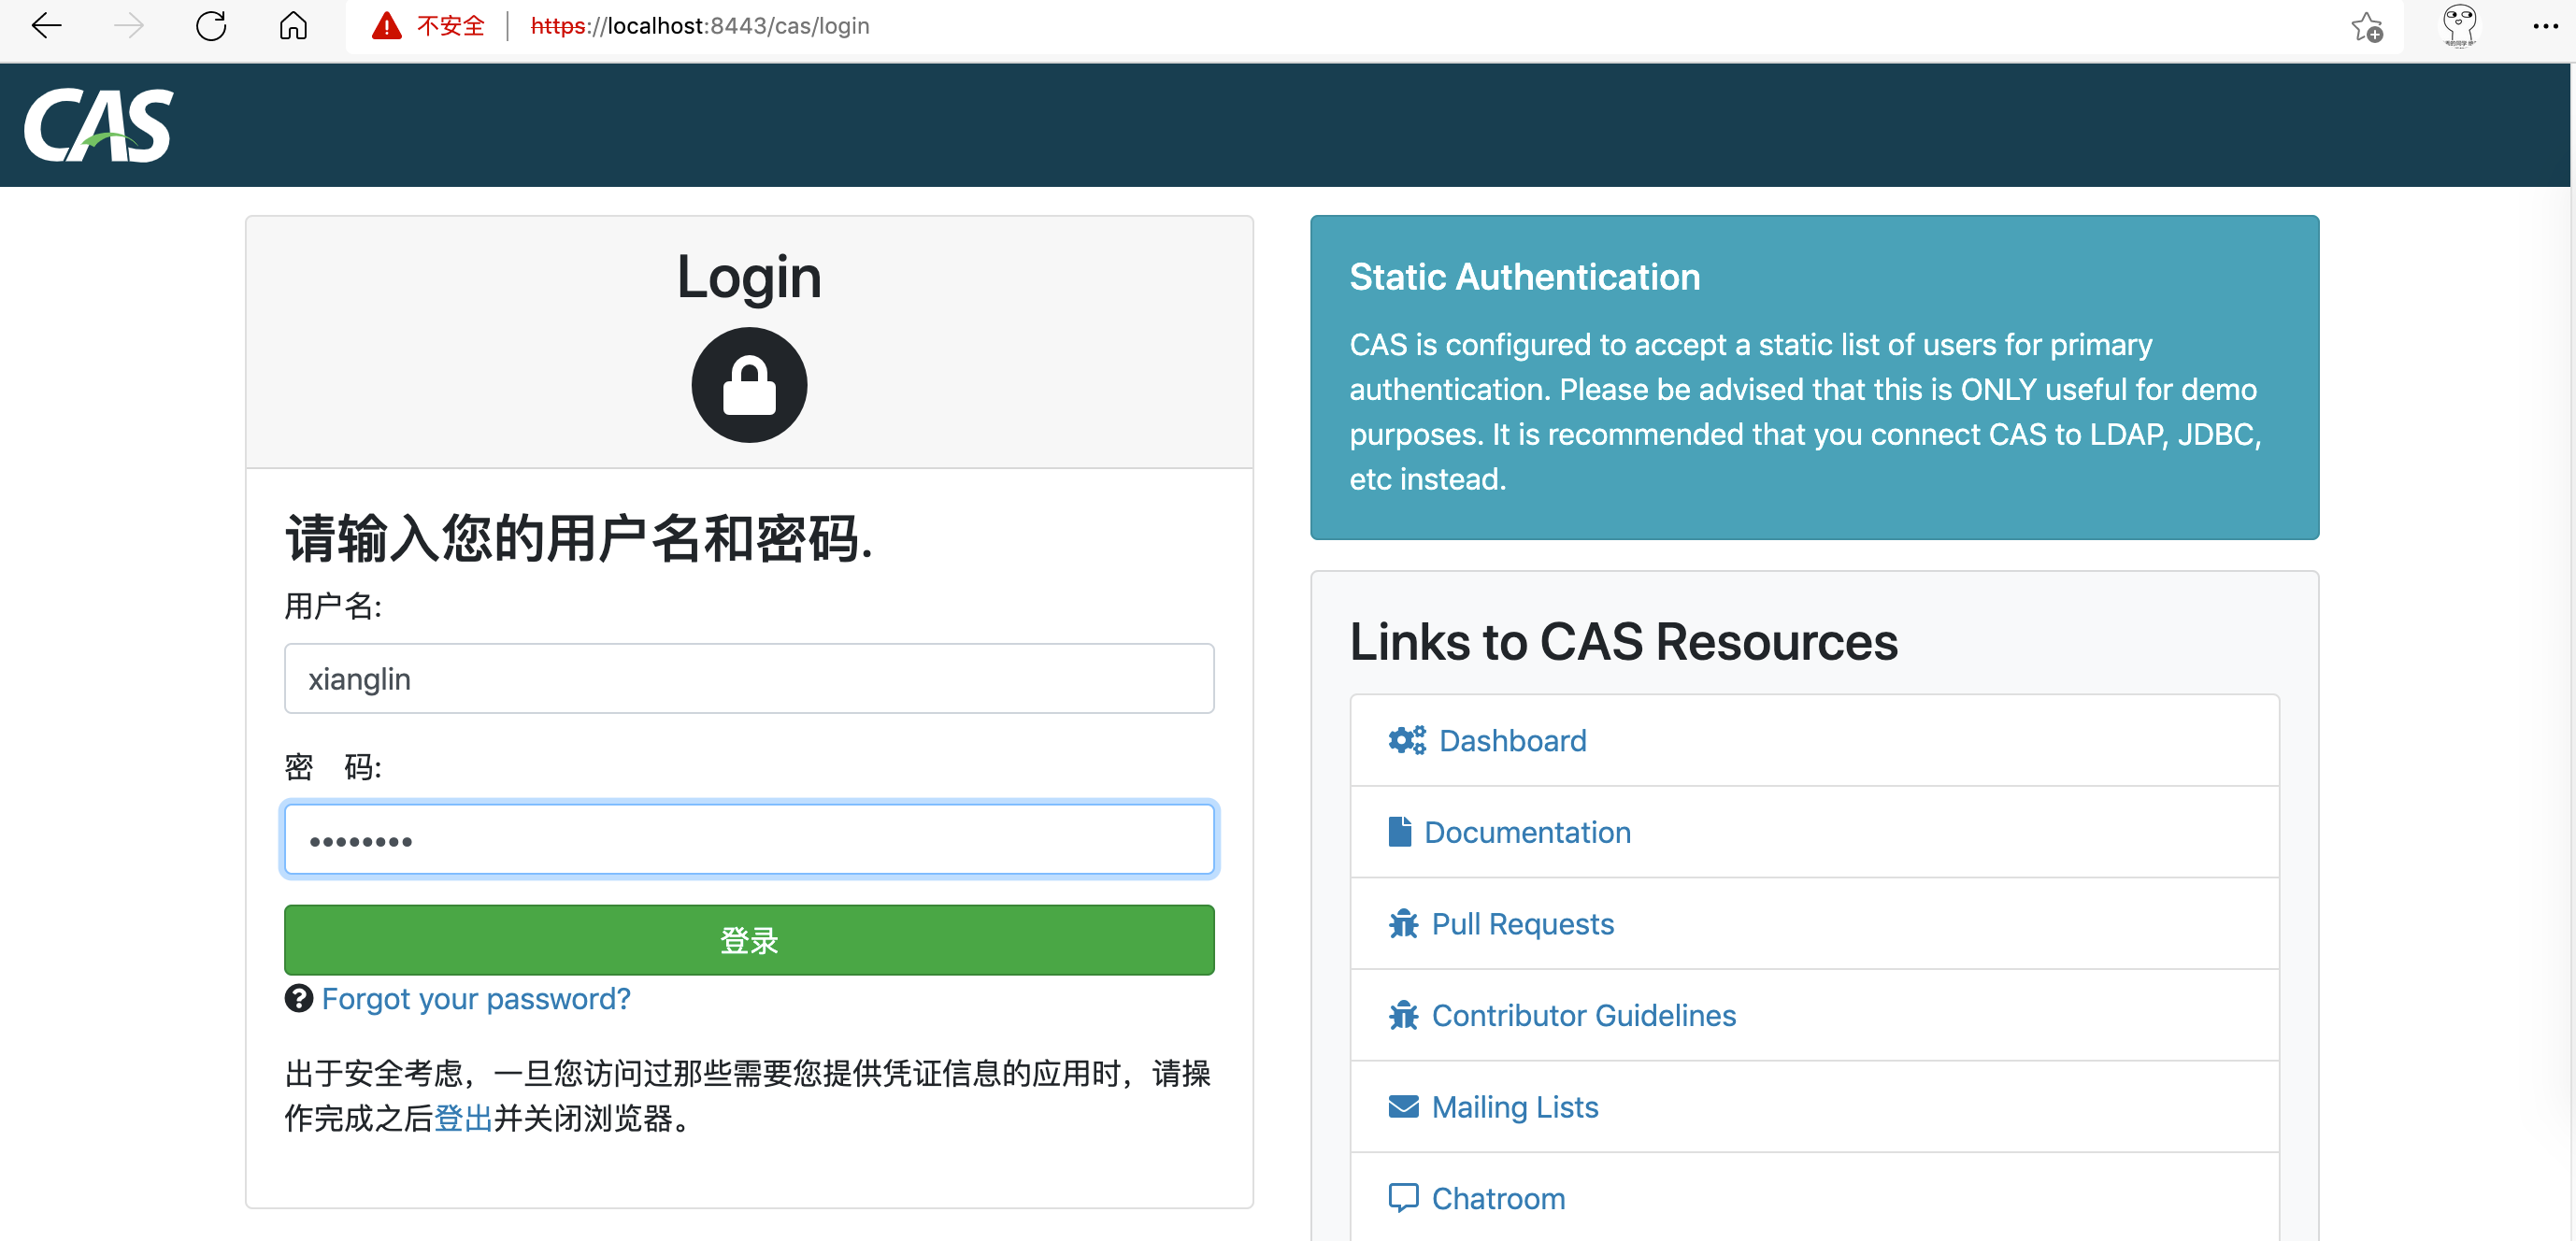
客户端集成 CAS
CAS 客户端启动步骤:
修改
web.xml配置,增加 CAS 提供的过滤器,关键参数有:casServerUrlPrefix:指向 CAS 服务器地址,如:https://cas.server.com:8443/cas,serverName:CAS 认证后重定向的地址,即客户端地址,如:https://localhost:9443/sample。完整
web.xml示例如下:<?xml version="1.0" encoding="UTF-8"?> <web-app version="2.4" xmlns="http://java.sun.com/xml/ns/j2ee" xmlns:xsi="http://www.w3.org/2001/XMLSchema-instance" xsi:schemaLocation="http://java.sun.com/xml/ns/j2ee http://java.sun.com/xml/ns/j2ee/web-app_2_4.xsd"> <filter> <filter-name>CAS Single Sign Out Filter</filter-name> <filter-class>org.jasig.cas.client.session.SingleSignOutFilter</filter-class> <init-param> <param-name>casServerUrlPrefix</param-name> <param-value>https://cas.server.com:8443/cas</param-value> </init-param> </filter> <listener> <listener-class>org.jasig.cas.client.session.SingleSignOutHttpSessionListener</listener-class> </listener> <filter> <filter-name>CAS Authentication Filter</filter-name> <filter-class>org.jasig.cas.client.authentication.AuthenticationFilter</filter-class> <init-param> <param-name>casServerLoginUrl</param-name> <param-value>https://cas.server.com:8443/cas/login</param-value> </init-param> <init-param> <!--这是客户端的部署地址,认证时会带着这个地址,认证成功后会跳转到这个地址--> <param-name>serverName</param-name> <param-value>https://localhost:9443/sample</param-value> </init-param> </filter> <filter> <filter-name>CAS Validation Filter</filter-name> <filter-class>org.jasig.cas.client.validation.Cas30ProxyReceivingTicketValidationFilter</filter-class> <init-param> <param-name>casServerUrlPrefix</param-name> <param-value>https://cas.server.com:8443/cas</param-value> </init-param> <init-param> <param-name>serverName</param-name> <param-value>https://localhost:9443/sample</param-value> </init-param> <init-param> <param-name>redirectAfterValidation</param-name> <param-value>true</param-value> </init-param> <init-param> <param-name>useSession</param-name> <param-value>true</param-value> </init-param> <init-param> <param-name>authn_method</param-name> <param-value>mfa-duo</param-value> </init-param> </filter> <!-- 该过滤器负责实现HttpServletRequest请求的包裹,比如允许开发者通过HttpServletRequest的getRemoteUser()方法获得SSO登录用户的登录名,可选配置--> <filter> <filter-name>CAS HttpServletRequest Wrapper Filter</filter-name> <filter-class>org.jasig.cas.client.util.HttpServletRequestWrapperFilter</filter-class> </filter> <filter-mapping> <filter-name>CAS Single Sign Out Filter</filter-name> <url-pattern>/*</url-pattern> </filter-mapping> <filter-mapping> <filter-name>CAS Validation Filter</filter-name> <url-pattern>/*</url-pattern> </filter-mapping> <filter-mapping> <filter-name>CAS Authentication Filter</filter-name> <url-pattern>/*</url-pattern> </filter-mapping> <filter-mapping> <filter-name>CAS HttpServletRequest Wrapper Filter</filter-name> <url-pattern>/*</url-pattern> </filter-mapping> <welcome-file-list> <welcome-file> index.jsp </welcome-file> </welcome-file-list> </web-app>修改 Tomcat 配置,见 server.xml:
<!-- <Connector port="8080" protocol="HTTP/1.1"
               connectionTimeout="20000"
               redirectPort="8443" /> -->
<Connector port="9443" protocol="org.apache.coyote.http11.Http11Protocol"
               maxThreads="150" SSLEnabled="true" scheme="https" secure="true"
               clientAuth="false" sslProtocol="TLS" keystoreFile="/Users/linxiang/Documents/cas/thekeystore"
               keystorePass="changeit"/>
启动客户端,如图。
Spring Boot 应用简单集成CAS 认证:
在
pom.xml中添加 CAS 客户端的依赖;<dependency> <groupId>org.jasig.cas.client</groupId> <artifactId>cas-client-support-springboot</artifactId> <version>3.6.2</version> </dependency>在
application.yaml添加 CAS 相关配置;server: port: 7443 ssl: key-store: classpath:thekeystore key-store-password: changeit key-store-type: pkcs12 key-alias: cas cas: server-url-prefix: https://cas.server.com:8443/cas server-login-url: https://cas.server.com:8443/cas/login client-host-url: https://client1.server.com:7443/使用注解
@EnableCasClient来启用 CAS;@SpringBootApplication @EnableCasClient public class SpringbootCasDemoApplication { public static void main(String[] args) { SpringApplication.run(SpringbootCasDemoApplication.class, args); } }启动客户端,如图。

认证流程
CAS 名词
通过 Fiddler 抓包学习 CAS 的认证流程前,先熟悉几个名词 (见 CAS Protocol):
TGC:(Ticket-granting Cookie),存放 SSO 用户身份凭据的 Cookie,类似 JSESSIONID。TGT:(Ticket Granting Ticket),在 SSO 中标识一位用户,类似 Session。ST:(Service Ticket),作为一个参数跟在 url 后面, 代表 CAS 为某一用户访问 CAS 客户端签发的凭据。
- The
TGT(Ticket Granting Ticket), stored in theTGCcookie, represents a SSO session for a user.- The
ST(Service Ticket), transmitted as aGETparameter in urls, stands for the access granted by the CAS server to the CASified application for a specific user.
首次认证流程
按上述步骤启动 CAS 相关应用后,打开浏览器,访问 https://localhost:9443/sample/,输入口令完成登录,在 Fiddler 中过滤无关请求,需要学习的请求如图。

序号 930,第一次访问
https://localhost:9443/sample/,会经过 CAS 提供的过滤器org.jasig.cas.client.authentication.AuthenticationFilter,过滤器判断到当前用户没有登录,将请求重定向到认证中心,如图;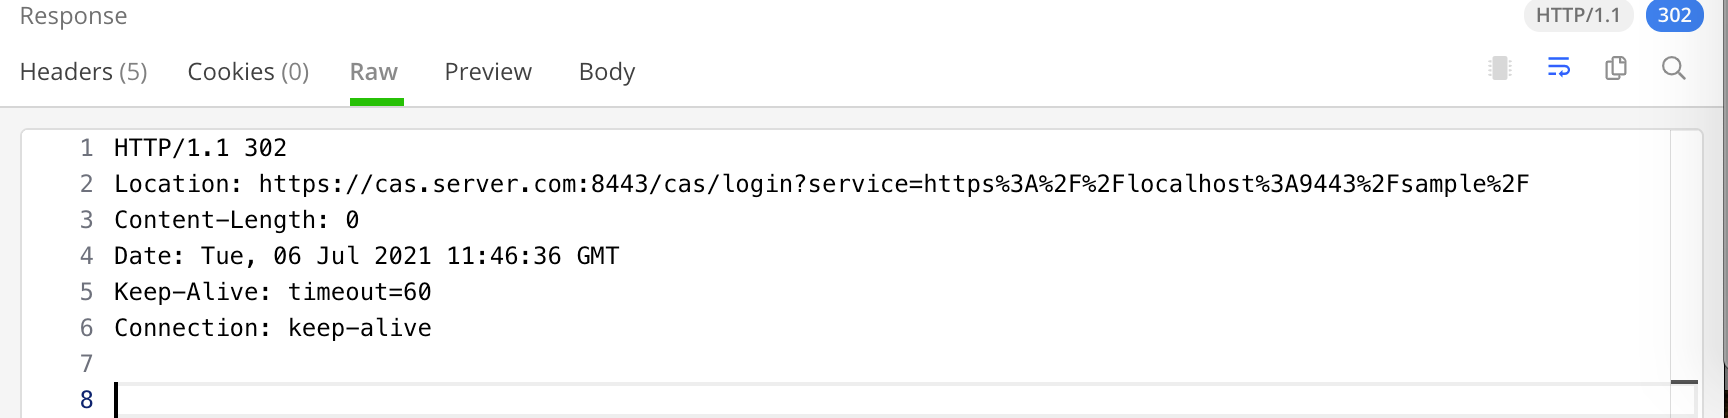
重定向的地址是在过滤器参数中配置的
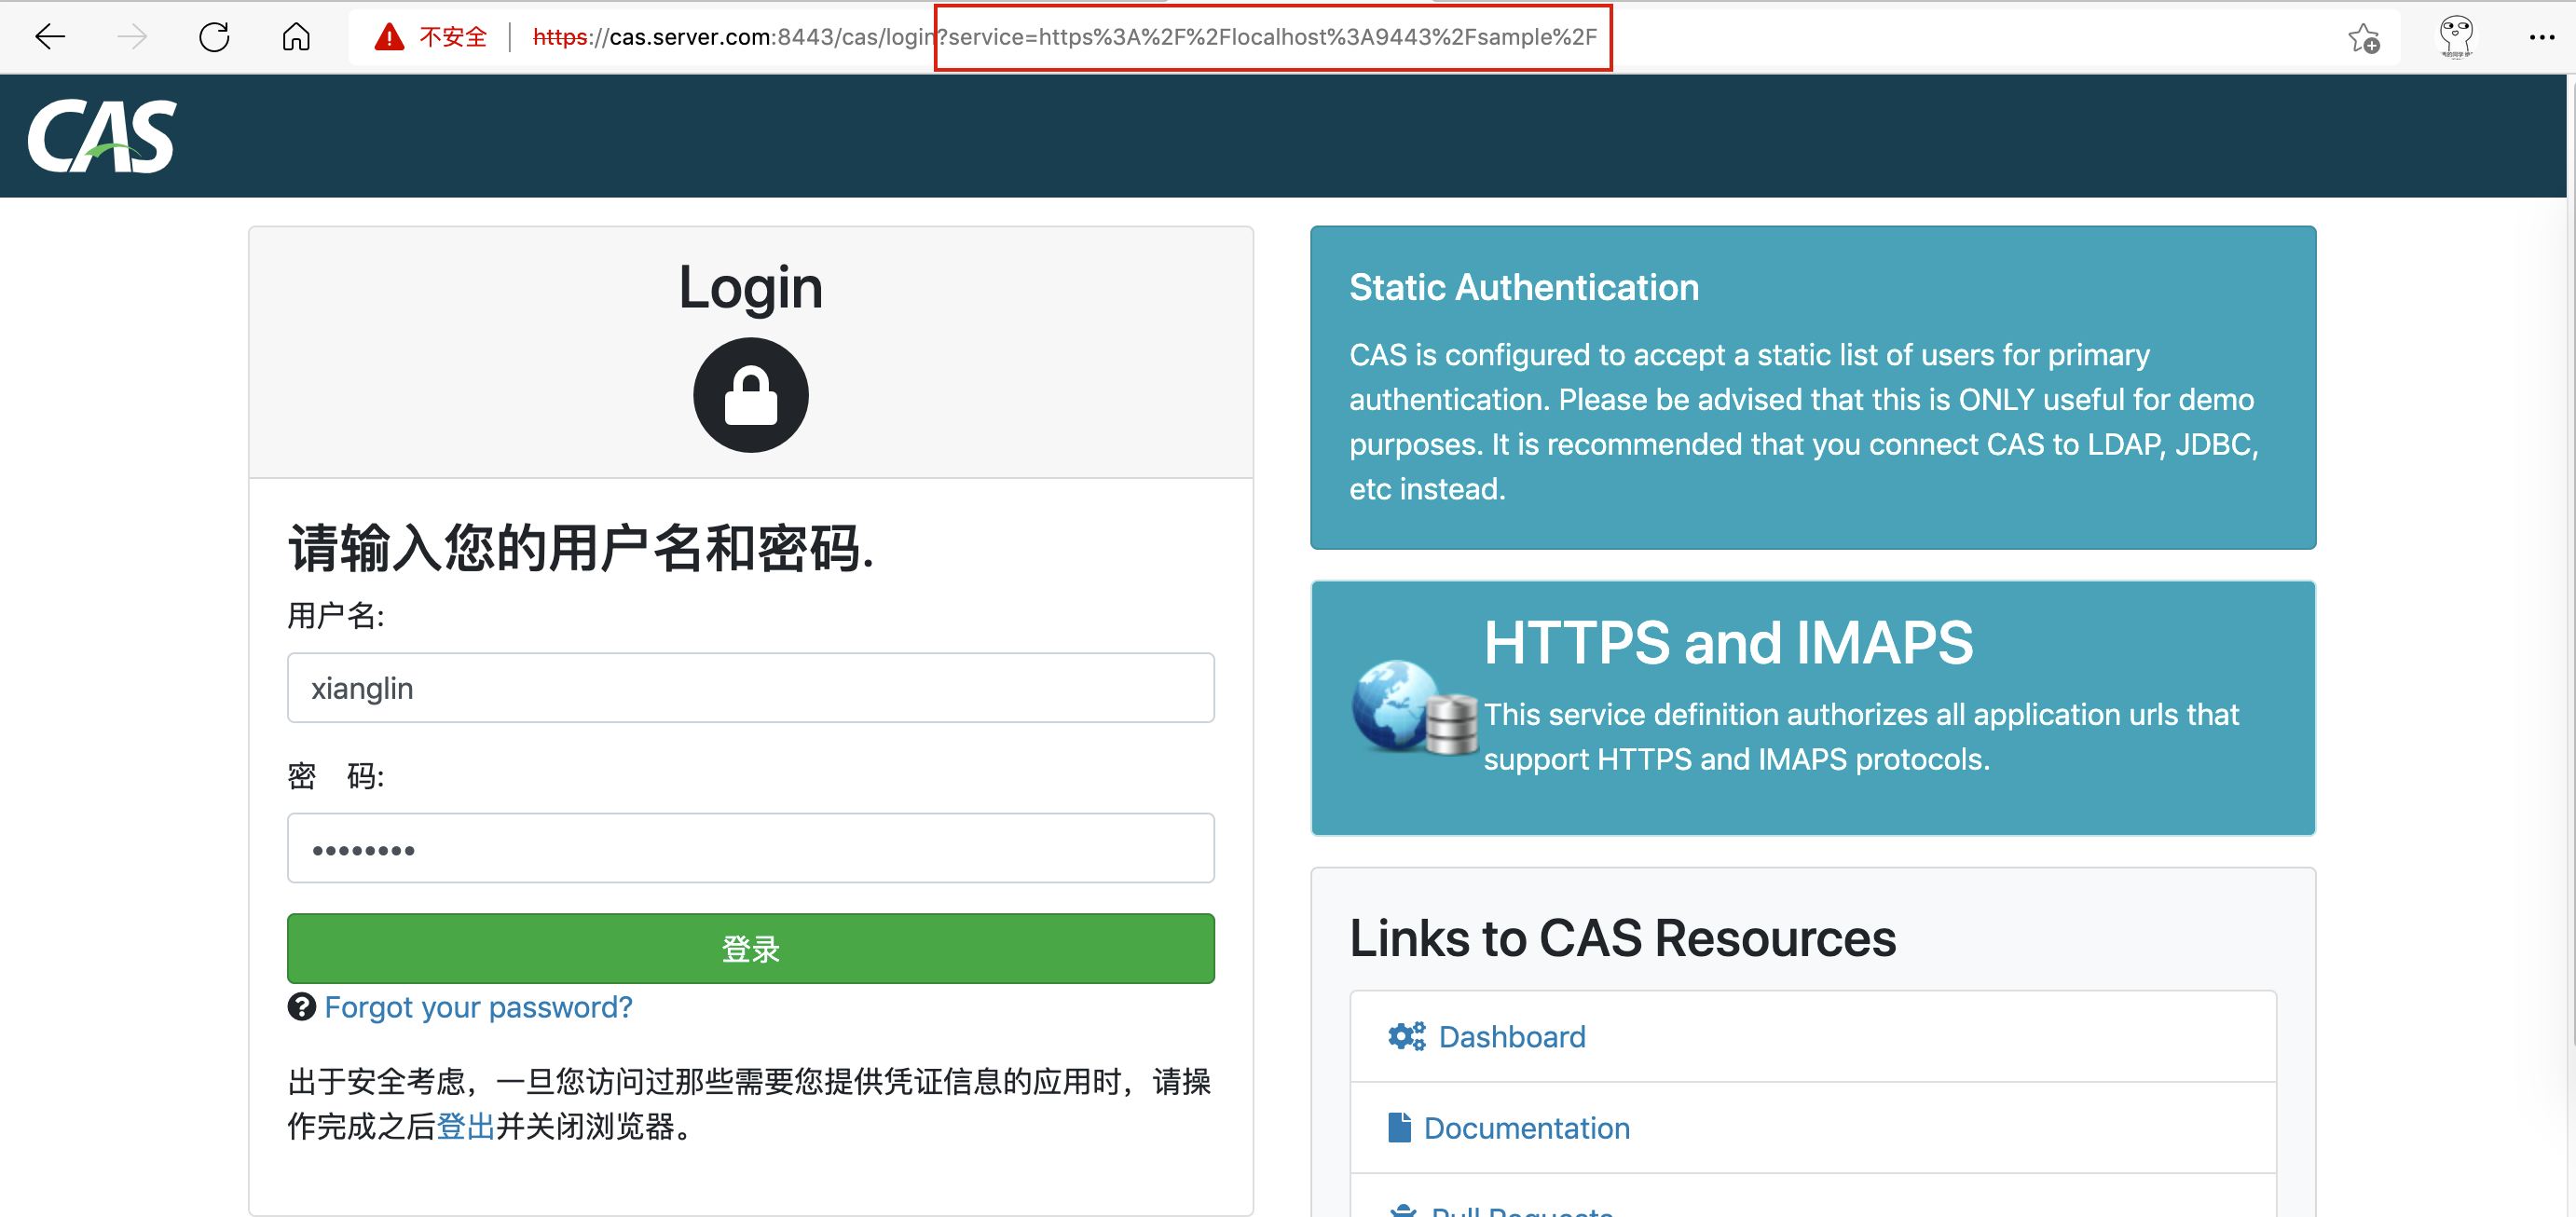
casServerLoginUrl,service参数值则是过滤器参数中配置的serverName,即认证后要跳转的地址。序号 932,CAS 服务器接收到登录请求,返回登录页面;
序号 956,用户输入口令后提交登录,CAS 服务器验证用户名密码是否有效(这里使用静态认证),如图;
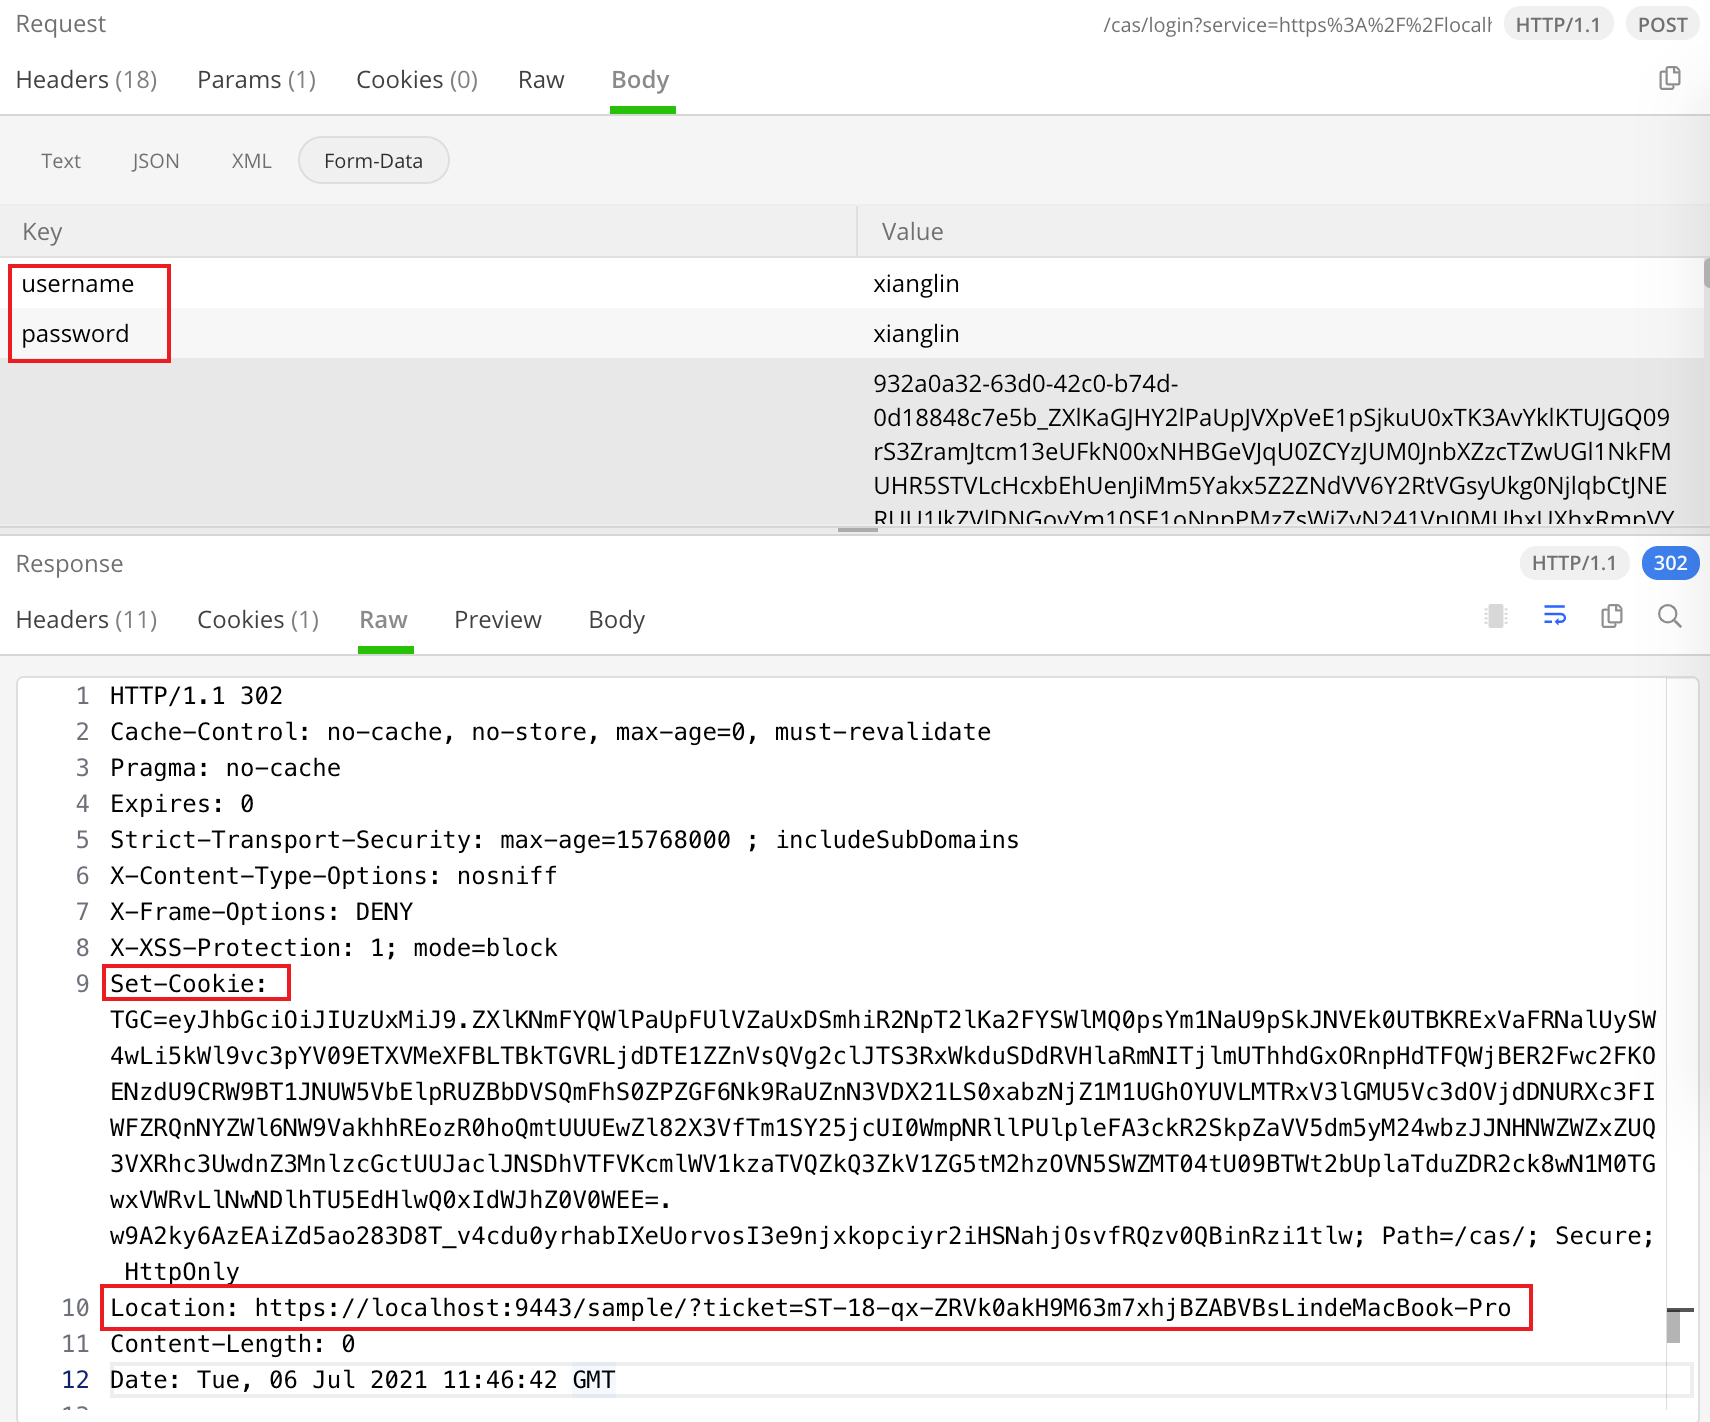
使用
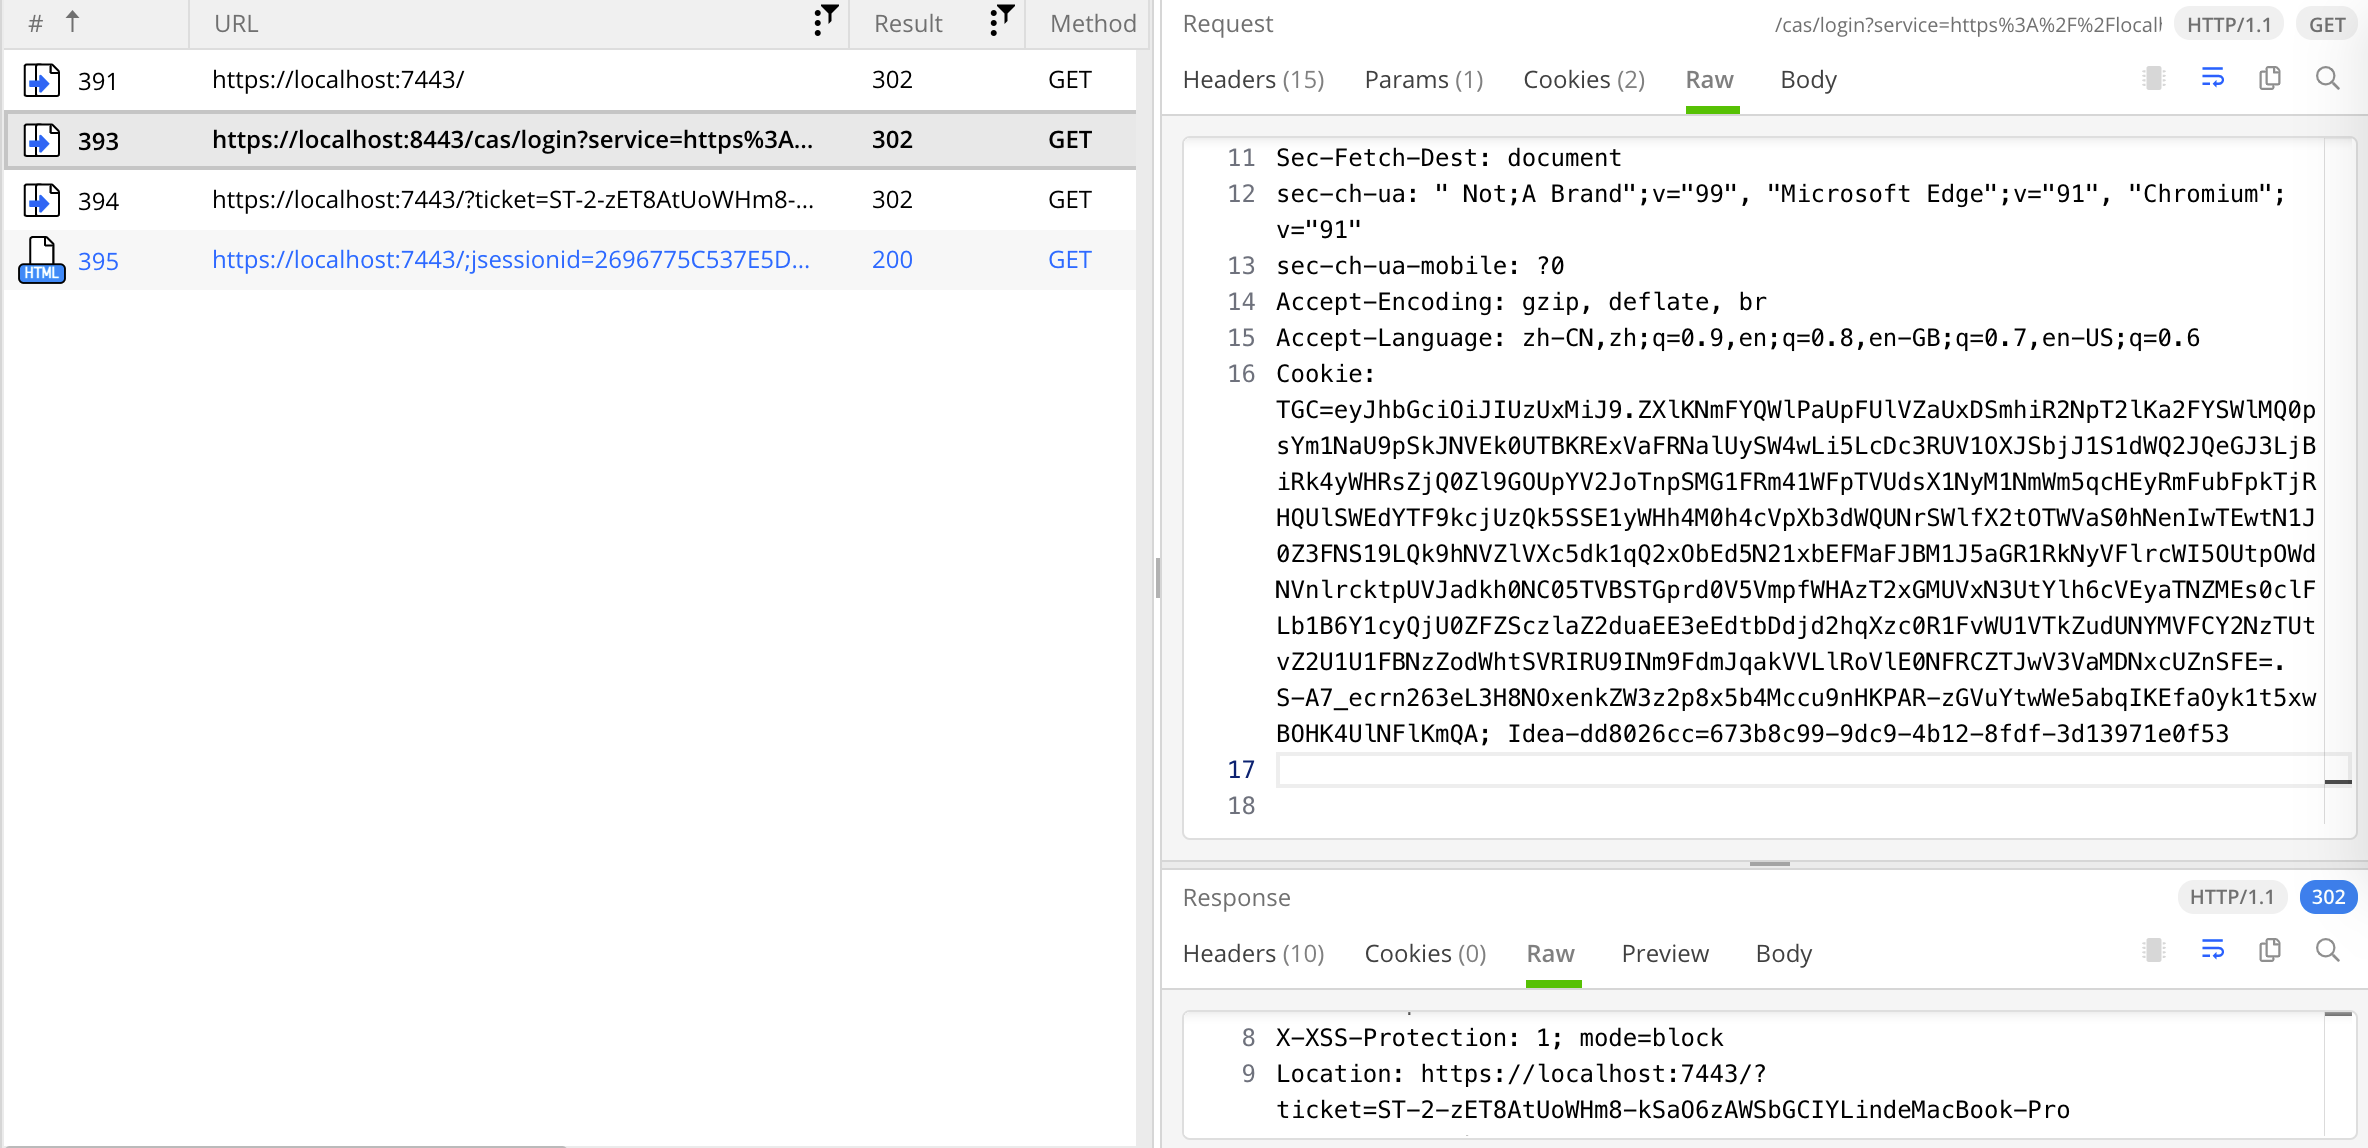
POST请求的方式提交登录表单,用户认证成功后,请求的响应码是 302,指示浏览器将请求重定向到最开始访问的地址。重定向的地址通过 querySpring 携带了一个ticket参数。同时会设置一个名为TGC的 Cookie,路径为/cas/。下次访问https://cas.server.com:8443时会携带这个 Cookie,服务器可以根据这个TGC,查找与之对应的TGT,从而判断用户是否认证过,是否需要展示登录页面。TGT与TGC的关系就像SESSION与 Cookie 中JSESSIONID的关系;序号 957,浏览器向
https://localhost:9443/sample/发起请求,请求携带 CAS 服务器签发的ST,localhost:9443在过滤器中获取到 ticket 值,通过 HTTP 请求的方式调用 CAS 服务验证该 ticket 是否有效,过滤器全称org.jasig.cas.client.validation.Cas30ProxyReceivingTicketValidationFilter,验证方法在org.jasig.cas.client.validation.AbstractUrlBasedTicketValidator#validate, 如图。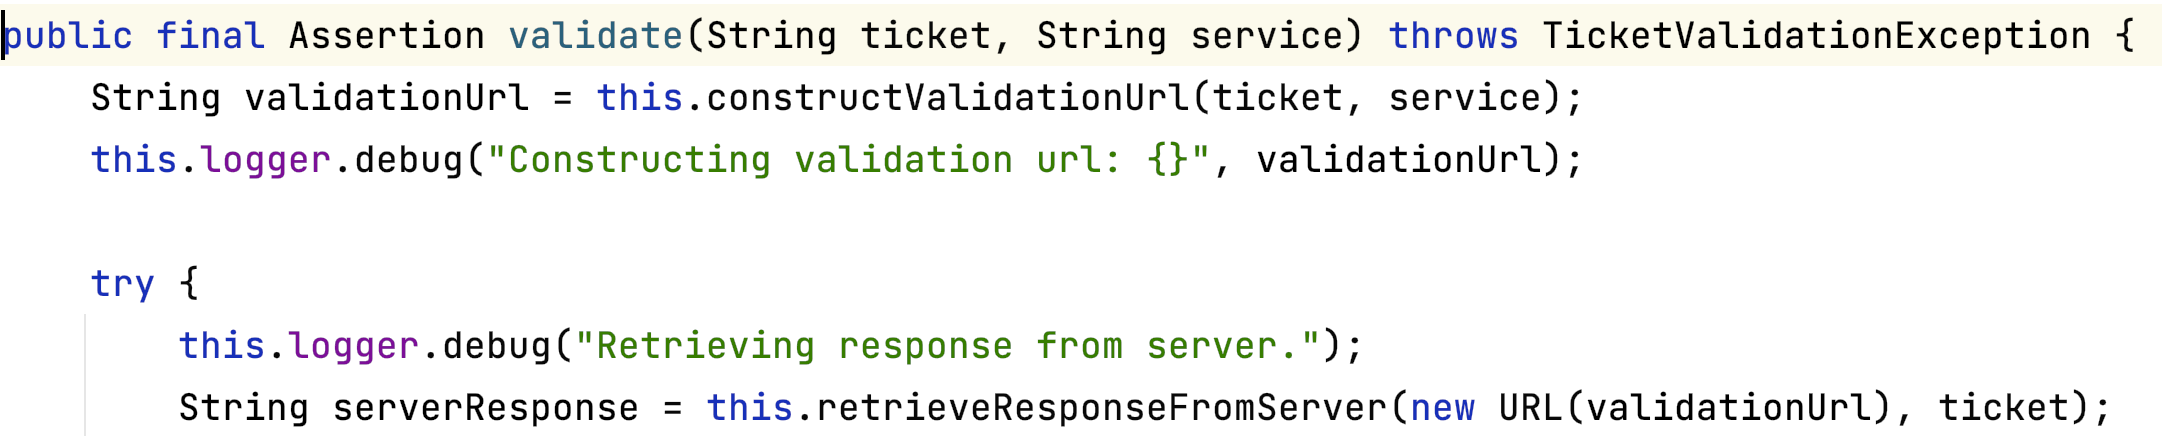
此时,CAS 服务器的日志如下图。

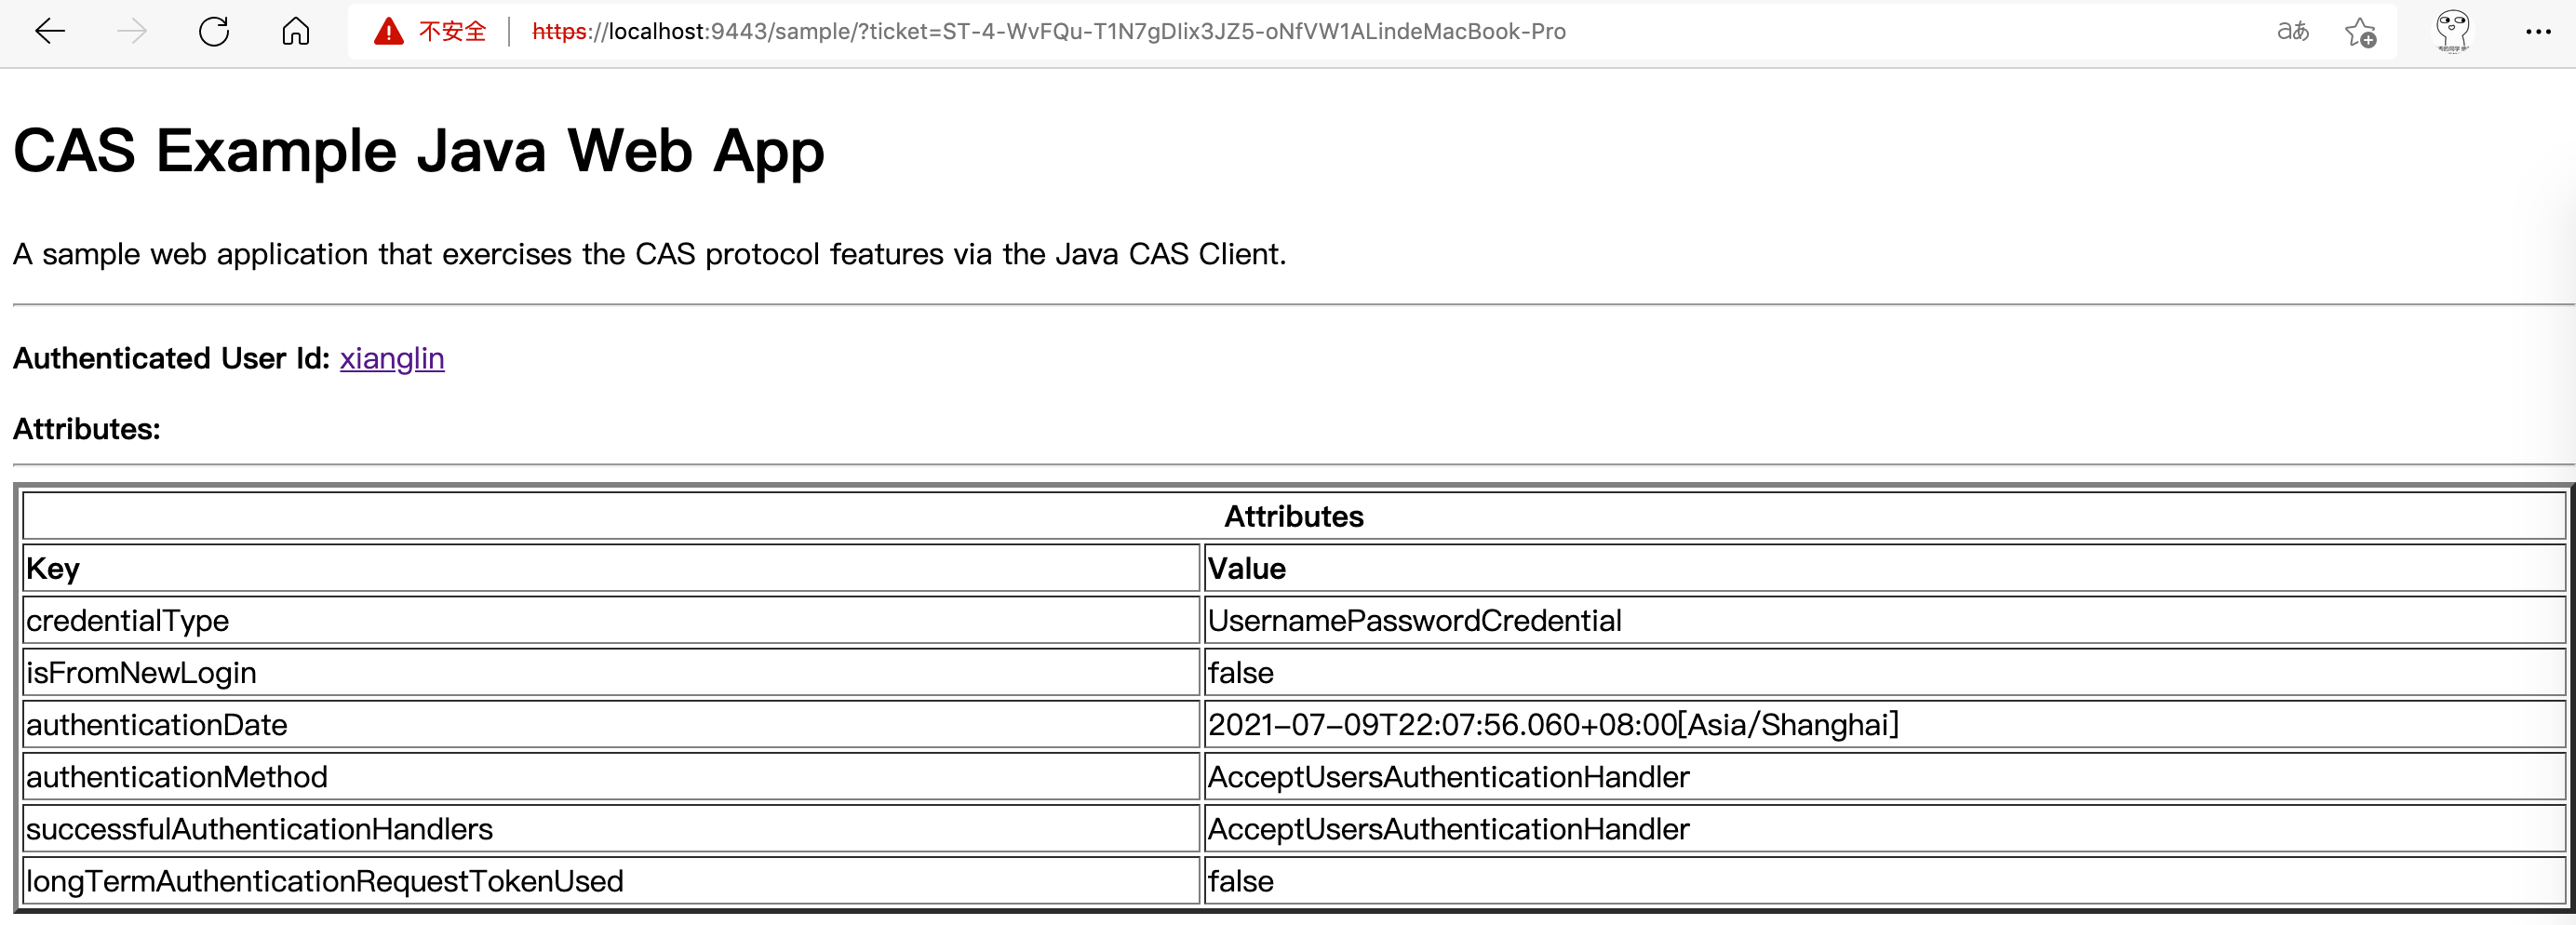
localhost:9443收到 CAS 服务器返回,知道用户合法,即可正常响应请求,展示页面,如图。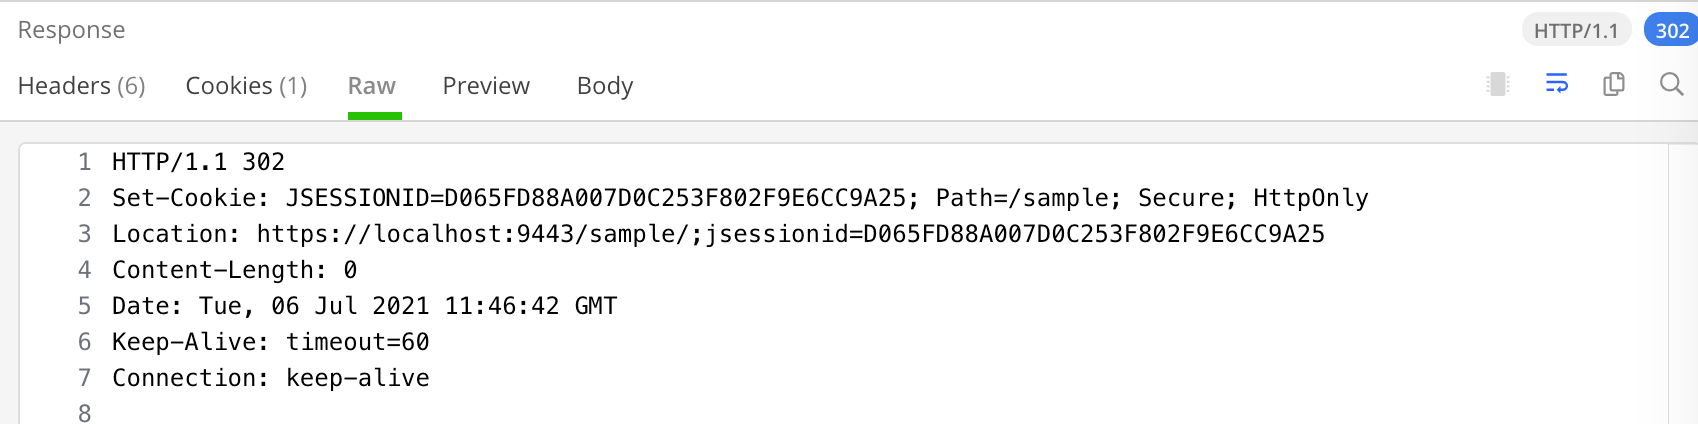
序号 958,
ST验证通过后再次重定向是在Cas30ProxyReceivingTicketValidationFilter过滤器中使用了redirectAfterValidation参数(默认为true),将其配置成false即可在验证用户后返回正常页面,如图。
再次认证流程
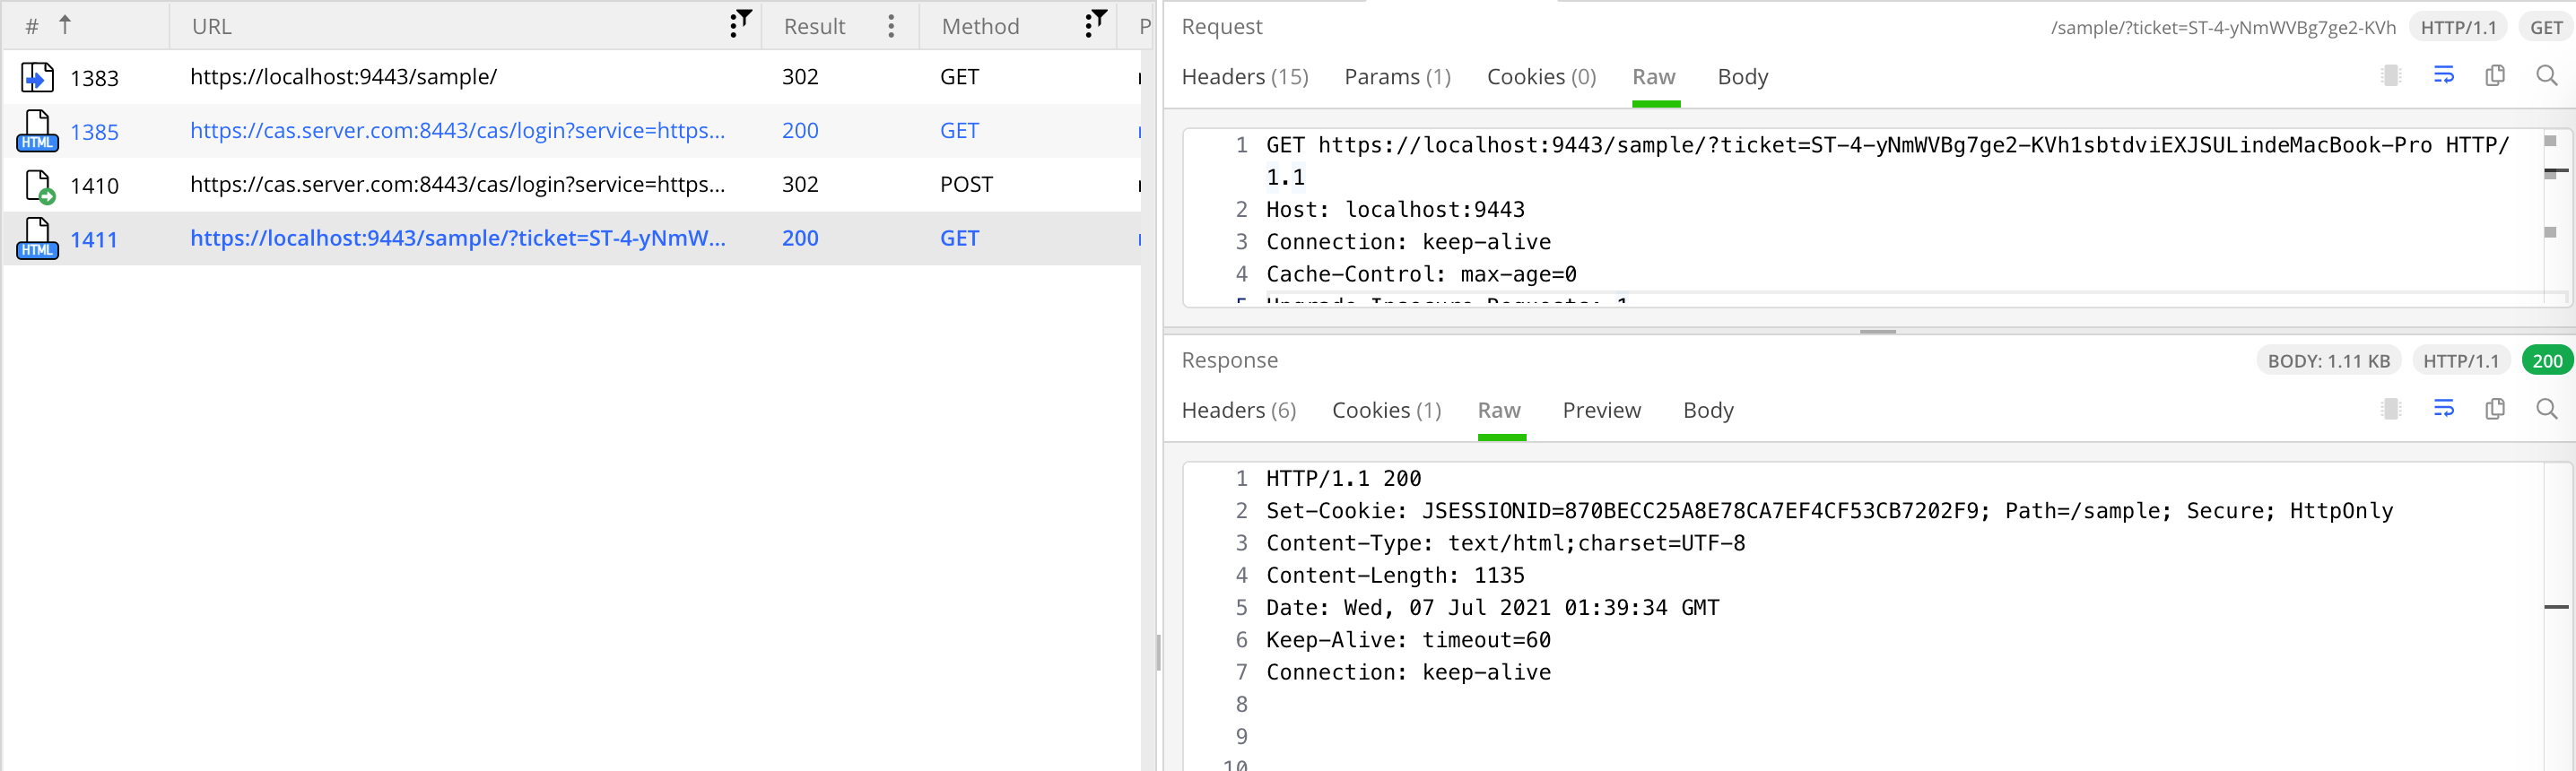
第一次访问 localhost:9443 的步骤已梳理完成,保持用户在 SSO 的会话,尝试访问 localhost:7443,观察其流程。请求重定向到 CAS 服务器时,携带了值为 TGC 的 Cookie。CAS 服务器通过此 TGC 查找到对应的 TGT,判断到用户已经登录,便不再展示登录页面,即少了 CAS 服务器登录这个步骤,剩余步骤和首次登录一致,如图。
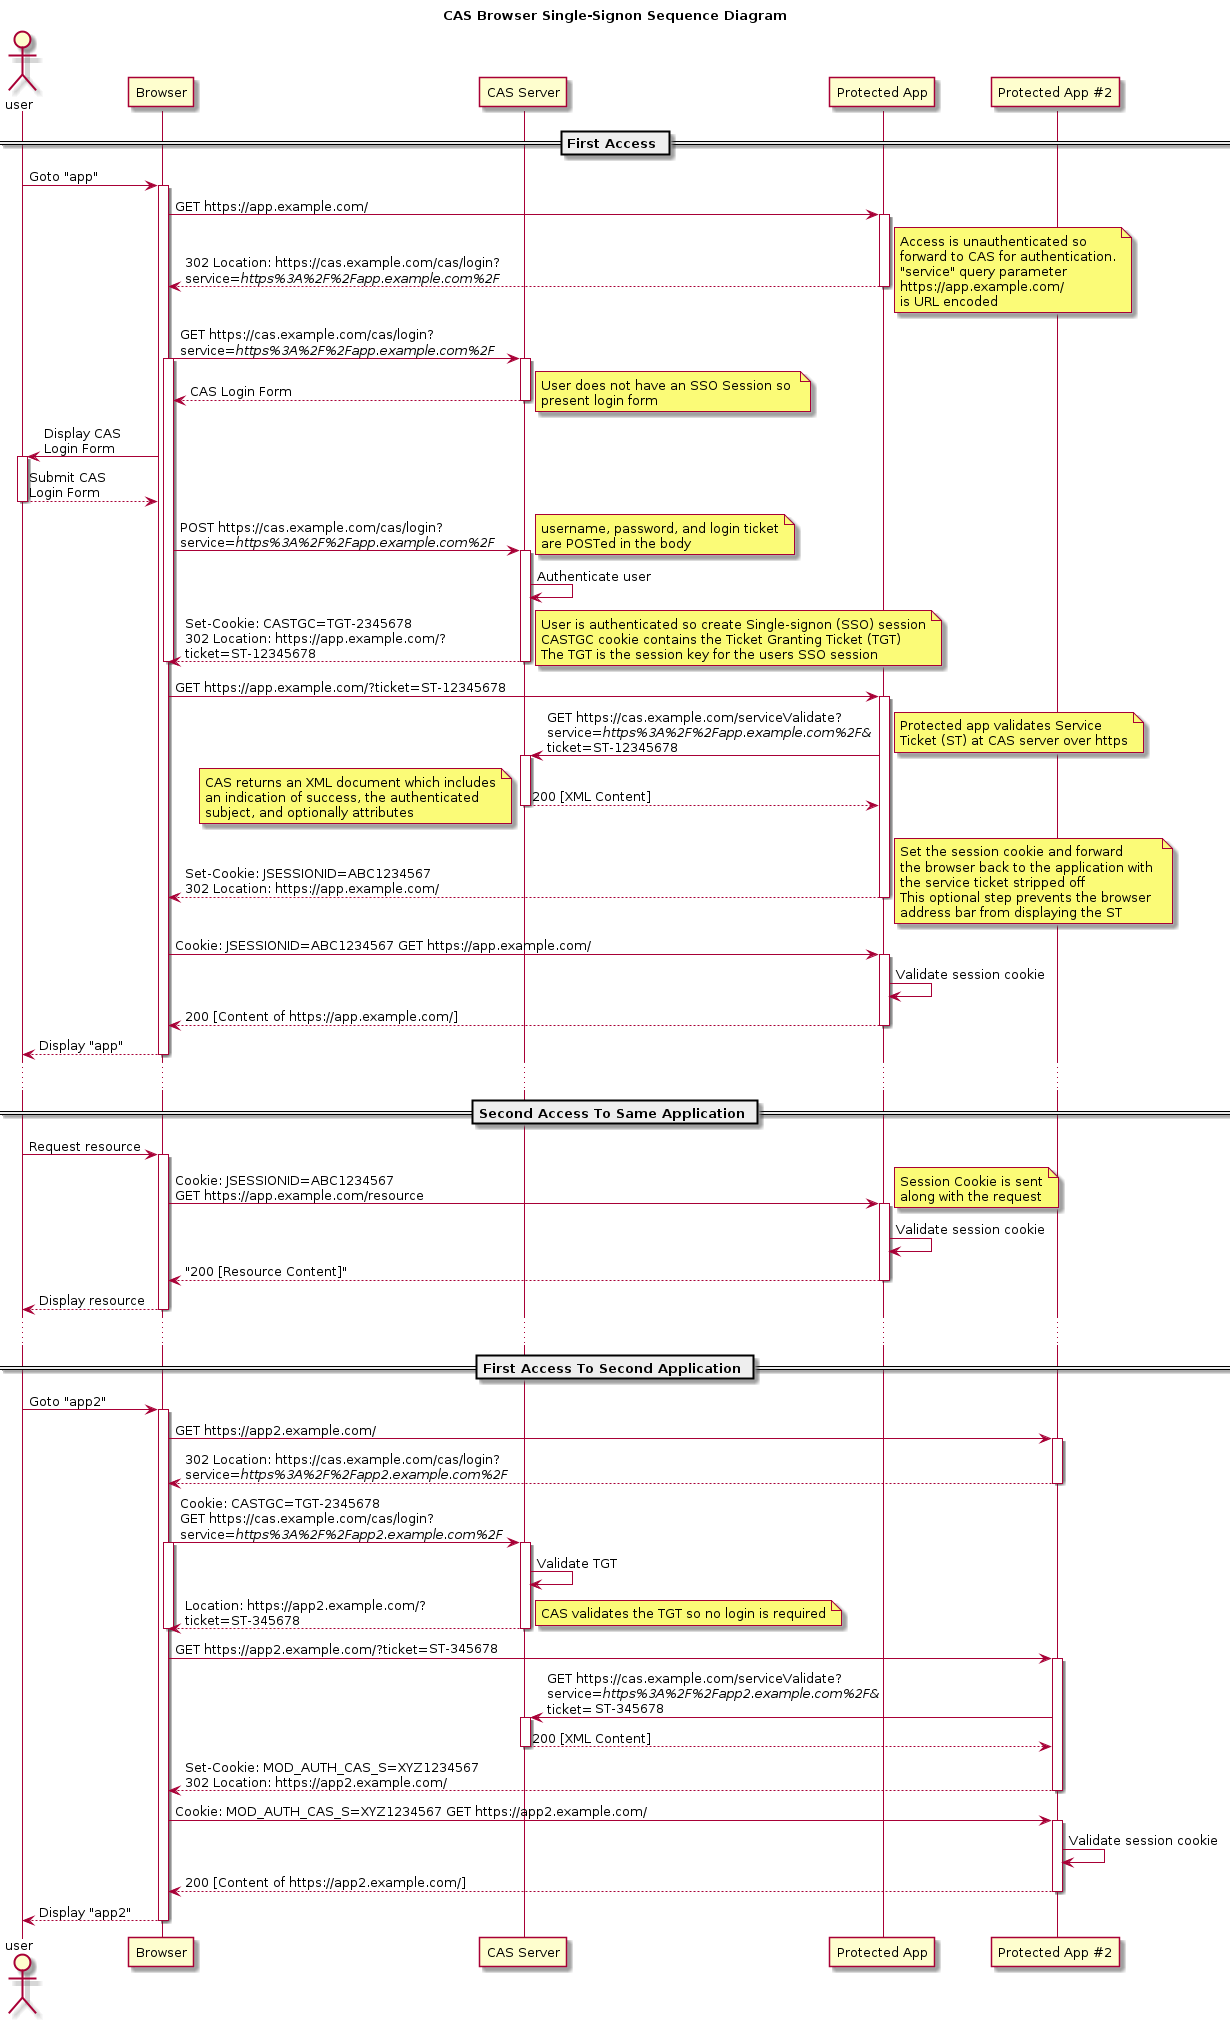
官方文档中的时序图如下,见 CAS - CAS Protocol。
模拟登录
示例代码见 Simulation.java
使用 HttpClient 模拟登录
分析首次登录流程可知,模拟登录时只需要处理好 CAS 认证、重定向到客户端两个步骤,就可以获取包含 JSESSIONID 的 Cookie,使用此 Cookie 便可以完成其它后续请求的模拟,模拟登录的简单示例代码如下:
public class Simulation {
    private static final String SERVER_LOGIN_URL = "https://cas.server.com:8443/cas/login";
    private static final String CLIENT_HOST_URL = "https://client1.server.com:7443/";
    private static final CloseableHttpClient client;

    static {
        client = HttpClients.createDefault();
    }

    /**
     * 模拟登录,返回包含 JSESSIONID 的 Cookie
     *
     * @param userName userName
     * @param password password
     * @return CookieValue
     * @throws IOException IOException
     */
    public String simulationLogin(String userName, String password) throws IOException {
        CloseableHttpResponse response;
        String url = SERVER_LOGIN_URL + "?service=" + CLIENT_HOST_URL;
        // 1、获取 CAS 登录页面
        HttpGet httpGet = new HttpGet(url);
        response = client.execute(httpGet);
        StatusLine statusLine = response.getStatusLine();
        int statusCode = statusLine.getStatusCode();
        if (HttpStatus.SC_OK != statusCode) {
            System.out.println("获取 CAS 登录页面返回错误!" + statusLine);
            return null;
        }
        String casLoginPageHtml = EntityUtils.toString(response.getEntity(), StandardCharsets.UTF_8);
        IOUtils.closeQuietly(response);
        // 使用 JSoup 解析表单
        Document document = Jsoup.parse(casLoginPageHtml);
        Element fm1Element = document.getElementById("fm1");
        Elements inputElements = fm1Element.getElementsByTag("input");
        // 提交参数
        List<NameValuePair> casLoginBody = new ArrayList<>(8);
        for (Element inputElement : inputElements) {
            String type = inputElement.attr("type");
            if ("submit".equals(type)) {
                continue;
            }
            String name = inputElement.attr("name");
            String value = inputElement.attr("value");
            if ("username".equals(name)) {
                value = userName;
            }
            if ("password".equals(name)) {
                value = password;
            }
            casLoginBody.add(new BasicNameValuePair(name, value));
        }
        // 2、提交登录表单
        HttpEntity loginEntity = new UrlEncodedFormEntity(casLoginBody, StandardCharsets.UTF_8);
        HttpPost httpPost = new HttpPost(url);
        httpPost.setEntity(loginEntity);
        response = client.execute(httpPost);
        statusLine = response.getStatusLine();
        if (HttpStatus.SC_MOVED_TEMPORARILY != statusLine.getStatusCode()) {
            System.out.println("登录 CAS 返回错误!" + statusLine);
            return null;
        }
        // 处理响应头
        Header cookie = response.getFirstHeader("Set-Cookie");
        System.out.println("cookie: " + cookie.getName() + " => " + cookie.getValue());
        Header location = response.getFirstHeader("Location");
        String locationUrl = location.getValue();
        System.out.println("locationUrl : " + locationUrl);
        IOUtils.closeQuietly(response);
        // 3、重定向到客户端
        httpGet = new HttpGet(locationUrl);
        response = client.execute(httpGet);
        statusLine = response.getStatusLine();
        if (HttpStatus.SC_MOVED_TEMPORARILY != statusLine.getStatusCode()) {
            System.out.println("登录客户端返回错误!" + statusLine);
            return null;
        }
        // 处理响应头,返回 Cookie
        cookie = response.getFirstHeader("Set-Cookie");
        System.out.println("cookie: " + cookie.getName() + " => " + cookie.getValue());
        location = response.getFirstHeader("Location");
        locationUrl = location.getValue();
        System.out.println("locationUrl : " + locationUrl);
        IOUtils.closeQuietly(response);
        return cookie.getValue();
    }
}
常见问题
忽略 SSL 证书
CAS 默认不支持 HTTP 请求,使用 HttpClient 模拟登录时可能会遇到如下错误:
Exception in thread "main" javax.net.ssl.SSLHandshakeException: PKIX path building failed: sun.security.provider.certpath.SunCertPathBuilderException: unable to find valid certification path to requested target
	at java.base/sun.security.ssl.Alert.createSSLException(Alert.java:131)
.........
Caused by: sun.security.validator.ValidatorException: PKIX path building failed: sun.security.provider.certpath.SunCertPathBuilderException: unable to find valid certification path to requested target
	at java.base/sun.security.validator.PKIXValidator.doBuild(PKIXValidator.java:439)
有两种方式解决这个问题:
使用如下语句将证书导入 JVM 的证书库:
keytool -import -keystore "JAVA_HOME/jre/lib/security/cacerts" -file <path-to-cert> -alias cas -storepass changeit设置 HttpClient 忽略 SSL 证书,如示例代码如下:
static {
  // client = HttpClients.createDefault();
  SSLContext sslContext;
  try {
    sslContext = SSLContexts.custom().loadTrustMaterial(null, new TrustStrategy() {
      @Override
      public boolean isTrusted(X509Certificate[] x509Certificates, String s) throws CertificateException {
        // 返回 true 即忽略认证
        return true;
      }
    }).build();
  } catch (Exception e) {
    throw new RuntimeException(e);
  }
  client = HttpClients
    .custom()
    .setSslcontext(sslContext)
    .build();
}
忽略主机名称验证
HttpClient 在 SSL 握手时会验证对方主机名称,防止链接被重定向到其他地址上去,若服务器证书上的 HostName 和实际访问的 URL 不匹配时,会抛出如下异常:
Exception in thread "main" javax.net.ssl.SSLPeerUnverifiedException: Host name 'client1.server.com' does not match the certificate subject provided by the peer (CN=cas.server.com, OU=Unknown, O=Unknown, L=Unknown, ST=Unknown, C=Unknown)
这里是因为 CAS 登录后会重定向到客户端 client1.server.com,可以通过如下配置忽略这个问题,参考 Host name does not match the certificate subject provided by the peer - Stack Overflow:
static {
    // client = HttpClients.createDefault();
    client = HttpClients.custom()
    .setSSLHostnameVerifier(NoopHostnameVerifier.INSTANCE)
    .build();
}
NoopHostnameVerifier 在 verify 方法中返回 true 忽略主机名验证。
public boolean verify(String s, SSLSession sslSession) {
    return true;
}
关闭 HttpClient 自动重定向
simulationLogin 方法期望返回 client.server.com 响应头中的 Cookie 信息,实际执行时控制台打印如下。
cookie: Set-Cookie => TGC=eyJhbGciOiJIUzUxMiJ9.ZXlKNmFYQWlPaUpFUlVZaUxDSmhiR2NpT2lKa2FYSWlMQ0psYm1NaU9pSkJNVEk0UTBKRExVaFRNalUySW4wLi5lZGRGZVhZT3A1ekVscy10aTFlRFhnLm1wemwtdnFxMEo0UDM2cGp3SFZnMTN4cVc3UWxlUUtfSzdhNkFOUHI4TFkwRFZDUnYzby13VUE2V2FCMG1zamQ3OGVNcmh4MVAxTDdpdDZBMWhveUZ5dDJMZkxTTEpNbjRNa0dhT3lHTWxERjV5SXZhd0xvQWlxNVZsclR4S0dPY3J5S3FXMF9wdl9aa09TT3RoMmVuT2NLSFg4VkMzMkhiaENyRHFGcWdYNlBtQ2RZdUNRMWl6aUVYVTM5X2tMdy45RVdvbVgzaVBQbEhzd2lCQlB4Q1Zn.YKSYFjFhm1TXHOr1Bzrb3z9-oSDsGECpJK7kOMeTz4oAeOF8Nd2WYii6oV1kb9Bzat4w7NhPxUxjvLmPjoe8Jg; Path=/cas/; Secure; HttpOnly
locationUrl : https://client1.server.com:7443/?ticket=ST-16-eYyvOXKLcocogqqtv84HVwxhuuMLindeMacBook-Pro
登录客户端返回错误!HTTP/1.1 200
cookie => null
发现“3、重定向到客户端”这一步并没有像在“认证流程”中分析的那样返回 302 状态,而是直接返回 200,这是因为 HttpClient 默认自动处理重定向,可以通过 Fiddler 抓包观察到这一点。自动重定向后的请求返回响应头中并没有 Cookie 信息,想要获取 Cookie 可以配置 HttpClient 不自动重定向,代码如下。
static {
    // client = HttpClients.createDefault();
    final RequestConfig config = RequestConfig
    .custom()
    .setRedirectsEnabled(false)
    .build();
    client = HttpClients.custom()
    .setDefaultRequestConfig(config)
    .setSSLHostnameVerifier(NoopHostnameVerifier.INSTANCE)
    .build();
}
再次执行,即可获取到 Cookie 信息,如图。

HttpClient 自动重定向默认不支持 POST 请求,这也是有“3、重定向到客户端”这一步的原因,HttpClient 使用 RedirectStrategy 来完成重定向的处理,默认实现类 DefaultRedirectStrategy 中只允许 GET、HEAD方法的重定向,如果需要支持 POST 可以使用 LaxRedirectStrategy,代码如下。
client = HttpClients.custom()
  .setRedirectStrategy(LaxRedirectStrategy.INSTANCE)
  .build();
使用 Fillder 观察 HttpClient 请求
正常情况下 Fillder 是无法抓取 HttpClient 请求的,可以通过设置代理的方式,代码如下。
HttpHost httpHost = new HttpHost("127.0.0.1", 8866);
final RequestConfig config = RequestConfig.custom()
  .setRedirectsEnabled(false)
  .setProxy(httpHost)
  .build();
client = HttpClients.custom()
  .setDefaultRequestConfig(config)
  .setSSLHostnameVerifier(NoopHostnameVerifier.INSTANCE)
  .build();
获取 Cookie 信息
HttpClient 自动重定向时,可能无法在响应头中获取到 Cookie,而且自己解析请求头获取 Cookie 也比较繁琐。可以借助 CookieStore 来管理 Cookie,代码如下。
final CookieStore cookieStore = new BasicCookieStore();
client = HttpClients.custom()
  .setDefaultCookieStore(cookieStore)
  .build();

// 遍历 Cookie
List<Cookie> cookieList = cookieStore.getCookies();
for (Cookie cookie1 : cookieList) {
  System.out.println(cookie1.getName() + " => " + cookie1.getValue() + " => " + cookie1.getPath());
}
打印结果如下,第一个是 client1.server.com 的 Cookie,第二个是 cas.server.com 的 Cookie。
JSESSIONID => A07EF954C7591C5F1F724EFAA8141E86 => /
TGC => eyJhbGciOiJIUzUxMiJ9.ZXlKNmFYQWlPaUpFUlVZaUxDSmhiR2NpT2lKa2FYSWlMQ0psYm1NaU9pSkJNVEk0UTBKRExVaFRNalUySW4wLi4ycXMwX2lJZzYya1o1bDN5alcyTFpnLnVjOWdlR2VlbjJpM3lmdTZQd25jYzZqLUxpOThGNk5zTzE4d2NFaHBvdmI3REMtaG16TmVEbXhhNGhpVDJNU2FqWUdsNU5CSm16d3FfVkgzVFZCZG9rcG5HUFVBZkkyUE1LZ2pkOWthMTZYOVlfdnE1S3ZwdWlSdmE3QTJSSTlWM0pBS3IzS2p6aUVIUUpLQUQzLTM0Rmd3R3VQVUViak5LM3psZHA1UnVfRlktS0lMUmZPaFNYd2tqaF9wbGRiVS42Uy1CWTFTaUozNkN5b2tEV2VsbzVR.CsMVzXEYTWg5v7Oyh_DvosrY4mhFaqWTUqyn5Vzg2Spx3EMwhul12u9sovG8HS5lh73T5bKshw8UUtL82elLnQ => /cas/
借助 Postman 简化编码
遇到不会写或者代码繁杂的请求,可以借助 Postman 的示例代码快速完成开发。比如我不会使用 HttpClient 上传文件,可以先使用 Postman 完成文件上传接口的验证,如图:
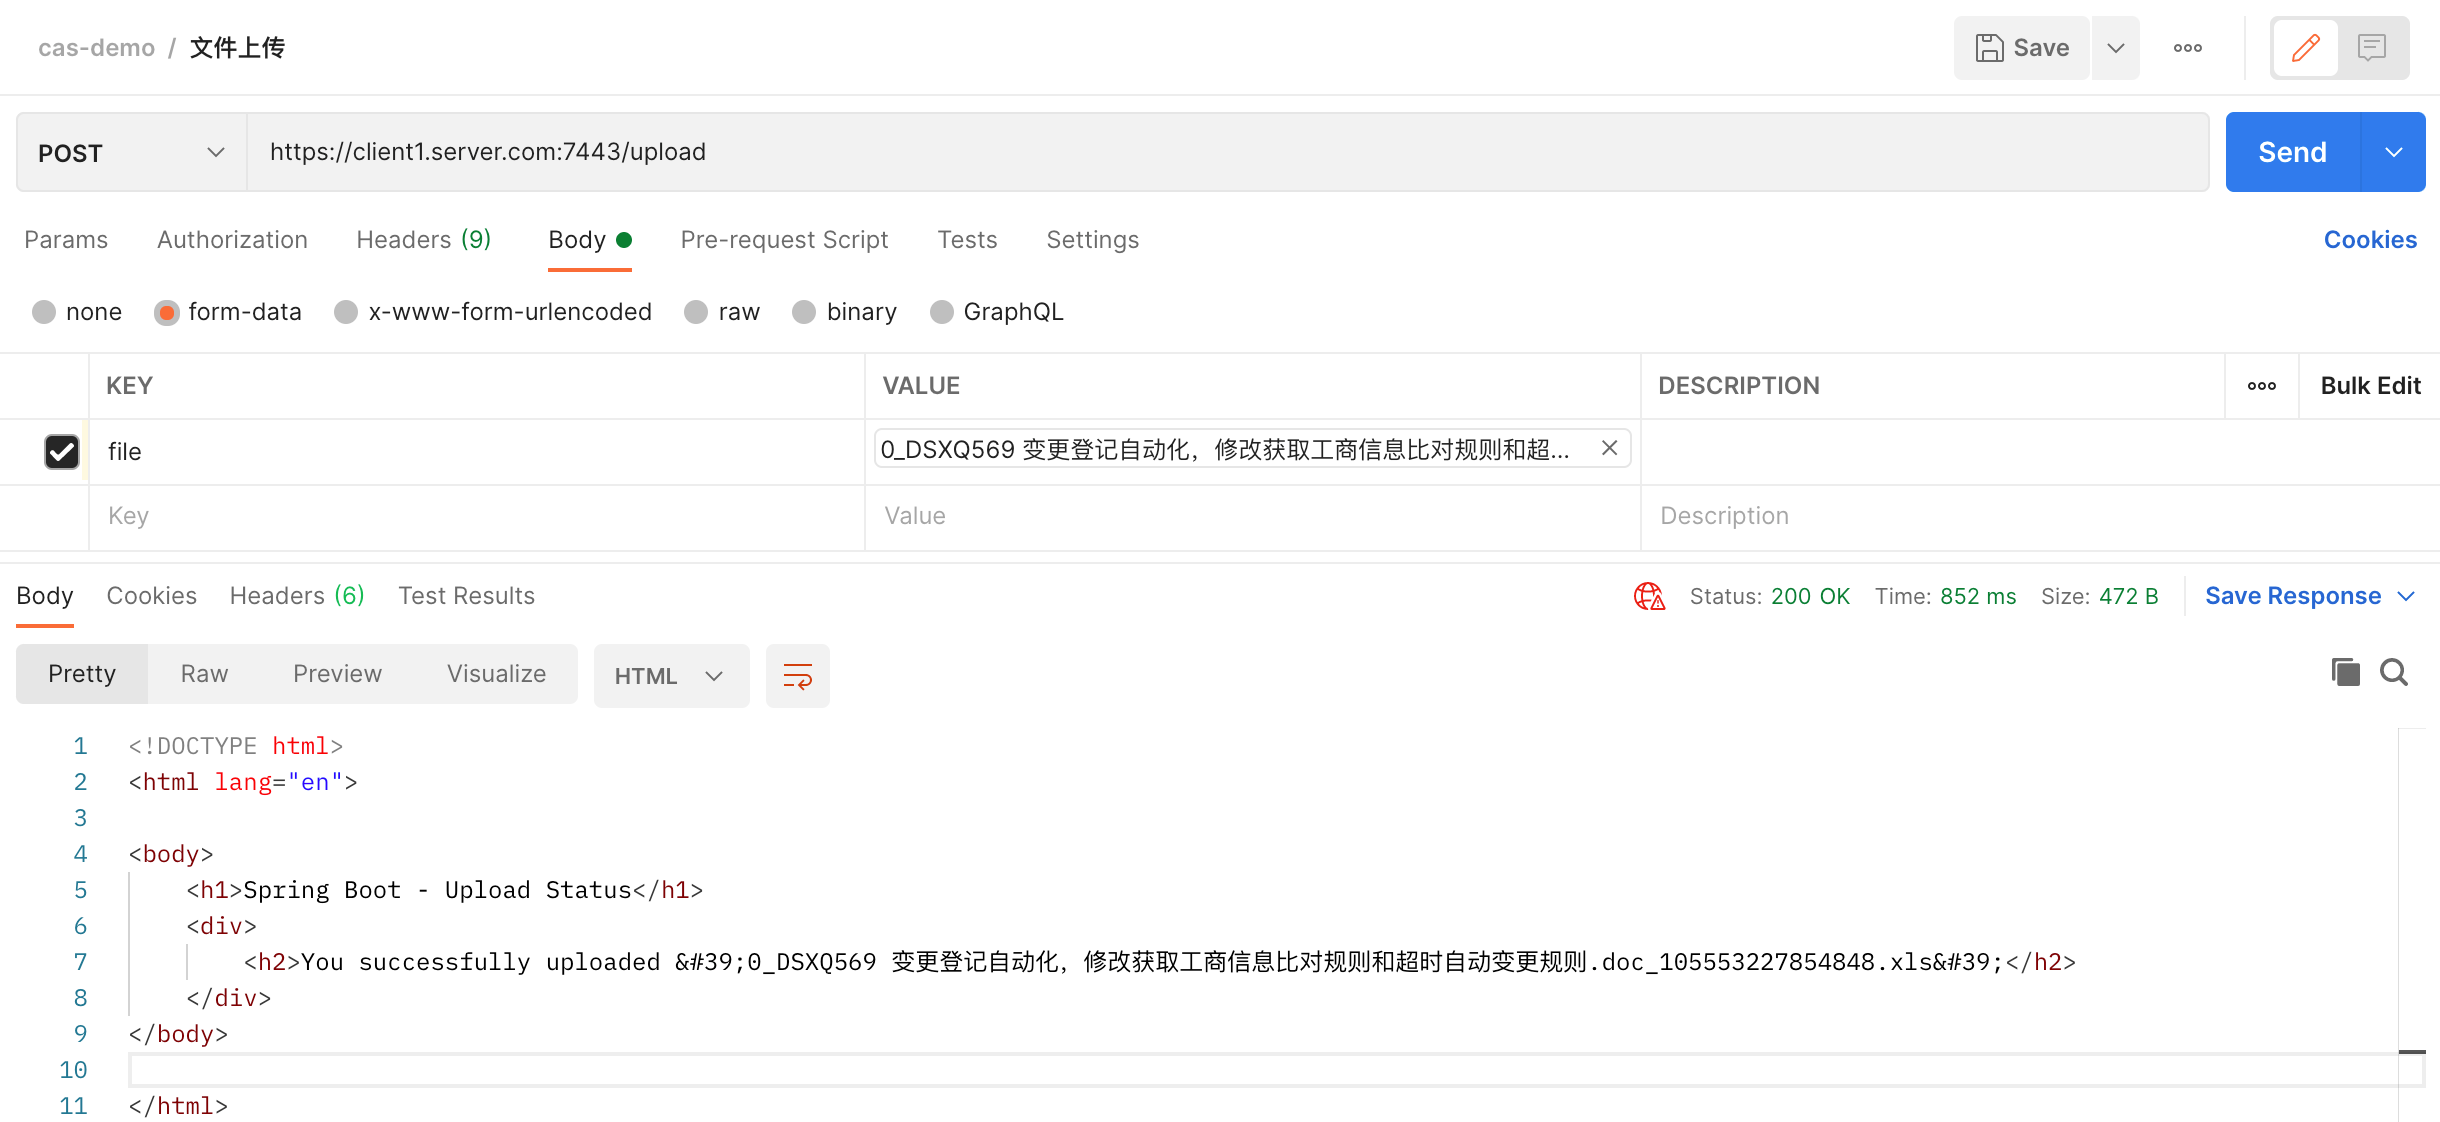
在右侧工具栏找到 Code 标签,在 Code snippet 中选择 “Java - OkHttp”,即可复用代码,如图。

将其复制到自己的代码中,简化开发,Cookie 可以使用上面提到的方法获取,详细代码如下。
public void upload(String cookie, String filePath) throws IOException {
  OkHttpClient client = new OkHttpClient().newBuilder().hostnameVerifier(NoopHostnameVerifier.INSTANCE)
    .build();
  RequestBody body = new MultipartBody.Builder().setType(MultipartBody.FORM)
    .addFormDataPart("file", filePath.substring(filePath.lastIndexOf("/")),
                     RequestBody.create(MediaType.parse("application/octet-stream"),
                                        new File(filePath)))
    .build();
  Request request = new Request.Builder()
    .url(CLIENT_HOST_URL + "upload")
    .method("POST", body)
    .addHeader("Cookie", cookie)
    .build();
  Response response = client.newCall(request).execute();
  ResponseBody responseBody = response.body();
  if (responseBody != null) {
    String string = responseBody.string();
    System.out.println(string);
  }
  IOUtils.closeQuietly(response);
  IOUtils.closeQuietly(responseBody);
}
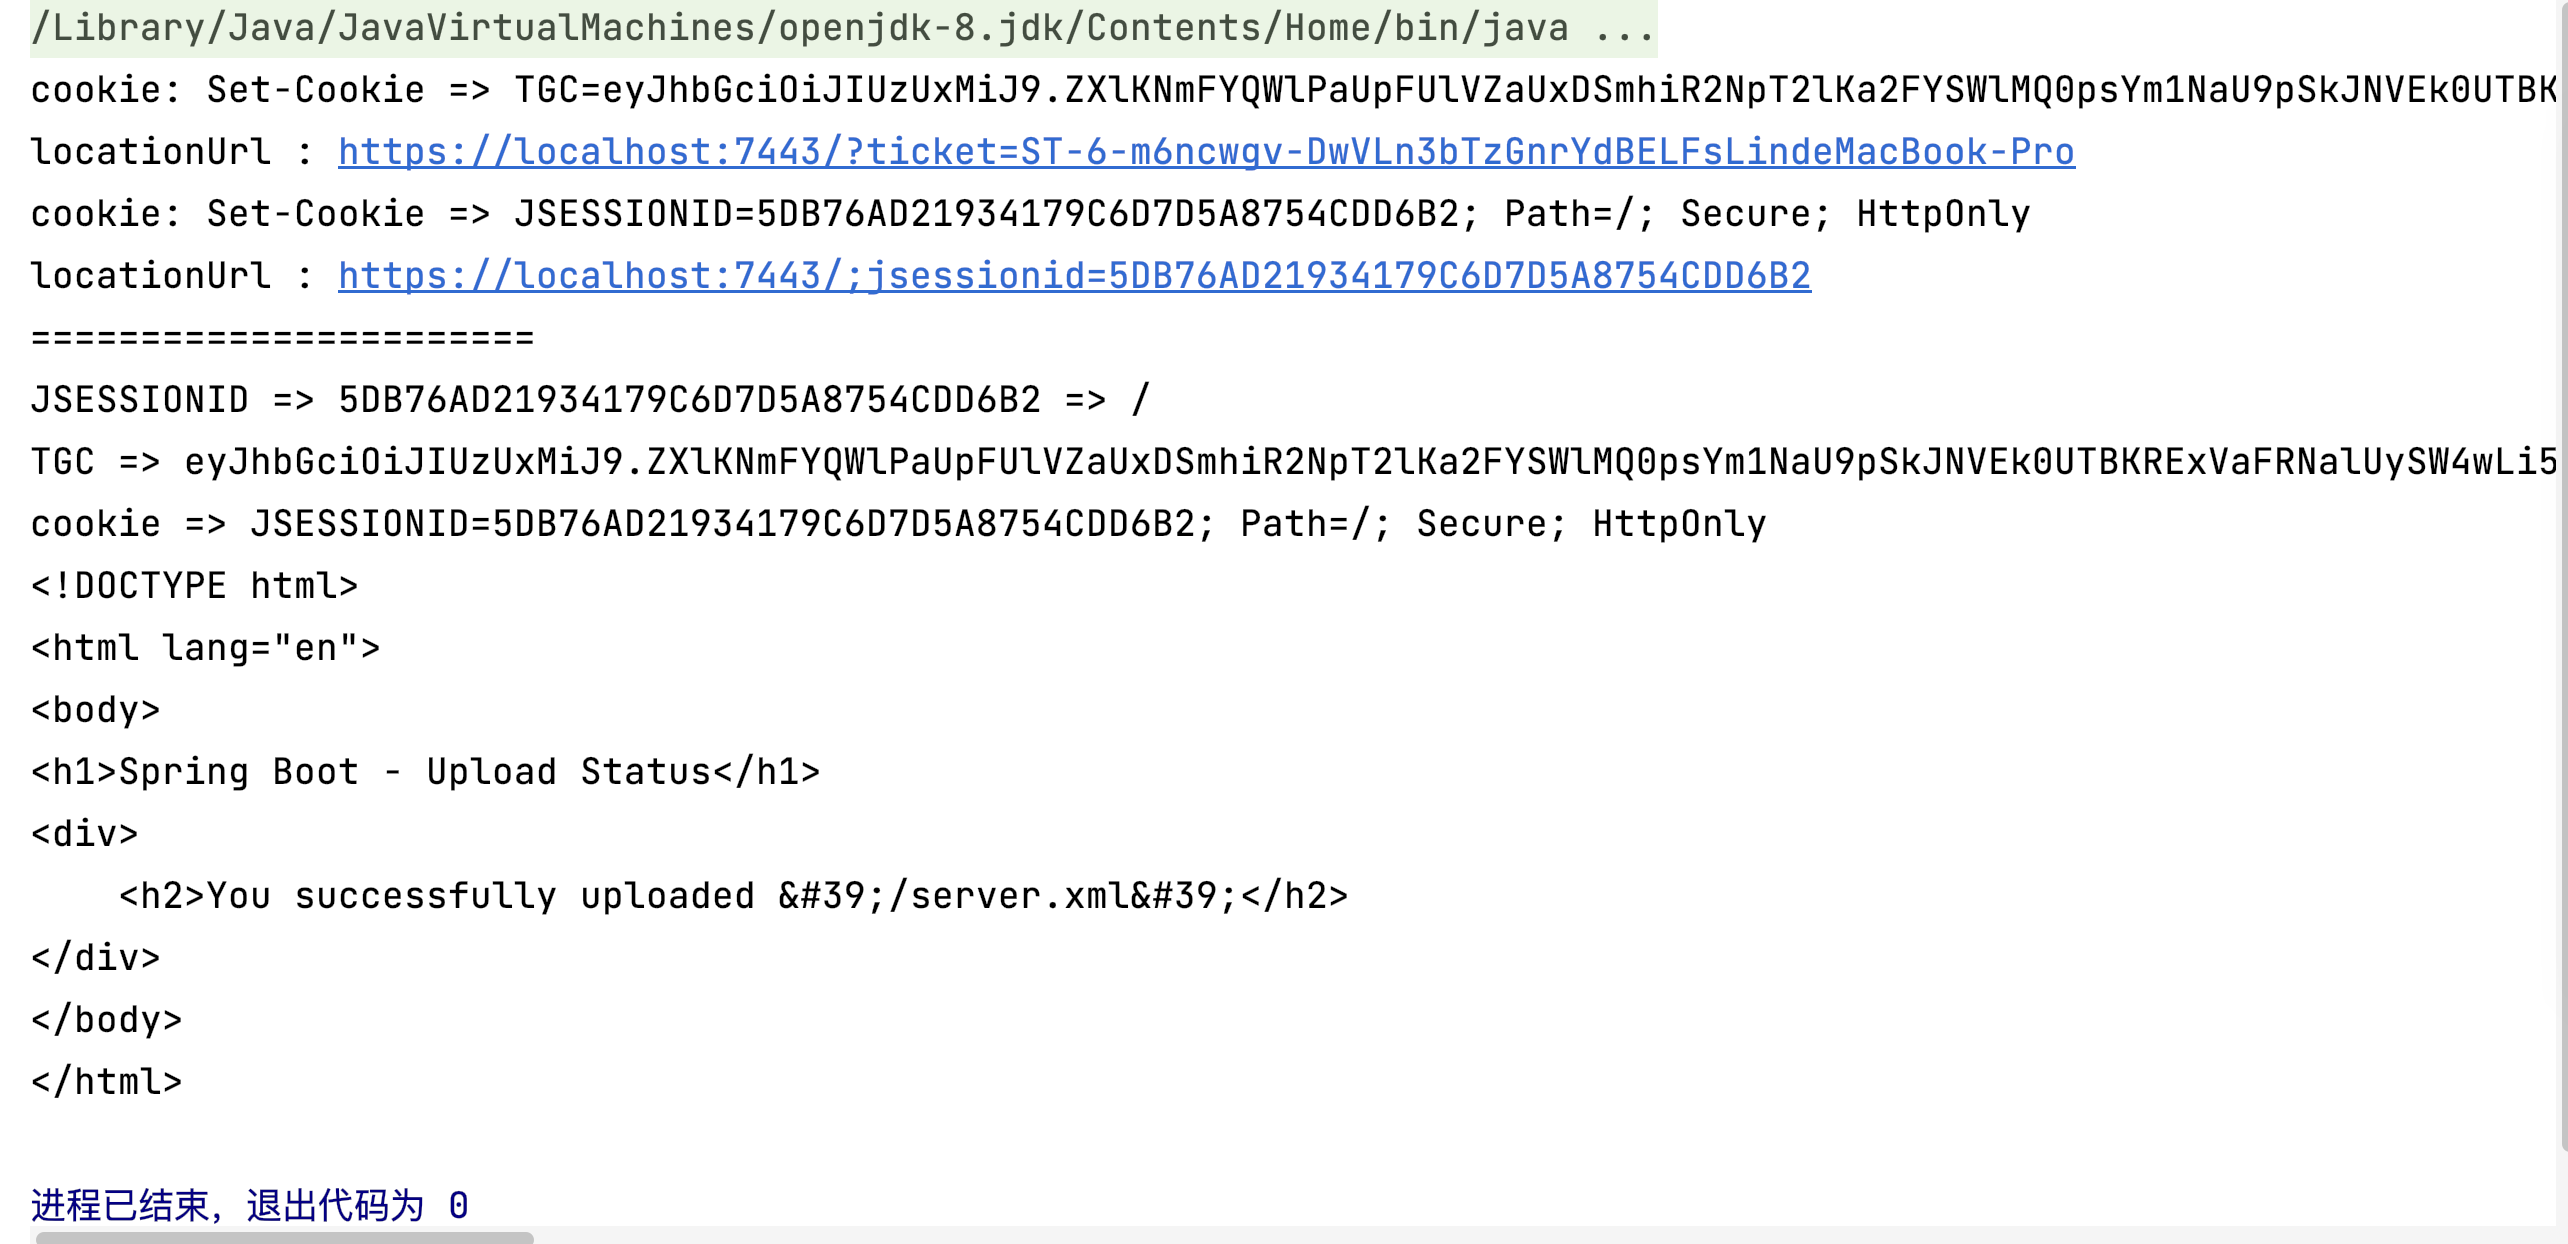
配合 simulationLogin() 方法可以完整的实现模拟 CAS 登录并上传文件的需求,结果如图:
public class App {
    public static void main(String[] args) throws IOException {
        String filePath = "/Users/linxiang/Documents/cas/cas-demo/server.xml";
        Simulation simulation = new Simulation();
        String cookie = simulation.simulationLogin("xianglin", "xianglin");
        System.out.println("cookie => " + cookie);
        simulation.upload(cookie, filePath);
    }
}