Hadoop
Hadoop 适合海量数据的分布式存储和分布式计算框架。
Hadoop Common:支持其他 Hadoop 模块的通用实用程序。
Hadoop HDFS:一种分布式文件系统,可提供对应用程序数据的高吞吐量访问。
Hadoop YARN:用于作业调度和集群资源管理的框架。
Hadoop MapReduce:基于 YARN 的系统,用于并行处理大数据集。
Hadoop 伪分布式安装
下载 Hadoop 安装包和 Java 安装包。
https://archive.apache.org/dist/hadoop/common/
https://archive.apache.org/dist/hadoop/common/hadoop-3.2.0/hadoop-3.2.0.tar.gz
将路径添加到环境变量中。
# .bashrc
export JAVA_HOME=/root/hadoop/jdk8u432-b06
export HADOOP_HOME=/root/hadoop/hadoop-3.2.0
export PATH=$PATH:$JAVA_HOME/bin:$HADOOP_HOME/bin:$HADOOP_HOME/sbin
配置以 HADOOP_HOME 为相对路径
按伪分布式运行修改配置文件。
# etc/hadoop/hadoop-env.sh
export JAVA_HOME=/root/hadoop/jdk8u432-b06
export HADOOP_LOG_DIR=/root/hadoop/hadoop_repo/logs/hadoop
<!-- etc/hadoop/core-site.xml -->
<configuration>
    <property>
        <name>fs.defaultFS</name>
        <value>hdfs://debian101:9000</value>
    </property>
    <property>
    	<name>hadoop.tmp.dir</name>
    	<value>/root/hadoop/hadoop_repo</value>
    </property>
</configuration>

<!-- etc/hadoop/hdfs-site.xml -->
<configuration>
    <property>
        <name>dfs.replication</name>
        <value>1</value>
    </property>
</configuration>

<!-- etc/hadoop/mapred-site.xml -->
<configuration>
    <property>
        <name>mapreduce.framework.name</name>
        <value>yarn</value>
    </property>
</configuration>

<!-- etc/hadoop/yarn-site.xml -->
<configuration>
    <property>
        <name>yarn.nodemanager.aux-services</name>
        <value>mapreduce_shuffle</value>
    </property>
    <property>
        <name>yarn.nodemanager.env-whitelist</name>
        <value>JAVA_HOME,HADOOP_COMMON_HOME,HADOOP_HDFS_HOME,HADOOP_CONF_DIR,CLASSPATH_PREPEND_DISTCACHE,HADOOP_YARN_HOME,HADOOP_MAPRED_HOME</value>
    </property>
</configuration>
修改启动配置。
# sbin/start-dfs.sh
HDFS_DATANODE_USER=root
HDFS_DATANODE_SECURE_USER=hdfs
HDFS_NAMENODE_USER=root
HDFS_SECONDARYNAMENODE_USER=root

# sbin/start-yarn.sh
YARN_RESOURCEMANAGER_USER=root
HADOOP_SECURE_DN_USER=yarn
YARN_NODEMANAGER_USER=root
启动 Hadoop。
# 格式化文件系统
bin/hdfs namenode -format
# 启动
sbin/start-all.sh
验证启动效果。
http://192.168.56.101:9870/dfshealth.html#tab-overview
http://192.168.56.101:8088/cluster
HDFS
HDFS 命令行工具。
# 帮助命令
bin/hdfs dfs -help

# 从本地上传文件
bin/hdfs dfs -put README.txt /

# 列出文件
bin/hdfs dfs -ls /

# 查看文件内容
bin/hdfs dfs -cat /README.txt

# 下载文件到本地
bin/hdfs dfs -get /README.txt README.txt.bak

# 创建文件夹
bin/hdfs dfs -mkdir /test

# 删除文件
bin/hdfs dfs -rm /README.txt
Java 代码操作 HDFS。
9000连接失败
https://www.cnblogs.com/duanxz/p/5142535.html
引入依赖
<dependencies>
    <dependency>
        <groupId>org.apache.hadoop</groupId>
        <artifactId>hadoop-client</artifactId>
        <version>3.2.0</version>
    </dependency>
</dependencies>
编写代码
public class HdfsOp {
    public static void main(String[] args) throws IOException, URISyntaxException, InterruptedException {
        Configuration conf = new Configuration();
        FileSystem fileSystem = FileSystem.get(new URI("hdfs://debian101:9000"), conf, "root");

        // 上传本地文件
        String localPath1 = "C:\\Users\\xiang\\Documents\\IdeaProjects\\bigdata\\hadoop\\pom.xml";
        FSDataOutputStream outputStream = fileSystem.create(new Path("/pom.xml"));
        IOUtils.copyBytes(Files.newInputStream(Paths.get(localPath1)), outputStream, conf, true);

        // 下载文件到本地
        String localPath2 = "C:\\Users\\xiang\\Documents\\IdeaProjects\\bigdata\\hadoop\\README.txt";
        FSDataInputStream fsis = fileSystem.open(new Path("/README.txt"));
        IOUtils.copyBytes(fsis, Files.newOutputStream(Paths.get(localPath2)), conf, true);

        // 删除文件
        boolean ignored = fileSystem.delete(new Path("/README.txt"), true);
    }
}
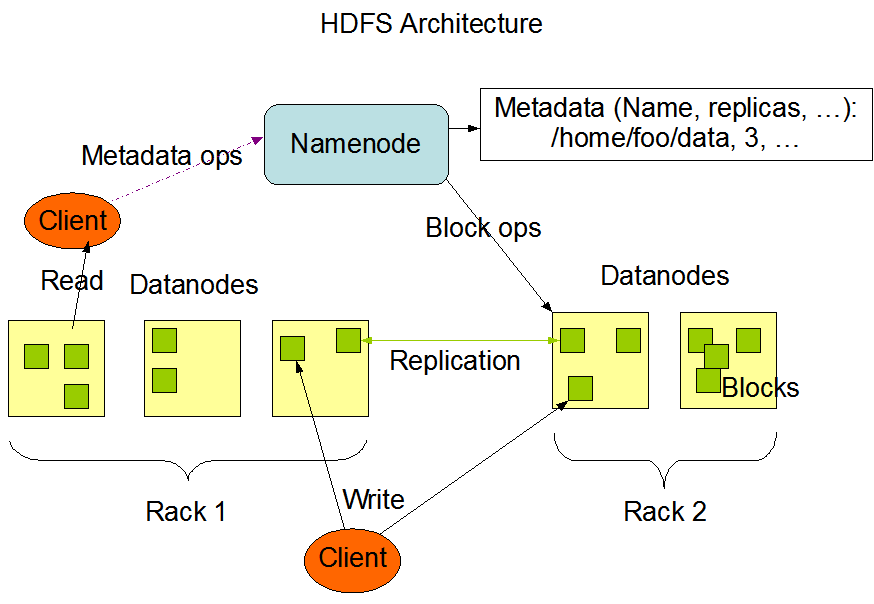
基础概念:https://hadoop.apache.org/docs/stable/hadoop-project-dist/hadoop-hdfs/HdfsDesign.html#NameNode_and_DataNodes
MapReduce
Hadoop MapReduce 是一个用于编写并行处理海量数据的框架。一个 MapReduce 作业通常将输入数据集拆分成独立数据块,由并行的 map 任务进行处理。框架会对 map 任务的输出做排序,然后将其输入到 reduce 任务中。通常情况下输入和输出都存储在文件系统中,框架负责调度任务、监控任务并重新执行失败的任务。
MapReduce 作业的输入和输出:
(input) <k1, v1> -> map -> <k2, v2> -> combine -> <k2, v2> -> reduce -> <k3, v3> (output)
词频统计 WordCount 程序
public class WordCountJob {
    public static void main(String[] args) throws IOException, InterruptedException, ClassNotFoundException {
        Configuration conf = new Configuration();
        Job job = Job.getInstance(conf);
        job.setJarByClass(WordCountJob.class);
        // map 相关
        job.setMapperClass(MyMapper.class);
        job.setMapOutputKeyClass(Text.class);
        job.setMapOutputValueClass(LongWritable.class);

        // reduce 相关
        job.setReducerClass(MyReducer.class);
        job.setOutputKeyClass(Text.class);
        job.setOutputValueClass(LongWritable.class);

        // 指定文件路径
        FileInputFormat.setInputPaths(job, new Path(args[0]));
        FileOutputFormat.setOutputPath(job, new Path(args[1]));

        job.waitForCompletion(true);
    }

    public static class MyMapper extends Mapper<LongWritable, Text, Text, LongWritable> {
        final LongWritable one = new LongWritable(1);

        @Override
        protected void map(LongWritable key, Text value, Context context) throws IOException, InterruptedException {
            String[] words = value.toString().split(" ");
            for (String word : words) {
                context.write(new Text(word), one);
            }
        }
    }

    public static class MyReducer extends Reducer<Text, LongWritable, Text, LongWritable> {
        @Override
        protected void reduce(Text key, Iterable<LongWritable> values, Context context) throws IOException, InterruptedException {
            long sum = 0;
            for (final LongWritable value : values) {
                sum += value.get();
            }
            context.write(key, new LongWritable(sum));
        }
    }
}
提交任务,查看执行结果
# 提交任务
bin/hadoop jar hadoop-1.0-SNAPSHOT.jar store.xianglin.mr.WordCountJob /test/hello.txt /out

# 查看结果
bin/hdfs dfs -ls /out
bin/hdfs dfs -cat /out/part-r-00000
配置查看作业的日志信息
<!-- etc/hadoop/yarn-site.xml -->
<configuration>
    <property>
        <name>yarn.resourcemanager.hostname</name>
        <value>debian101</value>
    </property>
    <property>
        <name>yarn.log-aggregation-enable</name>
        <value>true</value>
    </property>
    <property>
        <name>yarn.log.server.url</name>
        <value>http://debian101:19888/jobhistory/logs/</value>
    </property>
</configuration>
# 启动日志服务
bin/mapred --daemon start historyserver
然后可通过 http://192.168.56.101:8088/cluster 查看作业日志或者通过下面命令查看
bin/yarn logs -applicationId application_1729607544722_0001
MapReduce 性能问题
HDFS 小文件问题:https://developer.aliyun.com/article/697054
数据倾斜问题:https://www.hangge.com/blog/cache/detail_3567.html
常见数据压缩格式
运行 Map Reduce 时指定压缩格式
// 1. 在代码中指定压缩格式
Configuration conf = new Configuration();
conf.setBoolean(MRJobConfig.MAP_OUTPUT_COMPRESS, true);
conf.setClass(MRJobConfig.MAP_OUTPUT_COMPRESS_CODEC, DeflateCodec.class, CompressionCodec.class);
Job job = Job.getInstance(conf);

// 2. 通过命令参数设置压缩格式
Configuration conf = new Configuration();
String[] remainingArgs = new GenericOptionsParser(conf, args).getRemainingArgs();
Job job = Job.getInstance(conf);
bin/hadoop jar bigdata-1.0-SNAPSHOT.jar store.xianglin.hadoop.compress.DataCompress -Dmapreduce.output.fileoutputformat.compress=true -Dmapreduce.output.fileoutputformat.compress.codec=org.apache.hadoop.io.compress.DeflateCodec /words.dat /words_out/non_compress
YARN
https://hadoop.apache.org/docs/stable/hadoop-yarn/hadoop-yarn-site/YARN.html
YARN 实现 Hadoop 集群的资源共享,YARN 不仅支持 MapReduce,还支持 Spark、Flink 等计算引擎。
YARN 主要负责集群资源的管理和调度,主要负责内存和 CPU 两种资源。
ResourceManager:主节点负责集群资源的分配和管理;
NodeManager:从节点负责当前机器资源管理
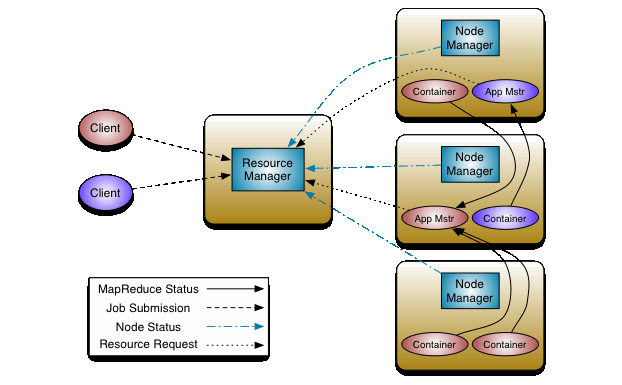
调度程序负责在各种队列、应用程序之间分配集群资源。
Capacity Scheduler:旨在以友好的方式将 Hadoop 应用程序作为共享的多租户集群运行,同时最大限度地提高集群的吞吐量和利用率。
Fair Scheduler:公平调度可使所有应用程序在一段事件内平均获得相同份额的资源(内存)。可以让耗时短的应用程序在合理时间内完成,也不会让耗时长的应用程序处于饥饿状态。
使用 -Dmapreduce.job.queuename= 指定队列。
HiDataPlus
一个可持续升级的免费Hadoop发行版。
Flume
https://blog.csdn.net/weixin_42175752/article/details/140098093
Flume 是一个高可用、高可靠、分布式的海量日志采集、聚合和传输的系统。
它有一个简单、灵活的基于流的数据流结构,具备负载均衡机制和故障转移机制,有一个简单可扩展的数据模型。
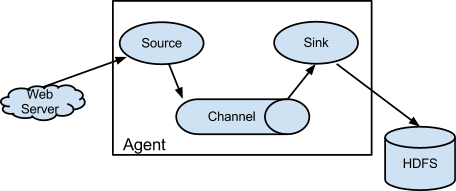
Source
Source 是 Flume 的数据输入组件,负责从外部数据源收集数据,并将数据转换为 Flume 的内部事件(Event)格式。常见的 Source 类型包括:
- Exec Source:从命令执行的输出中读取数据,例如从 tail -F 命令读取日志文件。
- Netcat Source:通过网络套接字接收数据。
- Spooling Directory Source:从指定目录中读取新文件的内容。
- HTTP Source:通过 HTTP POST 请求接受数据。
- Kafka Source:从 Kafka 消息队列中采集数据。
Channel
Channel 是 Flume 的数据缓冲组件,负责在 Source 和 Sink 之间暂存数据,确保数据传输的可靠性和高效性。常见的 Channel 类型包括:
- Memory Channel:将数据存储在内存中,适用于低延迟和高吞吐量的场景。
- File Channel:将数据存储在磁盘文件中,适用于需要高可靠性的场景。
- Kafka Channel:使用 Apache Kafka 作为 Channel,适用于需要高可用性和持久化的场景。
Sink
Sink 是 Flume 的数据输出组件,负责将 Channel 中的数据传输到目标存储系统。常见的 Sink 类型包括:
- HDFS Sink:将数据写入到 Hadoop 分布式文件系统(HDFS)。
- HBase Sink:将数据写入到 HBase 数据库。
- ElasticSearch Sink:将数据写入到 Elasticsearch。
- Kafka Sink:将数据写入到 Apache Kafka。
启动 Flume
https://archive.apache.org/dist/flume/1.9.0/apache-flume-1.9.0-bin.tar.gz
https://flume.apache.org/releases/content/1.9.0/FlumeUserGuide.html#a-simple-example
# example.conf: A single-node Flume configuration

# Name the components on this agent
a1.sources = r1
a1.sinks = k1
a1.channels = c1

# Describe/configure the source
a1.sources.r1.type = netcat
a1.sources.r1.bind = localhost
a1.sources.r1.port = 44444

# Describe the sink
a1.sinks.k1.type = logger

# Use a channel which buffers events in memory
a1.channels.c1.type = memory
a1.channels.c1.capacity = 1000
a1.channels.c1.transactionCapacity = 100

# Bind the source and sink to the channel
a1.sources.r1.channels = c1
a1.sinks.k1.channel = c1
# 启动 agent
bin/flume-ng agent --conf conf --conf-file conf/example.properties --name a1 -Dflume.root.logger=INFO,console
使用 telnet 连接 netcat source 创建的 TCP 服务。
telnet 127.0.0.1 44444
logger sink 的输出如下:
2024-10-23 15:50:32,990 (SinkRunner-PollingRunner-DefaultSinkProcessor) [INFO - org.apache.flume.sink.LoggerSink.process(LoggerSink.java:95)] Event: { headers:{} body: 68 65 6C 6C 6F 0D hello. }
采集文件内容上传至 HDFS
创建配置文件
# example.conf: A single-node Flume configuration

# Name the components on this agent
a1.sources = r1
a1.sinks = k1
a1.channels = c1

# Describe/configure the source
a1.sources.r1.type = spooldir
a1.sources.r1.spoolDir = /root/flume/data/studentDir

# Use file channel
a1.channels.c1.type = file
a1.channels.c1.checkpointDir = /root/flume/data/student/checkpoint
a1.channels.c1.dataDirs = root/flume/data/student/data

# Describe the sink
a1.sinks.k1.type = hdfs
a1.sinks.k1.hdfs.path = hdfs://debian101:9000/flume/studentDir
a1.sinks.k1.hdfs.filePrefix = stu-
a1.sinks.k1.hdfs.writeFormat=Text
a1.sinks.k1.hdfs.fileType=DataStream
a1.sinks.k1.hdfs.hdfs.rollSize=3600
a1.sinks.k1.hdfs.hdfs.rollInterval=134217728
a1.sinks.k1.hdfs.hdfs.rollCount=0

# Bind the source and sink to the channel
a1.sources.r1.channels = c1
a1.sinks.k1.channel = c1
启动 agent
bin/flume-ng agent --conf conf --conf-file conf/dirpool-to-hdfs.conf --name a1 -Dflume.root.logger=INFO,console
查看 HDFS 中的文件
bin/hdfs dfs -ls /flume/studentDir
Hive
Hive 是建立在 Hadoop 上的数据仓库基础架构,提供了一系列工具,可以进行数据提取、转化和加载。
Hive 是一种分布式容错数据仓库系统,可进行大规模分析,并便于使用 SQL 读写和管理驻留在分布式存储中的 PB 级数据。
数据仓库
传统的关系型数据库主要应用在基本的事务处理,支持增删改查,例如银行交易。
数据仓库主要做一些复杂的分析操作,侧重决策支持。相对数据库而言,数据仓库分析的数据规模要大得多,只支持查询操作。
数据库与数据仓库的本质区别就是 OLTP 和 OLAP 的区别。
https://www.ibm.com/think/topics/olap-vs-oltp
安装 Hive
下载 hive 安装包解压。
https://archive.apache.org/dist/hive/hive-3.1.2/apache-hive-3.1.2-bin.tar.gz
修改配置文件
# cp conf/hive-env.sh.template conf/hive-env.sh
export JAVA_HOME=/root/hadoop/jdk8u432-b06
export HADOOP_HOME=/root/hadoop/hadoop-3.2.0
export HIVE_HOME=/root/hive/apache-hive-3.1.2-bin
<!-- cp conf/hive-default.xml.template conf/hive-site.xml -->
<!-- 配置 MySQL -->
  <property>
    <name>javax.jdo.option.ConnectionURL</name>
    <value></value>
  </property>
  <property>
    <name>javax.jdo.option.ConnectionDriverName</name>
    <value></value>
  </property>
    <property>
    <name>javax.jdo.option.ConnectionUserName</name>
    <value></value>
  </property>
    <property>
    <name>javax.jdo.option.ConnectionPassword</name>
    <value></value>
  </property>
配置使用 MySQL 数据库:https://cwiki.apache.org/confluence/pages/viewpage.action?pageId=27362076#AdminManualMetastoreAdministration-RemoteMetastoreDatabase
上传 MySQL 驱动包 到 lib 目录下。
修改 Hadoop 配置
<!-- etc/hadoop/core-site.xml -->
<property>
    <name>hadoop.proxyuser.root.hosts</name>
    <value>*</value>
</property>
<property>
    <name>hadoop.proxyuser.root.groups</name>
    <value>*</value>
</property>
初始化 MySQL 数据库。
# 先创建数据库
bin/schematool -dbType mysql -initSchema
# 默认以 latin1 编码建表,为显示中文注释,需修改表编码
alter table COLUMNS_V2 modify column COMMENT varchar(256) character set utf8mb4;
alter table TABLE_PARAMS modify column PARAM_VALUE varchar(4000) character set utf8mb4;

alter table PARTITION_PARAMS modify column PARAM_VALUE varchar(4000) character set utf8mb4;
alter table PARTITION_KEYS modify column PKEY_COMMENT varchar(4000) character set utf8mb4;
使用 Hive
命令行使用。
# 启动 hive
bin/hive

# 或者使用 beeline
bin/hiveserver2
bin/beeline -u jdbc:hive2://localhost:10000 -n root

# hive 表操作
show tables;
create table t1(id int, name string);
insert into t1(id, name) values (1, 'zs');
select * from t1;
drop table t1;
Java 代码操作 hive,需要先启动 bin/hiveserver2。
引入依赖
<dependency>
    <groupId>org.apache.hive</groupId>
    <artifactId>hive-jdbc</artifactId>
    <version>3.1.2</version>
</dependency>
编写代码操作 Hive
public class HiveJdbcDemo {
    public static void main(String[] args) throws SQLException {
        String hiveUrl = "jdbc:hive2://192.168.56.101:10000";
        Connection connection = DriverManager.getConnection(hiveUrl, "root", "");
        Statement statement = connection.createStatement();
        statement.execute("create table t1(id int, name string)");
        statement.execute("insert into t1(id, name) values (1, 'zs')");
        try (ResultSet resultSet = statement.executeQuery("select * from t1")) {
            while (resultSet.next()) {
                int id = resultSet.getInt("id");
                String name = resultSet.getString("name");
                System.out.println(id + " " + name);
            }
        }
        statement.execute("drop table t1");
    }
}
hive 的配置顺序。
- 通过 set name=value 设置,针对当前会话有效。
- 通过 ~/.hiverc 配置,针对当前用户有效。
- 通过 hive-site.xml 配置,默认配置全局有效。
Hive 操作
默认数据库存放位置通过 hive.metastore.warehouse.dir 属性指定,默认值 /user/hive/warehouse。
# 创建数据库,指定存储位置
create database mydb1;
create database mydb2 location '/user/hive/mydb2';

-- 创建表
create table t2(id int);
-- 查看表字段
desc t2;
-- 查看建表语句
show create table t2;
-- 修改表名
alter table t2 rename to t2_bak;
-- 加载数据
load data local inpath '/root/hive/hivedata/t2.data' into table t2_bak;
-- 添加字段
alter table t2_bak add columns (name string);
-- 删除表
drop table t2;

-- 建表指定列分隔符
create table t3
(
    id           int comment 'ID',
    stu_name     string comment 'name',
    stu_birthday date comment 'birthday',
    online       boolean comment 'is online'
) row format delimited fields terminated by '\t'
    lines terminated by '\n';

load data local inpath '/root/hive/hivedata/t3.data' into table t3;
Hive 数据类型
https://cwiki.apache.org/confluence/display/Hive/LanguageManual+Types
Hive 表类型
内部表:Hive 中的默认表类型,表数据默认存储在 warehouse 目录中。加载数据时,实际数据会被移动到 warehouse 目录中。删除表时,表中的数据和元数据都会被删除。
外部表:建表语句中包含 external 关键字。加载数据时,实际数据不会被移动到 warehouse 目录中,只是与外部数据建立一个链接。删除外部表时,只删除元数据,移除链接。
-- 创建一个外部表
create external table external_table
(
    key string
) location '/data/external';
load data local inpath '/root/hive/hivedata/external_table.data' into table external_table;
select * from external_table;
drop table external_table;
-- 外部表和内部表的转换
alter table managed_table set tblproperties ('external'='true');
alter table external_table set tblproperties ('external'='false');
分区表:一个表可以有多个分区,分区列中的每个不同值组合都会创建一个单独的数据目录。
-- 创建分区表
create table partition_1
(
    id   int,
    name string
) partitioned by (dt string)
    row format delimited fields terminated by '\t';
-- 加载数据到分区中
load data local inpath '/root/hive/hivedata/partition_1.data' into table partition_1 partition (dt='20200101');
-- 添加/删除分区
alter table partition_1 add partition (dt='20200102');
alter table partition_1 drop partition (dt='20200102');
-- 查看分区信息
show partitions partition_1;
桶表:桶表是对数据进行哈希取值,然后放到不同文件中存储。物理存储上,每个桶就是表(或分区)里的一个文件。桶表用于数据抽样或者提高查询效率(join)。
Hive 内置函数
查看函数相关信息
-- 查看内置函数
show functions ;
-- 查看函数描述信息
desc function cos;
desc function extended cos;
分组取 TopN
-- 按学科分组,取每组中分数最高的三行
select *
from (select *, row_number() over (partition by sub order by score desc ) as num from student_score) s
where s.num <= 3;
row_number() over ():正常排序
rank() over ():跳跃排序,有两个第一时接下来是第三
dense_rank() over ():连续排序,有两个第一时接下来仍是第二
行转列
-- zs,swing
-- zs,footbal
-- zs,sing
-- zs,codeing
-- zs,swing
select * from student_favors;
-- zs,"[""swing"",""footbal"",""sing"",""codeing"",""swing""]"
select name,collect_list(favor) as favor_list from student_favors group by name ;
-- zs,"swing,footbal,sing,codeing,swing"
select name,concat_ws(',',collect_list(favor)) as favors from student_favors group by name ;
-- zs,"swing,footbal,sing,codeing"
select name,concat_ws(',',collect_set(favor)) as favors from student_favors group by name ;
concat_ws():根据指定的分隔符拼接多个字段,最终转化为一个带有分隔符的字符串。
collect_list() / collect_set():返回列表或集合。
列转行
-- zs,"swing,footbal,sing"
-- ls,"codeing,swing"
select * from student_favors_2;
-- zs,"[""swing"",""footbal"",""sing""]"
-- ls,"[""codeing"",""swing""]"
select name,split(favorlist,',') from student_favors_2;
-- swing
-- footbal
-- sing
-- codeing
-- swing
select explode(split(favorlist,',')) from student_favors_2;
-- zs,swing
-- zs,footbal
-- zs,sing
-- ls,codeing
-- ls,swing
select name, favor_new from student_favors_2 lateral view explode(split(favorlist,',')) table1 as favor_new;
split():根据规则切分字符串,返回字符数组。
explode():接受数组时,将数组中每个元素转成一行。接受map时,将每个键值对转为一行,且key、value各为一列。
排序关键字
order by:生成一个 reduce 任务,结果全局有序
sort by:每个 reduce 任务中数据有序
distribute by:根据指定的字段对数据分区输出到 reduce 中,不会排序,一般结合 sort by 一起使用。
cluster by:效果等同于 distribute by sort by,但不能指定 asc 或 desc。
Hive 性能问题
数据倾斜的原因以及解决办法:https://www.hangge.com/blog/cache/detail_3581.html
Hive 数据存储格式
https://cwiki.apache.org/confluence/display/Hive/FileFormats
https://cwiki.apache.org/confluence/display/Hive/LanguageManual+DDL#LanguageManualDDL-StorageFormats
在 Hive 表使用 TEXTFILE 存储格式并启用压缩
-- 创建一个不带压缩的表
create external table stu_textfile
(
    id   int,
    name string,
    city string
) row format delimited
    fields terminated by ','
    lines terminated by '\n'
    location 'hdfs://debian101:9000/stu_textfile';

select *
from stu_textfile
limit 2;

-- 使用 deflate 压缩的表
create external table stu_textfile_deflate_compress
(
    id   int,
    name string,
    city string
) row format delimited
    fields terminated by ','
    lines terminated by '\n'
    location 'hdfs://debian101:9000/stu_textfile_deflate_compress';
-- 当前会话开启压缩选项
set hive.exec.compress.output=true;
set mapreduce.output.fileoutputformat.compress=true;
set mapreduce.output.fileoutputformat.compress.codec=org.apache.hadoop.io.compress.DeflateCodec;
-- 导入数据
set mapreduce.job.reduces=1;
insert into stu_textfile_deflate_compress
select id, name, city
from stu_textfile
group by id, name, city;
-- 查询数据
select id,count(*) from stu_textfile_deflate_compress group by id ;
在 Hive 表中使用 SEQUENCEFILE 存储格式
-- 新开 session,避免与上面的 set 命令混淆
-- 使用 sequencefile 存储格式
create external table stu_seqfile_none_compress
(
    id   int,
    name string,
    city string
) row format delimited
    fields terminated by ','
    lines terminated by '\n'
    stored as sequencefile
    location 'hdfs://debian101:9000/stu_seqfile_none_compress';
-- 导入数据
set mapreduce.job.reduces=1;
insert into stu_seqfile_none_compress
select id, name, city
from stu_textfile
group by id, name, city;
-- 验证是否支持拆分:支持
select id, count(*)
from stu_seqfile_none_compress
group by id;

-- 使用 deflate 压缩
-- https://cwiki.apache.org/confluence/display/Hive/CompressedStorage
create external table stu_seqfile_deflate_compress
(
    id   int,
    name string,
    city string
) row format delimited
    fields terminated by ','
    lines terminated by '\n'
    stored as sequencefile
    location 'hdfs://debian101:9000/stu_seqfile_deflate_compress';
-- 当前会话开启压缩选项
set hive.exec.compress.output=true;
set mapreduce.output.fileoutputformat.compress=true;
set mapreduce.output.fileoutputformat.compress.codec=org.apache.hadoop.io.compress.DeflateCodec;
set io.seqfile.compression.type=BLOCK;
-- 导入数据
set mapreduce.job.reduces=1;
insert into stu_seqfile_deflate_compress
select id, name, city
from stu_textfile
group by id, name, city;
HBase
HBase 数据模型
https://hbase.apache.org/book.html#datamodel
安装 HBase
https://hbase.apache.org/book.html#quickstart
https://archive.apache.org/dist/hbase/2.2.7/hbase-2.2.7-bin.tar.gz
修改配置(伪分布式)
# conf/hbase-env.sh
export JAVA_HOME=/root/hadoop/jdk8u432-b06
export HADOOP_HOME=/root/hadoop/hadoop-3.2.0
export HBASE_LOG_DIR=/root/hbase/data/log
<!-- conf/hbase-site.xml -->
<property>
  <name>hbase.unsafe.stream.capability.enforce</name>
  <value>false</value>
</property>
<property>
  <name>hbase.cluster.distributed</name>
  <value>true</value>
</property>
<property>
  <name>hbase.rootdir</name>
  <value>hdfs://debian101:9000/hbase</value>
</property>
启动 Hbase
bin/start-hbase.sh
HBase 操作
使用 bin/hbase shell 进入 HBase 命令行工具。
基础命令:
# 集群状态
status
# 版本信息
version
# 登录用户
whoami
DDL 命令
# 创建表,指定列簇
create 'student','inof','level'
# 查看表信息
list
desc 'student'
# 修改表列簇信息
alter 'student',{NAME=>'level',VERSIONS=>'3'}
alter 'student','about'
alter 'student',{NAME=>'about',METHOD=>'delete'}
# 查看表状态
disable/enable 'student'
is_disabled/is_enabled 'student'
# 删除表
truncate 'student'
drop 'student'
DML 命令
# 添加数据
put 'student','jack','info:sex','man'
put 'student','jack','info:age','22'
put 'student','jack','level:class','A'
# 查看数据
scan 'student'
get 'student','jack'
get 'student','jack','info'
get 'student','jack','info:age'
# 统计总数
count 'student'
# 删除数据
delete 'student','jack','info:age'
deleteall 'student','jack'
Java API 操作 HBase
import org.apache.hadoop.hbase.CellUtil
import org.apache.hadoop.hbase.HBaseConfiguration
import org.apache.hadoop.hbase.TableName
import org.apache.hadoop.hbase.client.*
import org.apache.hadoop.hbase.util.Bytes

fun main() {
    // 获取 HBase 连接
    val conf = HBaseConfiguration.create()
    conf.set("hbase.rootdir", "hdfs://debian101:9000/hbase")
    conf.set("hbase.zookeeper.quorum", "debian101:2181")
    val conn = ConnectionFactory.createConnection(conf)

    val tableName = "test"

    // 表操作:
    // 创建表
    conn.admin.use { admin ->
        val familyInfo = ColumnFamilyDescriptorBuilder.newBuilder(Bytes.toBytes("info"))
            .setMaxVersions(3)
            .build()
        val familyLevel = ColumnFamilyDescriptorBuilder.newBuilder(Bytes.toBytes("level"))
            .setMaxVersions(2)
            .build()
        val descriptor = TableDescriptorBuilder.newBuilder(TableName.valueOf(tableName))
            .setColumnFamilies(listOf(familyInfo, familyLevel))
            .build()
        admin.createTable(descriptor)
    }

    dml(conn, tableName)

    // 删除表
    conn.admin.use { admin ->
        admin.disableTable(TableName.valueOf(tableName))
        admin.deleteTable(TableName.valueOf(tableName))
    }

    conn.close()
}

private fun dml(conn: Connection, tableName: String) {
    // 数据操作:
    // 新增数据
    conn.getTable(TableName.valueOf(tableName)).use { table ->
        val put = Put(Bytes.toBytes("laowang"))
        put.addColumn(Bytes.toBytes("info"), Bytes.toBytes("age"), Bytes.toBytes("18"))
        put.addColumn(Bytes.toBytes("info"), Bytes.toBytes("sex"), Bytes.toBytes("man"))
        put.addColumn(Bytes.toBytes("level"), Bytes.toBytes("class"), Bytes.toBytes("A"))
        table.put(put)
    }

    // 查询数据
    conn.getTable(TableName.valueOf(tableName)).use { table ->
        val get = Get(Bytes.toBytes("laowang"))
        get.addColumn(Bytes.toBytes("info"), Bytes.toBytes("age"))
        get.addColumn(Bytes.toBytes("info"), Bytes.toBytes("sex"))
        get.addColumn(Bytes.toBytes("level"), Bytes.toBytes("class"))

        val result = table.get(get)
        val cells = result.listCells()
        cells.forEach { cell ->
            val family = CellUtil.cloneFamily(cell)
            val column = CellUtil.cloneQualifier(cell)
            val value = CellUtil.cloneValue(cell)

            println("列簇: ${String(family)}, 列: ${String(column)}, 值: ${String(value)}")
        }

        val value = result.getValue(Bytes.toBytes("level"), Bytes.toBytes("class"))
        println("level:class: ${String(value)}")
    }

    // 查询多版本数据
    conn.getTable(TableName.valueOf(tableName)).use { table ->
        val get = Get(Bytes.toBytes("laowang"))
        // 指定读取所有版本数据,不设置时只获取最新数据
        get.readAllVersions()
        val result = table.get(get)
        result.getColumnCells(Bytes.toBytes("info"), Bytes.toBytes("age")).forEach { cell ->
            val value = CellUtil.cloneValue(cell)
            println("值为: ${String(value)}, 时间戳: ${cell.timestamp}")
        }
    }

    // 删除数据
    conn.getTable(TableName.valueOf(tableName)).use { table ->
        val delete = Delete(Bytes.toBytes("laowang"))
        // 仅删除 age 列
        delete.addColumn(Bytes.toBytes("info"), Bytes.toBytes("age"))
        table.delete(delete)
    }
}
Spark
Spark 是一个用于大规模数据处理的统一计算引擎。Spark 中一个重要的特性就是基于内存计算。
安装 Spark
下载 Spark:https://archive.apache.org/dist/spark/spark-2.4.3/spark-2.4.3-bin-hadoop2.7.tgz
https://archive.apache.org/dist/spark/docs/2.4.3/spark-standalone.html
修改配置
# cp conf/spark-env.sh.template conf/spark-env.sh
export SPARK_MASTER_HOST=debian101

# cp conf/slaves.template conf/slaves
debian101
启动 Spark
sbin/start-all.sh
访问 http://debian101:8080/ 查看控制台。
提交一个 Spark 任务:https://archive.apache.org/dist/spark/docs/2.4.3/submitting-applications.html
./bin/spark-submit \
  --class org.apache.spark.examples.SparkPi \
  --master spark://debian101:7077 \
  --executor-memory 2G \
  --total-executor-cores 2 \
  examples/jars/spark-examples_2.11-2.4.3.jar \
  2
Spark on YARN:https://archive.apache.org/dist/spark/docs/2.4.3/running-on-yarn.html
Spark 查看日志信息
修改配置
# cp conf/spark-defaults.conf.template conf/spark-defaults.conf
spark.eventLog.enabled=true
spark.eventLog.compress=true
spark.eventLog.dir=hdfs://debian101:9000/tmp/logs/root/logs
spark.history.fs.logDirectory=hdfs://debian101:9000/tmp/logs/root/logs
spark.yarn.historyServer.address=http://debian101:18080

# conf/spark-env.sh
export HADOOP_CONF_DIR=/root/hadoop/hadoop-3.2.0/etc/hadoop
export SPARK_HISTORY_OPTS="-Dspark.history.ui.port=18080 -Dspark.history.fs.logDirectory=hdfs://debian101:9000/tmp/logs/root/logs"
启动日志服务
sbin/start-history-server.sh
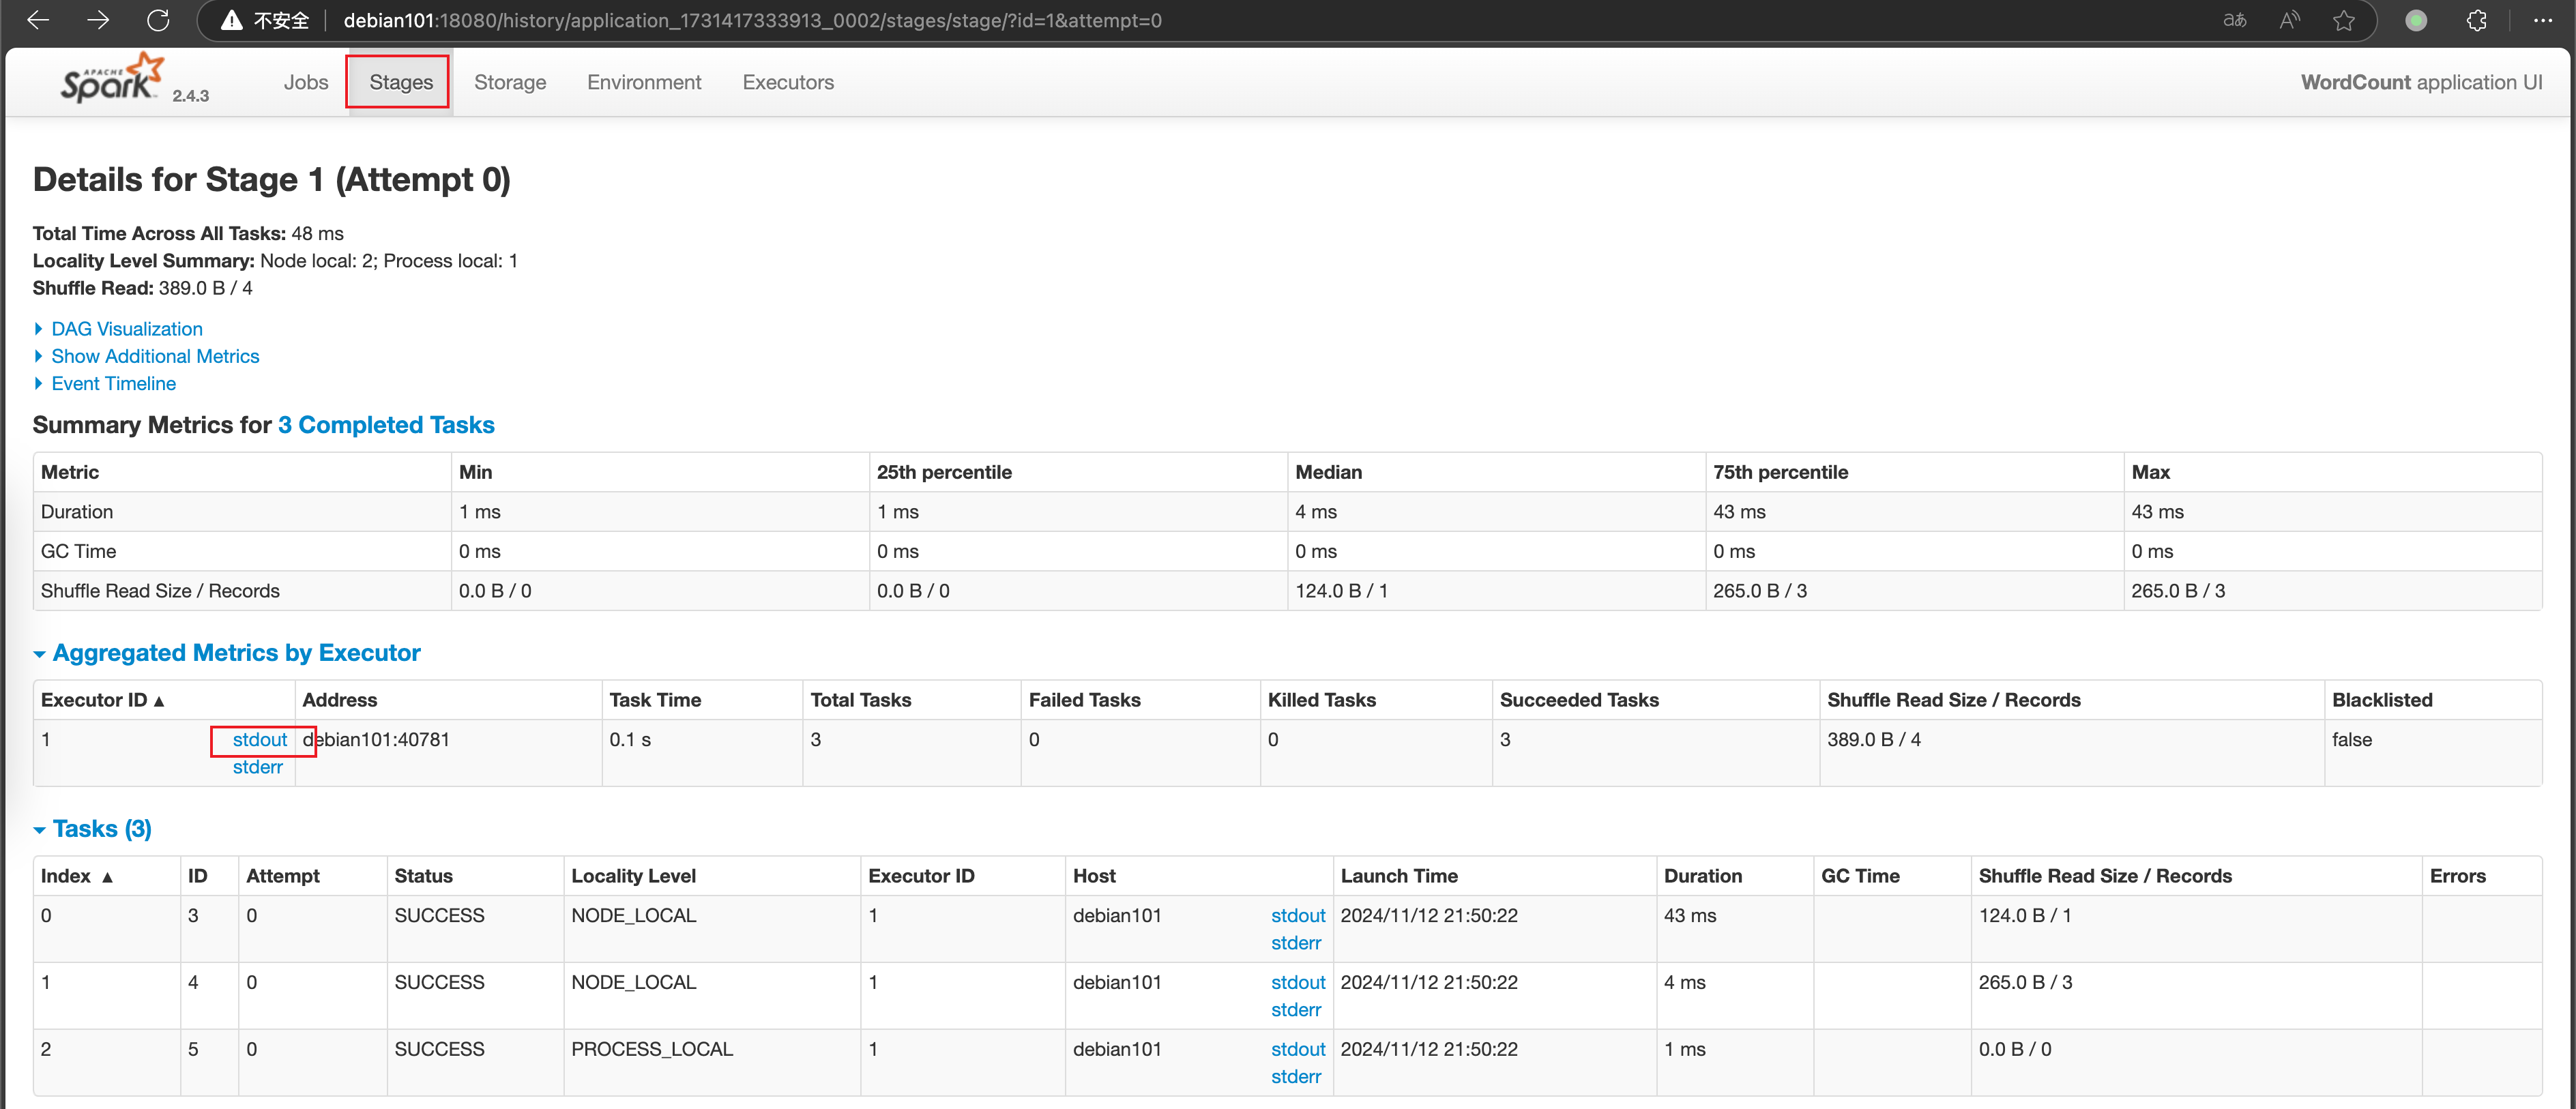
可以从 YARN 仪表盘进入日志界面

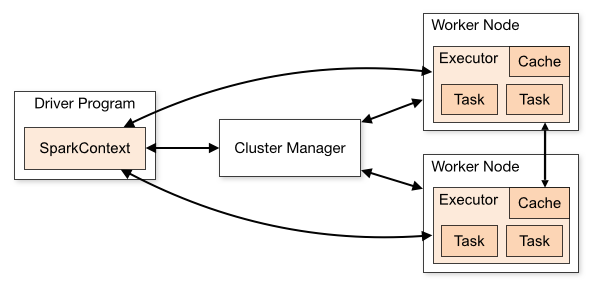
Spark 组件
https://archive.apache.org/dist/spark/docs/2.4.3/cluster-overview.html
Spark 编程
https://archive.apache.org/dist/spark/docs/2.4.3/rdd-programming-guide.html
Spark 提供的高级抽象:
RDD:弹性分布式数据集,是可并行操作的、在集群节点上分区的元素集合。RDD 可以从任何 Hadoop 支持的文件系统中的文件和代码定义的集合中创建。
共享变量:Spark 支持两种类型的共享变量。
广播变量:用于在所有节点的内存中缓存一个值,节点上所有的 task 共享这一份变量;
Broadcast<int[]> broadcastVar = sc.broadcast(new int[] {1, 2, 3});

broadcastVar.value();
累加器:在 task 中只能执行
added方法的变量,在 Driver 中可以读取值,例如计数器和求和。LongAccumulator accum = jsc.sc().longAccumulator(); sc.parallelize(Arrays.asList(1, 2, 3, 4)).foreach(x -> accum.add(x)); accum.value();
创建 RDD 的两种方式:
并行化集合:通过在现有集合上调用
parallelize方法创建。List<Integer> data = Arrays.asList(1, 2, 3, 4, 5); JavaRDD<Integer> distData = sc.parallelize(data);外部数据集:Spark 可以从任何 Hadoop 支持的数据源创建 RDD,Spark 支持文本文件、序列文件(
SequenceFiles)等。String path = "hdfs://debian101:9000/test/hello.txt"; JavaRDD<String> distFile = sc.textFile(path);
RDD 的两类操作:
- transformations,转换:从现有数据集创建新的数据集,Spark 中的 transformations 都是惰性计算的,例如
map。 - action,操作:在数据集上运行计算后向驱动程序返回值,例如
reduce。 - persist,持久化:通过
persist或cache方法,将 RDD 持久化在内存、磁盘,或者在多个节点上复制。
Shuffle 操作
Shuffle 是 Spark 中数据重新分组的方式,通常会涉及数据在 executor 和机器上复制数据。触发 Shuffle 的操作有两类
- 重新分区:repartition coalesce groupByKey reduceByKey
- 合并操作:join cogroup
Spark 程序性能优化
高性能序列化类库
Spark 提供了 Java 序列化和 Kyro 序列化两种机制,Kyro 序列化比 Java 序列化更快,序列化后的数据更小。
针对程序中多次被操作的 RDD 进行持久化操作,避免对一个 RDD 反复进行计算。
JVM 垃圾回收调优
默认情况下,Spark 使用每个 executor 60% 的内存来缓存 RDD,剩余 40% 内存用来存放算子执行期间创建的对象。如果垃圾回收频繁发生,需要通过
spark.stoage.memoryFraction参数调整比例。算子优化
- 使用 reduceByKey 替代 groupByKey
- 使用 mapPartitions 替代 map
- 使用 foreachPartitions 替代 foreach
Spark SQL
Spark SQL 是用于处理结构化数据的 Spark 模块。
Dataset 是数据的分布式集合,DataFrame 是按列组织的数据集,概念上等同于关系型数据库中的表。在 Scala API 中,DataFrame 只是 Dataset[Row] 的类型别名,在 Java API 中,需要使用 Dataset<Row> 来表示 DataFrame。
DataFrame 算子操作:https://archive.apache.org/dist/spark/docs/2.4.3/sql-getting-started.html#untyped-dataset-operations-aka-dataframe-operations
DataFrame SQL 操作:https://archive.apache.org/dist/spark/docs/2.4.3/sql-getting-started.html#running-sql-queries-programmatically
RDD 转换为 DataFrame:https://archive.apache.org/dist/spark/docs/2.4.3/sql-getting-started.html#interoperating-with-rdds
- 使用反射方式推断元数据
- 使用编码方式指定元数据,用于无法提前知道列及其类型的情况下构建数据集
load 和 save 操作
Load 操作用于加载数据,创建 DataFrame,save 操作用于将 DataFrame 中的数据保存到文件中。format 用于指定数据来源格式,默认为 parquet,支持 jdbc、json、csv、orc、text 等。mode 指定数据或表已存在时的行为,有如下选项(org.apache.spark.sql.SaveMode)
- Append:追加到已有的数据中
- Overwrite:覆盖已有数据
- ErrorIfExists:抛出异常,默认值
- Ignore:不执行保存操作
Dataset<Row> dataset = sparkSession.read().format("json").load("read_path");
dataset.write().format("csv").mode(SaveMode.ErrorIfExists).save("save_path");
Data Warehouse
基础概念
数据仓库是一个面向主题的、集成的、稳定的且随时间变化的数据集合,用于支持管理人员的决策。
事实表:保存实际业务数据的表
维度表:维度指一个对象的属性或特征,比如时间维度、商品维度。
数据库三范式
- 1NF:数据库表的每一列都是不可再分原子数据项
- 2NF:数据表的每一列都和主键相关,不能只和某一部分相关
数据仓库建模方式:
- ER 实体关系模型
- 维度建模模型
- 星型模型:不满足三范式,以存储空间为代价降低维度表连接数,性能较高。
- 雪花模型:满足三范式,有效降低数据冗余,使用时需要连接多个维度表,性能较低。
数据仓库分层
数据仓库分层原因:
- 清晰的数据结构
- 清晰的数据关系
- 减少重复开发
- 屏蔽业务影响
数据仓库分层设计:
- ODS 原始数据层:存放原始数据
- DWD 明细数据层:清洗之后的数据
- DWS 数据汇总层:对数据进行轻度汇总(宽表)
- APP/DM 数据应用层:为统计报表提供数据
每一层的表命名时以分层名称为前缀,比如 ODS 层表命名为 ods_table_name。
数据清洗原则:
- 数据唯一性校验
- 数据完整性校验,对缺失的数据直接丢弃或用前后数据相同列补齐
- 数据合法性校验,根据业务需求对错误的数据置为默认值
典型数据仓库架构
- 数据采集:Flume、Logstash、FileBeat、Sqoop
- 数据存储:Hive(HDFS)、MySQL
- 数据计算:Hive、Spark
- 数据可视化:Zeppelin、Echarts
Flink
Flink 是一个开源的分布式、高可用、高性能、准确的流处理框架,Flink 支持流处理和批处理。
Flink 三大核心组件:Data Source –> Transformations –> Data Sink
安装 Flink
https://archive.apache.org/dist/flink/flink-1.11.1/
https://nightlies.apache.org/flink/flink-docs-release-1.20/zh/docs/try-flink/local_installation/
启动本地集群
bin/start-cluster.sh
控制台:http://192.168.56.101:8081/#/overview
Flink ON YARN
# 在 YARN 中创建 Flink 集群
bin/yarn-session.sh -jm 1024m -tm 1024m -d
# 提交示例任务
bin/flink run examples/batch/WordCount.jar

# 停止 YARN 中的 Flink 集群
bin/yarn application -kill application_1729685357049_0016

# -m yarn-cluster 创建临时的 Flink 集群并提交任务
bin/flink run -m yarn-cluster -yjm 1024m -ytm 1024m examples/batch/WordCount.jar
Flink 核心 API
https://nightlies.apache.org/flink/flink-docs-release-1.20/zh/docs/concepts/overview/
DataSource 是程序的输入数据源,基于 socket,基于 Collection,和一批 Connectors 实现读取第三方数据源。

